Search This Blog

Monday, June 30, 2014

Wyatt card 32L Battery Operated Water Pressure Washer

30 June 2014

This battery-operated car washer was sold for about $45/= including shipping at Q0010.  It is suitable for most water cleaning jobs in cars as well as in homes.   It is a handy pressure cleaner for washing the air-conditioning outdoor units which hand-operated pressure washer just could not do the work properly.  The delivery was the next day which is pretty fast.  

Pros

  1. It has a 32-liter water tank;
  2. It can deliver up to 1.2 mpa (130 psi) water pressure; Its motor is rated at 3.0 mpa (430 psi)
  3. It is potable and equipped with all cleaning accessories,   such as a water brush,  hose,      and water gun;
  4. It has auto-start and stops function triggered by pressure sensing
  5. It is safer to use as it operates from a 12 volt supply which requires 4 to 5 amperes for normal operation;
  6. It is constructed from ABS plastic that can withstand rough usage.

Cons

  1. A full tank of water can be quite heavy to be carried around without having a trolley, But one can always carry a half-full tank then fill it full tank with a pail of water. 
  2. Water can leak from the bottom of the tank when the suction hose is not properly secured;
  3. The manual is written in Chinese.

Compared to hand pump washer


Pros
  1. It has a larger water tank;
  2. It can deliver at least 6 times the water pressure for cleaner wash;
  3. It does not have a pressure tank that can easily crack;

Cons
  1. It can be heavy to move due to larger and heavier water tank

Compared to mains operated pressure washer


Pros
  1. It is safer to operate using 12 volts supply;
  2. It does not require any hose for connection;
  3. Can get supply directly from car batteries;
  4. Easy storage as it comes with a box 

Cons
  1. Refilling of water is required from time to time;
  2. Needs 230 volts to 12 volts power adapter for mains operation; 

Construction


The box is quite pleasing in appearance and comes with a toolbox that can store all the components and accessories.  The box can be easily stored away in the storeroom.


The Pump Compartment


Hidden away from view is the pump compartment that is located underneath the water tank.  It can be opened for inspection by removing the 8 screws that held the cover as shown here


The 12-volt motor is held onto the bottom of the tank by a set of 4 screws.   

Testing 


It is noticed that the tank must be almost half full before one can prime the pump to start using the washer. 

When filling up the water,   water started leaking from the bottom of the tank.


Why the Water Leak? 


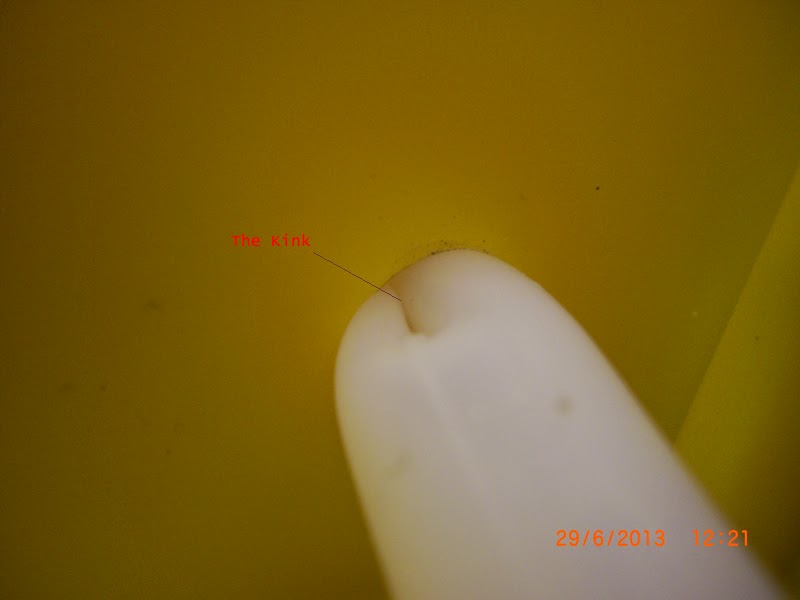
Water was found leaking from the flexible silicone hose that was only  ‘threaded” through the compartment hole without any adaptor or connector. The hose was connected to a non-return strainer located inside the tank.   

The design requires the flexible hose to be properly straightened so that the water seal is maintained by the wall of the flexible hose.  Water can leak through the ‘kink” if the hose is not properly seated to seal the hole as can be seen from this picture.


What Can be done?

Temporary fix


Pull the silicone hose carefully with a light force from the strainer inside the water tank to straighten the hose.  This will make sure that the “kink” on the hose will be straightened out.  However,  as the hose is flexible and can collapse under suction pressure,  the “kink” will soon re-appear after some usage.

Easy Permanent fix 


Cut a piece of a plastic tube with a diameter of around 7mm.  Test if it can easily be inserted into the hole to expand the hose to form a tighter water seal between the compartment hole and the hose as shown.   While testing the correct size of the plastic tube to be inserted,  unleash the hose clamp and pull the hose from inside the tank until one can try to test the fitting of the plastic tube.  Try not to pull the hose out totally as it could be a pain to re-insert the hose again.


While installing the plastic tube,  always make sure that the plastic tube would be larger than the inlet of the water pump so that it would not be sucked into the pump should it become loose during operation. 

Performance  


The washer has a pretty strong water pressure that can even strip off the paint work on a PVC pipe as can be seen from this video.
 

The pump would stop and start automatically just like any electrically operated pressure washer.  It has also a polarity switch that can switch over the polarities automatically without worrying if one has correctly connected the 12-volt cable in the right positive or negative polarities.   

The washing operation is quite smooth although one would have expected the soft suction tube to collapse occasionally when there is not enough water in the tank.  However,  it should not have caused permanent damage to the pump.

Operating from a main operated power adaptor

The washer can be operated from a 12-volt power adaptor which must have an output rating of at least 6 amperes. 


Conclusion 


It is a cost-effective car battery-operated water pressure washer which is well designed except for the leaking flexible suction hose which can be easily fixed.  Other battery-operated water pressure washers would cost easily more than $100/=.  

Thursday, June 5, 2014

Turning Food Waste into Compost in High-Rise Apartments

5 June 2014
In Singapore, more than 90% of the populations live in high-rise buildings.  Some might have luxury of balconies,  most just have common corridors for planting some plants and flowers in pots.  Not many have backyards that could be used to make compost which usually emits foul smell.  Many resorted to buying  pallet fertilisers from the shelves which can cost them a bomb over a longer period.

What is compost?


It is an organic fertiliser made from waste fruit peels,  skins,  vegetables and other organic foods.  They are usually left to decompose for a period of about two to three weeks until they are turned into partly a soil enriched with organic fertilising elements. 

How Compost was made?


Many in the net taught us how to make compost at home; some are suitable for high-rise buildings while others are not. Some used compost bins and some used earthenware to keep and make the compost. What they normally teach us is either to keep the waste in the bins or earthenware together with some dry leaves. These bins/earthenware might give out odours or scents and other rotten smell filling the whole apartment. 

What is the better method? 


Instead of bins and earthenware,  the better method would be to use plastic bag which every household will have plenty when they shop at the Supermarkets.  Instead of keeping the waste together with dry leaves,  one must treat the waste such that it will not give out lots of rotten smell.   

Preparing the compost 


1. Drying the waste 


A good method is just putting the waste under the sun. This will unfortunately attract a lot of small food flies and sometimes,  big flies which some may have strong objections.  However,  one can cover the waste with fine net mesh to keep away the flies as shown.   


It is always good to cut the waste into small pieces for easy spreading and for drying under the sun.

The other method is to fry the waste on a frying pan so that the heat will not only dry up the waste for safe keeping in the plastic bags,  it will also kill  the bacteria inside the waste.  

2.     Grinding the waste (optional) 


It would speed up the compost making if the waste is grounded every time for storage.  It is not quite necessary if one is prepared to keep the waste for a longer period than 3 weeks and not too fussy about the smell that may be emitted from the compost.   One could further fry the grounded waste to get rid of more moisture.

3.  Storage  

The success of the compost making will depend on how one can cultivate the anaerobic bacteria that will consume the waste and turn the waste into soil enriched with organic fertilising elements.  This is where plastic bags will come in handy as one can easily mark the plastic bags to keep track of the storage period as well as ensuring that there will be little exchange of oxygen that will kill the anaerobic bacteria.  

1.     Find a good plastic bag.  The shopping plastic bags are so thin that they would usually have small holes here and there.  To plug these holes,  inflate the plastic bag by blowing air into it and plug up the holes if any with masking tape. 

2.     Put the dry waste and spread it across the bag as a layer,  then cover it with 2 layers of ordinary soil. Active soil with some anaerobic bacteria in it will populate and digest the waste much faster than those inactive soil, idled for some period. 

3.     Mark the plastic bag with dates and keep in storage until 2 to 3 weeks later. Additional layer of same proportion of waste can be added to the plastic bag until it is full.

Precautions in Handling Compost


There were reports that some farmers in Australiaand New Zealandwere killed by legionnaire bacteria when they handled the compost with their bare hands and did not wash their hands afterwards.   

It is good to bear in mind that there would be many different type of bacteria in the soil and compost.  Legionnaire bacteria are one of such bacteria that could populate well under anaerobic condition especially when the waste is still wet before storage.   Legionnaire bacteria are commonly found in air conditioning cooling towers and also air conditioning condensate pipes and water storage if some part of the water is kept under an anaerobic condition. 

It is good to wear gloves as well as breathing mask when handling the compost as bacteria could fly around when the compost are being churned and mixed.  It is always advisable to wash the hands with soap and clean water each time after handing the compost.   Let the soil expose to the sun for a few day before handling them with the bare hands.


Monday, June 2, 2014

Review on Omron Blood Pressure Meter

2 June 2014
Bought this meter from Q0010 for less than SGD$90 including $4.50 shipping charge.  This meter was delivered within 4 days which was considered fast. The first impression was that it looked better than the Osim icheck 100 blood pressure meter I had had for almost 2 years.  I bought this Omron meter as a replacement for the Osim meter as the latter had not been giving accurate readings.  I had  to rely on manual method to get the readings done. 

Model and Features 


The model is BP742,  a lower 7 series of the Omron range.  It was manufactured in Vietnam.   It came standard with 3 main readings,  the systolic,  diastolic and the pulse/min reading.   The screen reading is quite big with characters measuring about 15 mm tall per character which is very easy to read for elderly who has vision difficulties.


Besides the bigger characters,  this Omron meter also has some other features which are useful:- 

1.   Memory storage for 2 persons.  Each person can store up to 30 readings that include time and date signatures.  The memories can be reviewed easily by selecting the front buttons. 

2    averaging the readings taken in the last 10 minutes 

It also comes with hypertension warning indicator. 

It is running on a set of 4 batteries giving a total of 6 volts supply.  It  did not come with a storage bag and a 6 volt adaptor.  The manual came together with the set are just description on how to use the meter. 

Inside the Meter 


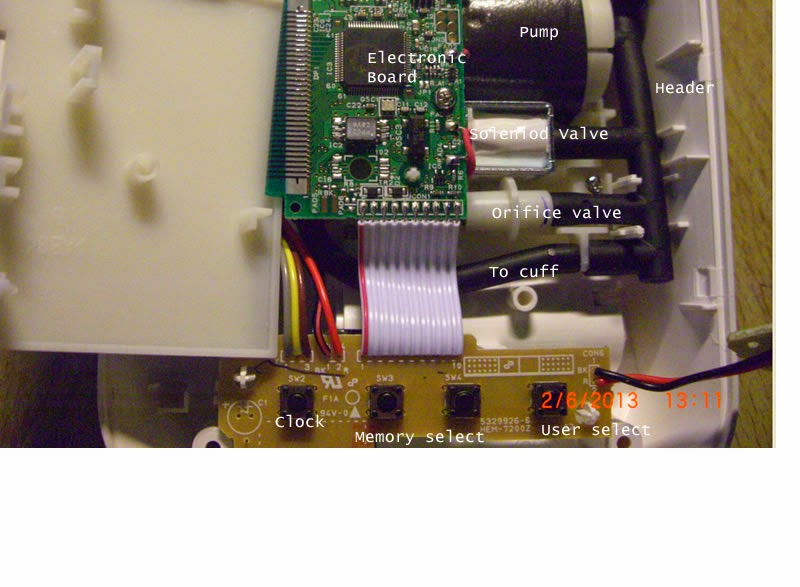
Those guts inside the meter are also quite standard.  It has the following components 

  1. The LCD display board
  2. The electronic control board and the pressure sensor
  3. The Pressure pump
  4. The pressure header
  5. The solenoid relieve valve
  6. The orifice capillary valve

How it works

When the start/stop button is pressed,  the electronic control board will start the pressure pump to pump air into the cuff via the pressure header.  The pressure sensor in the control board will give the readings to display on the LCD display board.   At the same time,  air will also be released continuously through the orifice valve at constant speed as the solenoid valve is slammed shut.   The pressure pump will be shut off once the electronic does not detect any pulsing signal through the pressure sensor and the air is allowed to discharge through the orifice valve until the pulsing pressure is detected again and subsequently,  disappears. This is when the solenoid valve will release the air completely and the LCD will display the reading. 

Accuracy Checking 


The meter was checked against a pressure dial gauge which had been calibrated before against a mercury pressure meter. The meter and the dial gauge are then connected in parallel to measure the blood pressures.   
The pressure readings recorded were almost the same for the two types of meters as shown in the following table. 

Dial Gauge (mmHg)
Omron meter (mmHg)
20
20
60
60
80
82
100
103
160
162
180
182

The measurements of systolic and diastolic pressures were also within close limits when compared between the manual dial gauge using stethoscope and the automatic Omron meter.

Overall Verdict


It is a cost effective and accurate blood pressure meter that will keep customers happy for a smaller sum.

Simple and Easy Way To Backup Photos, Movies and Documents from handphones

 2 December 2023 In the past,  we used iTunes when we wanted to transfer or backup our photos,  movies, and documents from iPhones or Androi...