Search This Blog

Monday, February 25, 2008

Repair Damage Master Boot Record & Boot Sectors

Introduction
Very often, computers cannot boot properly because there is a damaged Master Boot Record or Boot Sector; also, computers may run slow and may sometimes just re-start for no good reasons. This article will describe a way to repair that damaged record, boot sectors and the bad disk media.

FAQ
1. What is Master Boot Record (MBR) and Boot Sector?
When computer starts up, the BIOS (Basic Input/Output System) will start a small program stored in the first sector of the Master hard disk. This program, called the MBR, has a partition table that will tell which partition will be used for booting and transfer control to the partition boot sector of that partition to continue with the booting process. .

2. How Can MBR & Boot Sectors Get Damaged?
MBR and boot sectors can be damaged by virus attacks and sometimes, by power glitches or faulty disk medias.

3. What is the Common Messages for Damaged MBR?One will receive messages such as "Invalid partition table when loading the operating system" or "Missing operating system". In some cases, one does not get any message at all, depending on the make of the system.
4. Would the Existing Files and Partitions Be Erased?The repair would not erase existing files and partitions that have been created in the existing drive or the multi-partitions in one drive provided the partitions are of the standard partitions.

5. How Do We Repair ?
There are several ways to carry this repair to MB, of which, the
most common one is to use the Recovery Console of the Window XP system.
PreparationOne would need a copy of the XP installation disk. For those who does not have a XP installation disk, one can download filies from this Microsoft Website to make 6 floppy disks. One can also make CD by following the advice from this reader who had prepared a package which contains instructions in the readme file.

Next Steps
1. Detection of Hard Disk
Boot up the computer and in the first screen, hit Del or F2 or F10 depending on your computer make to get into the BIOS Setup Page. In the Main page, one should see the Hard disk being detected by the BIOS. If there is no harddisk detected, the harddisk could have a loose connection or the hard disk is faulty;

2. Set Boot Device PriorityIf a harddisk has been detected, navigate to the Boot menu and set Boot Device Priority to start from CD or DVD drive;

3. Enter Recovery Consolea) Boot up the computer with the Windows XP installation disk in CD/DVD drive. At the prompt to "press a key to start the computer from CD/DVD drive", do so quickly;

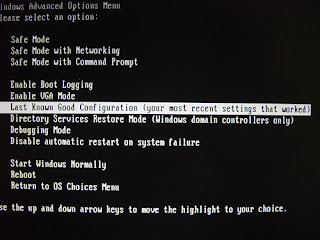
b) After a few minutes, one should reach the following screen:

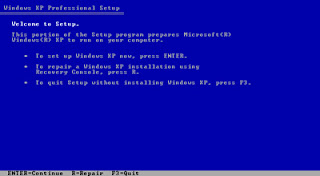
However, when PC has SATA drives, XP installation software may not be able to find it and display the screen shown. This is because XP, being an older technology, does not have the drivers for SATA drives. One would have to incorporate SATA drivers in the installation process.

c) At the prompt, press the R key to enter the Recovery Console.
4. Start Recovery Consolea) When Recovery Console started up, it will prompt one to enter a number corresponding to the Windows XP installation that one needs to repair. In most cases, one will enter "1" (which may be the only choice). If one presses ENTER without typing a number, Recovery Console will quit and restart your computer.
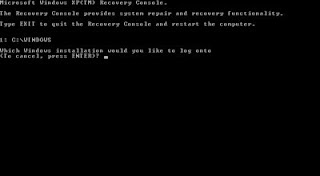
b) Enter your Administrator password. If one doesn't enter the correct password, the process cannot continue.
5) Check and Repair Damaged SectorsWhile in Recovery Console and at the DOS prompt, the first thing to do is to check and repair the disk drives for damaged disk sectors.
In the prompt, type "chkdsk c: /r (without quote, same as rest. Change C: to other drive number to be checked) and hit enter. "Chkdsk" will repair bad sectors, lost clusters, cross-linked files, and directory errors caused by system crashes or freezes, power glitches, incorrectly turning off and other problems.
This process may take about 10 minutes to scan a harddisk depending on the capacity and the condition of the hard disk. It might take longer (more than 1 hour) if it detects multiple bad sectors; however, if Chkdsk takes much longer than 1 hours, it may indicate hard drive had gone bad. A good disk drive will take only minutes to complete the scanning.
If there is a bad sector detected, Chkdsk will respond "CHKDSK is performing additional checking or recovery" and may run a second scan automatically.
Sometimes, it might be necessary to dismantle the harddisk and remove the print circuit board(PCB) to clean the contacts between the PCB and the harddisk. After many years of operation, these contacts may need to be cleaned using contact cleaner.
6) Repair MBRAt the next DOS prompt, type "fixmbr" and then verify that one wants to proceed. The damaged MBR will be replaced with a good one from the XP installation disk. The user will be prompted if MBR detects more than one partition in the hard disk irrespective of the type of partitions..

7) Repair Boot SectorsAt the next prompt, type "fixboot" and then verify to proceed.
8) At the next prompt, type "Exit" to exit Recovery Console. Type "Ctl-Alt-Del" to reboot.

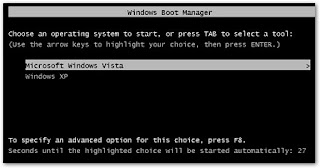
NOTE: Should one has a dual boot or multiple booting system installed in the computer, the procedures to repair the MBR and boot sector would be different as the MBR program would be different. For example dual booting of XP and Vista, one would have to amend the Boot Configuration Data with VistaBoot Pro after one has successfully repaired the MBR/Boot sector.

8) Making Recovery Console AvailableOne can make the Recovery Console always available during startups. With the XP installation disk in drive, click start button then run, in the drop down box, enter "F:\I386\WINNT32.EXE /cmdcons", where "F:" is the drive that has the XP installation disk.
The Recovery Console will always appear as one startup option when one turns on the computer. The default timing of the option is 30 sec. One can adjust this timing from the "startup and recovery" section of the advance tab in the "System Properties" windows.

Other Related Sites
1. How to Revive Faulty Hard Disk
2. How To Restart After Computer Hangs


Thursday, February 21, 2008

Windows XP System Restore

IntroductionOne of the easiest ways to get rid of viruses and to repair the XP operating system is to restore the computer's operating system to a restore point saved earlier. The article describes how.

FAQ
1. What is a System Restore?System Restore is a built-in feature of Windows XP. System Restore takes snapshots of the registry of the computer system and saves them as restore points. It is for one to return the computer to an earlier state if one has a system failure or other major problem with the computer. If one can restore the system to an earlier working restore point, one would not need to reinstall the operating system.

2. How Often System Save Restore PointsRestore points are always created when one installs new device drivers or some application or when one performs an update of the operating system. These points are created without prompting. By default, the restore points can be created on a daily basis. One can also manually create restore points.

3. Would One Lose All the Data ?
System Restore will preserve all the data including Word documents, e-mail settings and messages , Internet favorite list and other data. One would not lose any data; however, one might not be able to use those application programs installed after the date of the restore point.

4. How much Disk Space One will need?About 200 MB of free hard disk space to store the data gathered if one is creating a restore point. Performing a system restore to an earlier date will not need any additional free hard disk space.

Create System Restore Point ManuallyTo create system restore point manually:
1. Start the System Restore Wizard as an Administrator. Use either:
a) Click Start, then run. In the dropdown box, enter “Restore” (without quotes). In the new screen, doubleclick strui.exe or
b) Click Start, point to All Programs, point to Accessories, point to System Tools, and then click System Restore.

In the new screen, select "Create a Restore Point" and in the next screen, give some description about the restore point. Date of restore point would be automatically inserted.

Turn on and off Automatic Restore Point Feature
Click Start button, then click run. In the dropdown box, enter "sysdm.cpl" (without quotes) to bring up the System Properties widndow. Select the System Restore tab and check or uncheck the system restore features. When system restore is set on, the system will store a copy of the working registry everyday. Older copy will be erased.


Perform a System Restore
Method 1. Use Last Know Good ConfigurationReboot computer. At the first starting screen, press F8. Use arrow keys to navigate to “Last Known Good Configuration, and then press ENTER. The system will be restored to the last restore point where computer has been successfully started.


Method 2. Use System Restore1. Start System Restore Wizard as an Administrator. Use either:
a) Click Start, then run. In the dropdown box, enter “Restore” (without quotes). In the new screen, doubleclick strui.exe or
b) Click Start, point to All Programs, point to Accessories, point to System Tools, and then click System Restore.
2. On the Welcome screen, click "Restore my computer to an earlier time", and then click Next.
3. On the Select a Restore Point page, select the date from the calendar that shows the point to restore to and then click Next.

4. On the Confirm Restore Point Selection page, verify that the correct restore point is chosen, and then close any open programs.
5. Click Next if one is ready to proceed or click Back to change the restore point.
6. The computer will shut down automatically and reboot. On reboot, one will see the Restoration Complete page, and then click OK.

If System Restore doesn't work in Normal Mode, it might work in Safe Mode. To use System Restore in Safe Mode, press the F8 key during reboot and choose Safe Mode. If the restoration also failed in Safe Mode, the system restoration files stored in the harddisk could have been corrupted.

Other Related Sites
1. Microsoft Windows XP System Restore.


Tuesday, February 19, 2008

Remove Viruses Manually

IntroductionThere are viruses in the computer. Some scanner detected the virus and some don’t. The scanner I have cannot get rid of the viruses. What should I do next?

FAQ1. Why My Scanner Cannot Get Rid of the Viruses?The scanner might not have the databases of the viruses because it is new to the scanner; but some viruses are quite smart in that it can hide itself from detection once it resides in the memory. Some will lock themselves and prevent any detection; others might just restore the file when deleted.

2. What Are The Methods Recommended Here?
Manual detection and deletion. Windows has a Safe Mode to start up only few selected system components. As viruses are usually not part of the system components, it will not be started up and will remain dormant and therefore, one can detect and delete it.

3. What if the Virus is Part of the System File?Sometimes, the viruses will disgust themselves and replace or embed in one of the system files which will be started up with the computer. This will also happen in the Safe Mode startup of the Computer. Once activated, it might prevent Windows from deleting them in the Safe Mode. Fortunately, Windows has Signature Verification and System File Check (sfc) programs that can verify the integrity of the system files and flag or replace them if necessary.

4. Can The Virus Disgust System File With The Signature?
Signature are digitally verified, it will be difficult for viruses to disgust themselves. The verification is supposed to protect the computer from virus attack but this is never fool proof. One might be able to find a virus that can disgust system file with signature.

Preparation
Ensure the one has a copy of the XP installation disk

Step By Step
Step 1. The First Step: Restore the Operating System
This should be the very first step. There are 2 ways described here. If the restoration by choosing the "Last Known Good Configuration" does not work, then choose the 2nd method and restore the operating system to an earlier date and if this very first step failed to get rid of the virus;

Step 2: Removal of Viruses Manually1 Terminate Running Virus
a) Reboot and get into Safe mode (Pressing F8 in the start screen)
b) Sign in as Administrator
c) Unhide file scan by selecting Start>MyComputer>tools>Folder options>view, the select “show hidden files and folders”
d) Press “Crtl-Alt-Del” to get into Task Manager (See Appendix 2 if one cannot activate Task Manager), then click the “Processes” tab". One should see only about 10 to 11 files running. These are taskmgr.exe, explorer.exe, svchost,lsass.exe,services.exe. winlogon.exe,csrss.exe,smss.exe.system and system Idle Process. Should there be other files or user names, just select them and click “End Process” to terminate it. This will end only the running of the program and does not delete the program.


2. Check File Signature Verificationa) Click Start>Run and in the dropdown box, enter “Sigverif” and click OK. One would be greeted by the following screen:


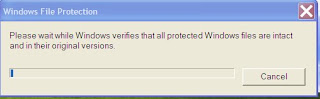
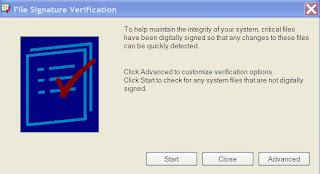
In the screen, click “Start”. The program will check all system file for digital signature. On completion, View log by clicking “Advance” and the “Logging tab”. There should be no non-signature file appearing in the list. If there is, locate the file by a search and try to change the extension of this file or delete it if one is sure that it is a virus file.

3. Check MS Configuration
a) Click Start>Run and in the dropdown box, enter “msconfig” and click “OK”, In the next screen, select “Startup” Tab, uncheck as many startup item as you can. This will only prevent the items from starting up and will not delete the files. Should you have found the virus file that you have found earlier, uncheck it.

4. Delete the Virus File
If one has found suspicious files, it is time to delete the files or if you are not sure, change the extension of the files to "tmp". One can find these files by using the search file function. Once complete, restart the computer normally. Sign in as an Adminstartor or its Team member.


a) Check Integrity of System files
After rebooting normally, check the integrity of the system files by using System File Checking program (sfc). Note that this sfc cannot be used from Safe Mode. Now, click Start>Run and in the dropdown box, enter “sfc /scannow” and click "OK", one will be greeted by the following screen


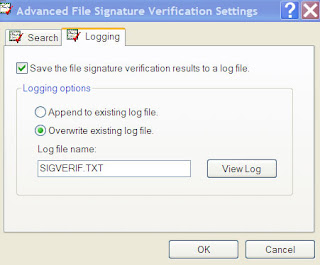
If there is nothing happening after clicking the OK or the above screen does not appear, it could be because one does not have the permission or "certificate' to amend the protected system files. Goto Appendix 1 to obtain this certificate and restart the computer. One can refer to the website shown at this end of this article for other problems in using sfc.
On successful starting of sfc, the program will start checking the integrity of the system files and replace these files if necessary, It might prompt for the XP installation disk to copy some files.

b) Re-visit Processes Removal and Scanning of Signature FileRepeat the Processes of stopping the running of suspicious files and Scanning of Signature Files as in step 1 and step 2 above. . This time, one would find lot more files being run in the "Processes" tab folder of the Task Manager and also the log file of the Signature file scan will be much longer. Carefully scan through the list of files and note down the names and extension of the suspicious files. Then Google the web for information. If there are virus file found, try to stop them from running in the Task Manager and then, rename them or remove them if possible.
c) Ending Processes that Are Running
If one still fail to locate the virus, one can try isolating the virus by stopping each process that is running in the Task Manager in Normal Mode. Remove first those processes created by the users (identified by name) except for the "Explorer.exe", which is required for window navigation. Then follow by ending the processes of other file names. Avoiding ending the system processes because that will require user to re-start the computer. A list of such system processes can be found here. Note down the name of each process ended and check the computer's working. If the virus attack has stopped, then that must be the virus file. Rename or remove the file.

Stubborn Viruses Cannot Be ErasedIn case one cannot remove the virus because it is locked and protected itself from being deleted. Note down the particular of the file, such as file folder, the file name and the extension.

1 Method 1. Floppy Disk
If one has a floppy disk drive :

a) Format the floppy disk
In Start>MyComputer, right click the A: and the select Format. Insert a new Floppy disk and check the “Create an MS-DOS Startup disk” box and start to format and create a bootable floppy disk.
b) Delete or Rename the Files

Restart the computer and hit the manufacturer’s prescribed key (F2, F10 or delete button) to enter the Boot Set up and change the Boot priority to start from floppy disk. In the boot up screen, one should see an A:> prompt. Use the following instructions:
a) To change drive from A: to C: Enter "C:" and hit Return
b) To change the folder : Enter "cd\" (without quotes, similar for the rest) at C:> prompt, followed by the name of the Folder and hit Return
c) To list the files in a director: Enter "dir/w" and hit Return
d) To delete a file: Enter "erase " , followed by the file name and extension with a space in between them (for example, "erase auto.bat"
e) To rename the file : Enter for example "rename auto bat auto.tmp" and hit Return.

2. Method 2: Bootable CD
If one does not have a floppy disk drive, one would have to either use
a) XP installation disk. Enter into the Recovery Console, in the DOS prompt, find the folder and delete the virus file. A copy of the Microsoft's guideline on the use of XP's Recovery Console and the commands can be found hereb) Make a bootable CD using Nero Express or similar CD burning. Select the “making of bootable CD” option to make this CD. Reboot into the CD, find the folder at the DOS prompt and delete or rename the virus file

3. Method 3. Make a Bart PE Bootable CD or KNOPPIX Linux CD
Make a bootable BartPE CD or KNOPPIX Linux CD and boot from the CD drive. Navigate the program to the folder to delete or rename the virus file. The BartPE is preferred because it is in Windows platform with many plug-ins available for virus scan and other programs.

Appendix 1: If sfc cannot run. Obtain Certificate
1. Click Start>Run and in the dropdown box, enter “mmc”. A “Console” screen will appear,
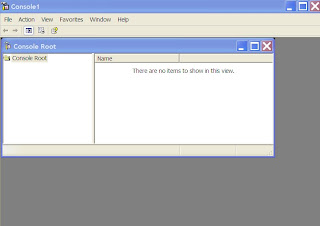
In the dropdown list of the file menu, select “Add/Remove Snap-in”. In the next screen, click “Add” and select “Certificates” in the dropdown list. In the new screen, select “Computer Account” and click “Next”. Finally, select “Local computer “ to complete.
2. Back to “Console screen” and in the right list, expand “Trusted Root Certificate Authorities” folder and double the “Certificate”, a list of certificates will be shown. Select “No Liability Accepted” and doubleclick to bring up the certificate and check to ensure that the expiry year is in 2004.
3. Export this certificate by selecting “Export” in the “All Tasks” dropdown after clicking the “Action” menu as shown. Save the certificate with a given name.
4. Back to the "Console" screen and in the Console's root directory, select “Trusted Root Certification Authority” and right click it to show a dropdown panel. Right click “All Tasks” and select “Import” to import the earlier certificate from the saved location.
Reboot the computer. The sfc function should now be working.

Appendix 2 : Ctl-Alt-Del Does not Bring up Task Manager screThe "Remove Task Manger" function has been enabled.
Window XP and 2000's Task Manager can be disabled by Administrator. If that is the case, Click Start and the Run, in the dropdown box, enter "gpedit.msc" (without quote) and click OK . One would be greeted by "Group Policy" window. In the left pane, expand the folder "User Configuration" and then the "Administrative Templates" . Click "Ctrl+Alt+Delete options". In the right pane, if the "Remove Task Manager" is enabled, doubleclick it and disable it in the new screen.Alternatively, for XP system one can use the following
a) Click Start then run, and in the dropdown box, copy and paste the following code: "REG add HKCU\Software\Microsoft\Windows\CurrentVersion\Policies\System /v DisableTaskMgr /t REG_DWORD /d 0 /f" (without quote) and click OK. the screen will flash. Now check if Task Manager has been enabled.
b) Start NotePad, copy and paste the following text :
Windows Registry Editor Version 5.00
[HKEY_CURRENT_USER\Software\Microsoft\Windows\CurrentVersion\Policies\System]"DisableTaskMgr"=dword:00000000
Click "save as" in the File menu and save the file as "taskmgr.reg" in one folder, then find this file and doubleclick it to update the system registry.

Other Related Sites
1. Window's Protection Files (such as sfc) May Not Start
2. Information on Recovery Console by Microsoft

3. How to System Restore

4. Creating a Troubleshooting BartPE Bootable CD

5. Problems on the user of sfc /scanow

6. Files names in System Processes

7. Task Manager Disabled


Sunday, February 17, 2008

Install XP in Vista Computers

Introduction
There are 2 methods one can install XP operating system in the new PC/Notebook that has been preinstalled with Vista operating system.
Method 1: Replace Vista Entirely with XP Operating System
Method 2: Dual boot with XP and Vista in one computer

FAQ
1. Will the Installation Void Warranty?
Check with the manufacturer or its website. Some manufacturers have advised against downgrading to XP but most do not give indication about voiding warranty; also, some manufacturers like HP, will require users to re-install back the Vista operating system if the PC/Notebooks are to be sent back to them for repairs.

2. Do I Need Another Hard Disk for the Operation?Not necessary. The PC/Notebook can be re-installed back to factory defaults any time if one has already make a copy of System Recovery Disk. However, it will facilitate the recovery and re-installation of the operating systems if there is another hard disk.

3. How difficult to Install the XP or Dual Boot?It is not too difficult but XP system will need new drivers for the hard disk, network controller, sound system and other new devices in the new computer. This is because XP, being older technology, does not have these new drivers incorporated. Finding these XP drivers can be difficult if the manufacturer does not provide the support. Most computers will require a special driver for the newer SATA (Serial ATA) hard disk; otherwise, XP will not be able to find the hard disk during installation.

4. How to get Drivers if there is no Support?
One will have to depend on forums and discussion boards to get these drivers. "Google" with the model number and with words such as "XP drivers", one may be able to find some essential drivers.


5. How Can I Extract Drivers from Other PC?If one can find suitable XP drivers in other PC/Notebook, one can extract the drivers and use them for installation. Please email for details on how to extract these drivers.
6. Will Dual Booting Slow down Vista?
A dual or multi-boot computer can only load one operating system at a time. The operating system will have full access to and the control of the RAM and the computer; therefore, its operation will not be affected by the other operating systems although they reside in the same machine.
Preparation
While one is still in Vista Operating System,
a) Download the SATA driver from the manufacturer’s site and save it in a floppy drive if one has a floppy drive; otherwise, one would have to slipstream the SATA driver into existing and create a new XP installation disk (see note1);.
b) Download the rest of XP drivers and keep them in a folder or CD (see note 2). The drivers could come in several forms. Many come with individual packages but there are some that come with compact format (with .info files). One can slipstream the drivers if they are in the latter format.
c) If one want to dual boot, download a copy of VistaBootPro from here or its Web page and save it in one of the folder in C:.
Remember where you have saved this file.
d) Make a System Recovery Disk and back up the important data in the hard disk to the CDs or an external hard disk or thumbdrives.
Important: One must make sure that the Sytem Recovery Disk will work by trying it out first. Also, make a copy of all the drivers available using this program.
Note 1: If the PC/Notebook's Boot Setup has a "Native SATA" mode. One can disable this mode without having to download and install the SATA driver.
Note 2: One could "slipstream" the SATA and the rest of XP drivers into existing and make a new XP installation disk.

Next StepsMethod 1: Replace Vista Entirely with XP Operating Systema) Boot from XP CD. One might have to change the boot sequence in the Boot Set up to allow booting from XP CD;
b) If SATA driver is required for the installation and if one did not "slipstream" the drivers, hit F6 when one see "'Press F6 if you need to install a third party SCSI or RAID driver".


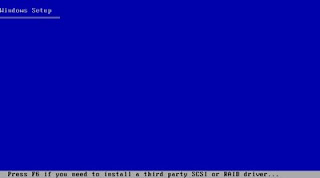
Then, press "S" to specify additional device in the next screen. At the prompt, insert the floppy disk with the SATA driver, press enter to continue. The computer will further prompt for selected driver. Select "VIA Serial ATA RAID Controller (Windows XP)" to install the SATA driver and continue with the installation.
c) If one has slipstreamed the drivers, just continue with the installation until one reaches the following partitioning screen;


d) Select "D" to delete the partition. Window will prompt to confirm the selection. Select "L" to confirm and delete the partition.
e) Follow the instructions to create a new partition and subsequently, format the partition and then, proceed to complete the rest of the XP installation.
f) Remove the XP installation Disk and reboot the computer.
g) Proceed to install the rest of the XP drivers if one has not slipstreamed the drivers into the XP installation Disk (see note2).

Note1: If XP installation cannot find hard disk with the SATA driver, it could be an incorrect SATA driver or the hard disk's cable may not have been connected correctly.
Note2: If the XP drivers are in a compact format (see Preparation b), one can use the Device Manager to install these drivers following the instructions here. (ignore the part on the downloading of HP drivers). Device Manager has a function to search for the required drivers if it is led to the right folder.
Note2: For some computers, there are reports that XP would not start properly without one having to delete the hidden partition created by Vista for making the system recovery disk. XP may experience repeating booting process. In that case, try rewriting the Master Boot Record and Fixboot or erase the hidden partition.
II) Method 2: Dual boot with XP and Vista in 1 computera) Make a new partition in the hard disk for XP
b) Follow step a), b) and c) in Method 1 until one reaches the following partitioning screen:
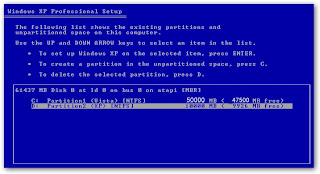
c) If the new partition is shown as "Unpartitioned Space", then select the Unpartitioned space, press “C” to create and subsequently, format the partition. If prompted, choose NTFS as the file system.


d) Continue with the rest of the installation as per normal instruction;
e) Reboot. This time, Windows will reboot into XP instead of Vista operating system. This is because XP, being an earlier version, cannot recognize Vista and has overwritten Vista's Boot Configuration Data (BCD);
f) When XP completes its booting, one should see a C: for Vista operating system, D: for XP operating system after clicking the "Start" and the "Computer" icons;
g) Proceed to install the rest of the XP drivers if these have not been "slipstream" into the XP installation disk. Check the network for proper connection to Internet because VistaBootPro will ask one to download Microsoft .Net.Framework when it is reconfiguring the BCD.
h) Start VistaBootPro and reconfigure the BCD to re-activate Vista operating system.
i) Remove the XP installation disk from CD drive and reboot the computer. One should now see two systems, the XP and Vista, being displayed in the Windows Boot Manager. Select either one system to boot and complete the installation by adding all the necessary XP drivers.


Other Related Sites

1. Dual Boot HP TX 1209

2. Making New XP Installation Disk

3. Forum on Downgrading of TX1000

Disclaimer: Efforts have been made to present the author's experience in correct details. Users are advised to do further research and checks by themselves. The author is not responsible for any damage (which should not have happened) as a result of any use of information contained in this blog.


Friday, February 15, 2008

Create Word Picture Using PhotoShop

Introduction
One can make a nice photo of oneself and create a word picture like this

How?
In the Adobe Photoshop
1. Create a Pattern from your picture
a) Open the picture
b) In the Edit menu, select Define Pattern
c) Save the pattern by clicking ok

2. Create the Word Life
a) Create New . Make sure you select Color Mode ; otherwise, the word would be in gray.
b) Type in the word Life
c) In the Edit menu, select Free transform
d) Drag the handles to resize the word Life

3. Create Pattern Overlay
a) double click the Text in the Layout window to bring up layout style window
b) Select Pattern overlay and doubleclick it
c) Click the small Pattern picture to select the picture
d) Click OK

Animated Picture of the Procedures
Click to enlarge and wait for the picture to roll


Tuesday, February 12, 2008

Making Movies

Introduction
Making a Movie? This article will describe how one can do this without using any expensive equipment.

FAQ
1. What One will need?
a) A digital camera or digital video camera with capability of taking reasonably good picture and video. It would facilitate quick transfer of pictures/movies if the camera has memory card that can work with your PC or notebook;
b) A working PC or notebook that has a DVDRW drive.

2. What Additional Software?
a) The Nero Vision that comes bundled with Nero Burning software;
Note: Nero Vision version 4 and above is preferred as it allow the mixing of pictures and movies freely during editing. The newer versions can be found in Nero 7 or Nero 8.

Preparation
If one does not have a copy of Nero Burning Rom, please download a trial copy from Nero site

Next Steps
I) Start up
1. Start NeroSmartStart and one would be greeted by the starting page;

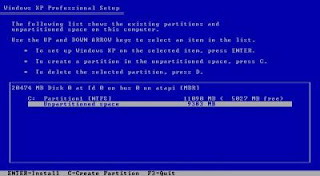
2. Click the Nero icon at the bottom left hand corner and select Nero Vision from the list. In the new screen, select “Make Movie” as the next choice. One would reach the Nero Editing Screen with 3 windows, namely: the Video, the Asset and the StoryBoard windows:


II) Adding Movies and Pictures
1) To add the movies or pictures
a) Click the first button, “Browse for Media” in the Asset Window. This button will be activated when the “Display Media” tab is selected;


b) Click and select “Browse and Add to Project” to attach the first picture or movie.

2) Repeat step 3 until one has completed a chapter, then click “Next” to return to another main screen. In here, one should see the first chapter of the movie;


3) To continue adding more chapters, click “Make Movie” and repeat step 1 and 2

III) Editing
1) To edit the movie.
• Doubleclick the chapter icon in the Main screen to reach the editing screen again.

2) To cut the movie

In the top left hand window as highlighted (edged red), for:
a) Rough Cutting
• Drag the left or the right tab to the correct location.
b) Fine Cutting
• Click the left or the right tab; the triangle in the tab will change color
• Click the spinning button up or down to move the movie in deci-seconds.

Note: The “XXXX” will appear when one drags the tab. It indicates the portion of the movie to be cut. If one cannot find the tab, try clicking the thumbnail of the movie in the “StoryBoard” window.

3) To add a moving effect text in the movie
• Select the Text Tab and the text movement in the Asset Window. The StoryBoard window will change to Timeline window. For example, if one wants the text to zoom in and out, select “zoom In/Out” by doubleclicking it. A “Properties” window will pop up.


• Enter the appropriate text replacing the “Sample Text”. Close the Property. One should find a Text bar shown in the Timeline Window.
• Drag this text bar to the exact location where one to show the moving text;

4) To add music or sound file
• Select the “Display Media” tab in the Asset Window. Click the first button, “Browse for Media” to add the music or sound file;
• After adding the file, the Timeline Window will appear, showing the music/sound bar which indicates the location and the actual length taken to play the music or sound file;


• To prevent double playing of sound in the movie and the music file, doubleclick the movie icon or the music/sound bar in the Timeline window, another property box will pop up. Drag the volume to zero to silent the sound of the movie or the music/sound. One can also lower the volume to play them in the background;

IV) Saving the file
One should always save a copy of the project file whenever convenience. It will only take seconds to save this copy and few seconds rather than hours to restore the work. To save a copy of the work, just click the diskette icon at the lower bar of the Nero Vision screen.


IV) To burn the Movie into DVD
In the Main Screen, select “NEXT”, one will be back to the original screen to create DVD Movies. Save a copy of the project when prompted.

To burn the project into DVDs, click "Open saved project" and in the pop up screen, select the project saved and one would be brought to the "Content" page where icon of various chapters of the movie will be shown. Click "Next: will start the burning process after one has selected the introduction in the next page and review the movie using the "remote control". The burning process will take approximately 15 to 20 minutes depending on the speed and the amount of of memory in the computer.

Other Related Sites
1. Make Youtube and Google DVDs using Nero 8
2. Professional Music/Audio Recorder


Monday, February 11, 2008

Avatar Picture Set 2

Animated Picture reduced to 84x84 pixels for making of Avatar. To download, right click picture and select "Save Picture as"


Avatar Picture Set 1

Animated Picture reduced to 84x84 pixels for making of Avatar. To download, right click picture and select "Save Picture as"


>


Simple and Easy Way To Backup Photos, Movies and Documents from handphones

 2 December 2023 In the past,  we used iTunes when we wanted to transfer or backup our photos,  movies, and documents from iPhones or Androi...