Search This Blog

Friday, December 21, 2007

Dual Booting HP TX1209 Tablet NoteBook

Introduction
TX1209 & other TX12XX or TX1XXX are actually HP 1000 series Tablet PCs. They come preinstalled with Vista Home Premium operating system. This article describes the step by step procedures to dual boot the HP tablet with XP and Vista operating system. Included are easy download of drivers for TX1209 & TX1222. The described procedures to dual boot, except for the drivers, are common to all pc and notebooks.

FAQ
1. Will dual booting void HP warranty?
No indication about voiding warranty but HP has warned users against downgrading or dual booting its operating system from Vista. Please read their instructions and advice carefully before proceeding with this installation. Please note that users will be required to re-install back the Vista operating system if the units are to be sent back to HP for repairs.

2. Do I need another hard disk for the operation?Not necessary. The units can be re-installed back to factory defaults any time if one has already make a copy of system recovery disk as instructed when they first switched on the computer. However, it will facilitate the recovering and re-installing of the operating systems if there is another hard disk.

3. How difficult to dual boot?It is not too difficult but for the first timer, it may take a little longer to find the correct information and learn how to install operating system especially when information on this model, TX 1209, is almost non-existence in the Web.

4. What if I don't like XP or dual boot after the downgrade?
Just boot up the recovery disk. Select factory default when asked. Everything will go back to factory default Vista operation system as if nothing has been done to the computer.

5. Need XP for Tablet PC Edition for Touchscreen?
Not required. An upgrade for XP Pro can be downloaded here and is provided for by courtesy of EETI. Unzip and start setup to install in the XP operating system.

6. What about the other xp software & programsa) Screen rotation software from here;
b) Touchscreen software from here
c) Quick Play 3.2 from here;
d) Handwriting software, Ritepen, from here;
f) Finger print Verisoft software from here. This software for Vista also works in XP;
g) Lightscribe Host Software from here;
h). Wireless Assistant software from here.

Note:
1.If XP SP2 has been installed, Windows will pick Windows USB Video Device driver for WebCam; If one prefers HP's Webcam driver, it can be downloaded from here.

7. What if my notebook is other TX1000 series or my PC is of other brandsThe dual boot procedures will still be the same except for the drivers, which many users claimed to have also used the TX1209 drivers. Additional HP drivers could be found here by searching the model.
The described procedures to dual boot the computer, except for the drivers, are applicable for use also in other PC and brands, especially, for PCs that are preinstalled with Vista operating system. A detail description can be found here.

Preparation
When you are still in Vista operating system:

1. Make sure if you have a copy of the following handy:
a) Vista operating system recovery disks;
b) XP operating system disk;
c) XP Service Pack 2 disk;
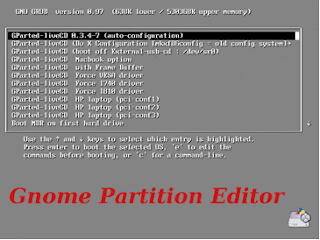
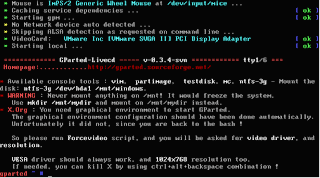
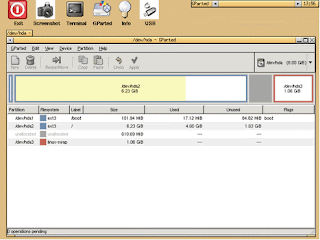
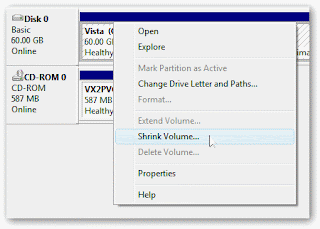
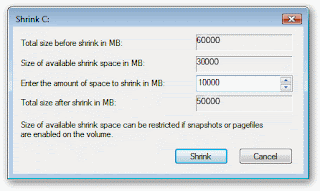
d) The Disk Partition Editor; either Partition Magic, Gnome Partition Editor or the like if one does not wish to use the Shrink Volume function of Vista, which is easier.
Important Note: Back up the important data in the hard disk. Make sure that the Sytem Recovery Disk will work by trying it out first. Make a copy of all the drivers available using this program.

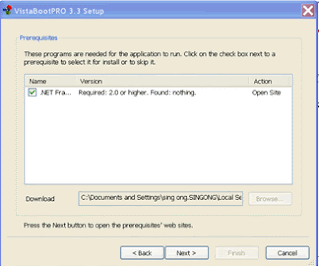
2. Download a copy of VistaBootPro from here or its Web page and save it in one of the folder in C:. Remember where you have saved this file.
3. Download the necessary XP drivers and keep them in a folder in C: However, it is advisable to keep Vistabootpro and the XP drivers and burn them into a CDRW for next use. One would need this Vistabootpro and the drivers if one has to re-install the XP operating system again;
4. Shutdown and restart the computer.


Things to Do Next
1. In case of a new hard disk, insert the system recovery disks in the DVD drive. Boot computer and follow the instructions to recover and reinstall the Vista operating system to the factory default;
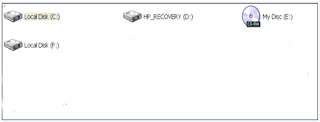
2. The existing or new hard disk will then have two partitions, one with Vista operating system; the other, a recovery partition with the recovery data;
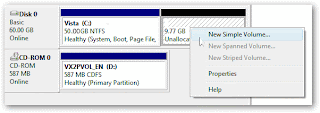
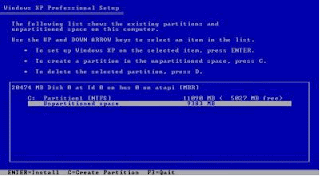
3. To dual boot, one must also create the 3rd partition for XP operating system (goto create new partition);
4. Once the 3rd partition has been created, it will be ready to install the XP operating system in this new partition (goto installation of XP) ;
5. After having installed the XP operating system, the computer will boot only into XP until one has amended the Boot Configuration Data (BCD) of the Vista Operating System. This is because XP system, being an earlier version, does not recognise the Vista system and the boot sector has now been over-written by the XP operating system during the installation;
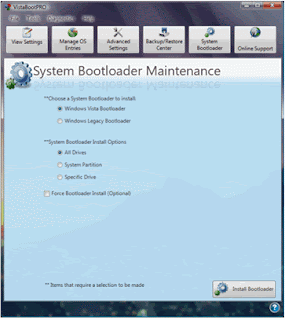
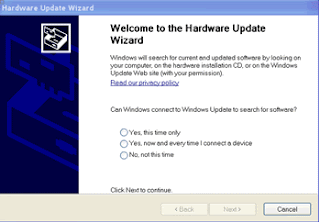
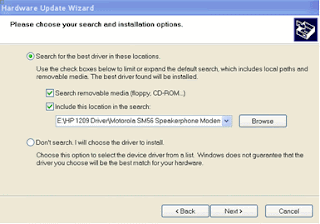
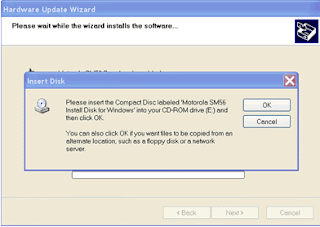
6. Before changing the BCD, one would have to make sure that the Internet is make operational as VistaBootPro will ask for such connection. Now, proceed to install all the XP drivers especially the network drivers (goto install drivers).;
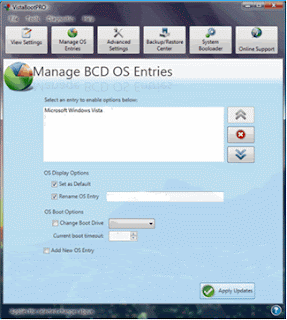
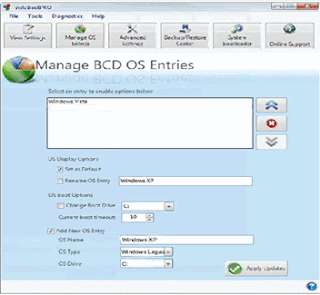
7. After having set up the internet connection, it is time to change the BCD so that one would be able to boot into Vista. Startup VistaBootPro.exe from inside XP operating system. Configure the BCD as instructed (goto configure BCD)
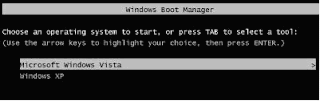
7. After that, reboot the computer and one should see the picture of the two operating systems as shown.


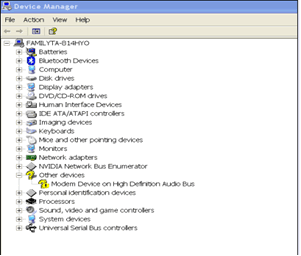
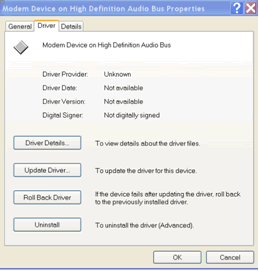
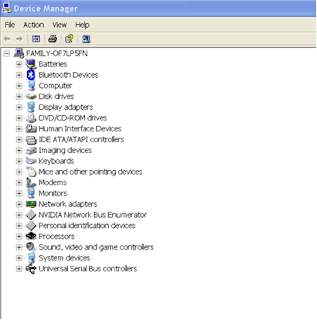
8. The job is done and one can proceed to install the rest of the software for XP such as screen rotation, fingerprint and wireless assist software if these are not automatically picked up by the Device Manager or the plug and play of XP operating system.
Other Related Sites
1. Install XP in Vista Computers
2.
Making New XP Installation Disk
3.
Forum on Downgrading of TX1000
4. Creating Partition Using Gnome Partition Editor

5. Creating New Partition Using Shrink Volume in Vista

Disclaimer: Efforts have been made to present the author's experience in correct details. Users are advised to do further research and checks by themselves. The author is not responsible for any damage (which should not have happened) as a result of any use of information contained in this blog.


Thursday, December 20, 2007

Configure Boot Configuration Data

Configure BOOT CONFIGURATION DATA (BCD)

1. Start up VistaBootPro from within XP operating system;
2. VistaBootPro will ask for Net Framework; install Net Framework as instructed;


3. Once VistaBootPro started, select Manage OS Entries. One should only see one entry i.e. Microsoft Windows Vista ; If one find also Windows XP or earlier window version, just delete them; after that, click Apply Updates to save;


4. Select System Bootloader and the following screen will appear. Select Windows Vista Bootloader, All Drives and also Force Bootloader Install, then click the install Bootloader button to change XP Boot to Vista Boot during startups;


5. Close VistaBootPro from File menu and then select Exit;
6. Restart the computer. One should now boot into Vista instead of the XP operating system.
7. Restart VistaBootPro from Vista operating system. Click OK to back up if prompted. When VistaBootPro started up, select Manage OS Entries and tick Add New OS Entry and then enter OS name as Windows XP, select Windows Legacy and enter OS Drive as C: as shown attached.
Note: It is important to select C: and not D: or F: in the OS drive because the boot data of windows XP was stored in C: rather than D; or F: when it was installed earlier. Selecting D: or F: will get an error message about missing NTLDR when booting into XP.
8. Set either Windows XP or Windows Vista as default during booting up before pressing Apply Updates to complete and before exiting VistaBootPro to reboot.
Disclaimer: Efforts have been made to present the author's experience in correct details. Users are advised to do further research and checks by themselves. The author is not responsible for any damage (which should not have happened) as a result of any use of information contained in this blog.


Installation of XP Drivers

Installation of XP Drivers for TX Notebook
This has been the most difficult part of the installation. HP has very few XP drivers to help. Download and install these drivers first, then One would have to find the rest of the drivers from other sites. To facilitate installation of drivers, I have compiled a set of relevant drivers (updated 22 Dec 07) (44 MB) for TX1209. The drivers for TX1222 is found here(43 MB).

As these files are in compact format with .info files, Device Manager can be used to search for these drivers. Download the file and unzip or unrar into a folder or a new disk, then follow the following step by step instructions:

1. If one has already installed the XP Service Pack2, proceed to step 2; otherwise, insert XP Service Pack2 (SP2) in the DVD drive and restart Computer to install SP2. The installation will require some features such as USB 2.0 driver from SP2

2. Reboot as required into XP operating system. Ignore all the “Found New Hardware Wizard” for the moment by pressing Cancel if such Windows appear.

3. After having completed the booting, bring up Device Manager from Control/System/Hardware/Device Manager. One should find quite a few question marks as shown indicating that these are devices that do not have the correct drivers


4. Doubleclick the question mark to bring up the following window


5. Select Update Driver to bring up the following screen


6. Select "No, not this time "etc to bring the following screen finally


7. Browse and select the correct folder that stores the driver. Follow installation instruction and repeat the same for other drivers.

8. If all the drivers have been installed properly, one should see the following picture of the Device Manager page without any yellow question mark; if not, try to resolve the driver problem; otherwise, some devices might not work properly.


Note: At times, the following screen may appear when Windows cannot locate the Directory automatically. Just close the Insert Disk window by clicking OK and direct Windows to the correct Directory again.


Disclaimer: Efforts have been made to present the author's experience in correct details. Users are advised to do further research and checks by themselves. The author is not responsible for any damage (which should not have happened) as a result of any use of information contained in this blog.


Installing XP Operating System

Installing XP Operating System in the 3rd Partition

1. Eject the DVD, restart computer (or just hit the reset button) and boot from the Windows XP CD;
2. When the Windows XP setup reaches the following screen, one should see the unpartitioned space created earlier; also, one should see the partition with Vista in it.


Note: On occasion that one does not see any of above screen and also XP said it could not detect any hard drive, it is likely that one would need to install the SATA drivers. If one has a bootable floppy drive, hit F6 when prompted to install "3rd party SCSI / RAID (& SATA)"; if not, one would have to slipstream the SATA driver into the XP installation disk. TX1209 does not require installation of SATA driver.

3. Select the Unpartitioned space, then press “C” to create a partition (if prompted, choose NTFS as the file system.)
4. Continue with the rest of the installation as per normal instruction;
5. Windows will thereafter reboot into XP operation system. This is because the boot sector in C: has been re-written to boot up XP instead of Vista operating system;
6. When XP reloads and completes its installation, one should see a C: for Vista operating system, D: or E: for HP_Recovery and a new disk D: or F: for XP operating system.


6. Proceed to install the XP SP2. The tablet might require some of the new Windows drivers to complete its driver installation;e.g. USB 2.0 driver

Disclaimer: Efforts have been made to present the author's experience in correct details. Users are advised to do further research and checks by themselves. The author is not responsible for any damage (which should not have happened) as a result of any use of information contained in this blog.


Create New Partition Using Gnome Partition Editior

Creating New Partition Using Gnome Partition Editor

1 Make a bootable copy of Gnome Partition Editor (GPE) from here; after that, use the ROXIE DVD burner in Vista, select "Burn image" to burn the ISO image into a bootable CD;

2. The computer could have a default to startup from CD; if it is not, restart the computer and hit F10 to go to the BIOS setup and change the boot options in system configuration to enable CD-ROM Boot

3. Insert the disk with Gnome Partition Editor in DVD drive and restart computer and one will see this screen


4. Select Gparted-liveCD HP Laptop (PCI-conf1); follow instructions and hit enter keys to accept default and US language etc. If everything goes fine, one should be greeted with the last screen as shown below. However, the program will stop working here because it will detect an error due to wrong graphical environment.


5. Now to resolve and to continue with the rest of the installation, type Forcevideo (exactly, including Capital F) & press Enter; thereafter, select nv as video driver and 800x600 as resolution. One should then see the following screen… if not, go to sourceforge to seek solution.


6. Follow the instructions in to resize and create another partition for XP.

Note: Further information about Gnome Partition Editor can be found here.


Monday, December 17, 2007

Creating New Partitions Using Shrink Volume

Introduction
One could create another partition in hard drive using PartitionMagic or Ranish Partition Manager or Gnome Partition Editor. The other method is to use the Shrink Volume function of Vista system.

Next Things to Do
For Vista Operating System1) Open the Computer Management panelUnder Administrative tools or right-click the Computer icon in start menu, chose Manage. In the Computer Management, select Disk Management.


2) Shrink Volumea) Right click the main hard drive and choosing Shrink Volume.


In the next screen, enter the amount of space that one would want to free up either for XP installation or other function. Click Shrink and the computer will free up the required amount of space


If one is partitioning the hard disk for the purpose of dual booting Vista and XP in the computer, one can leave it to the XP installation process to format the new partition and create a drive letter or one can change the drive letter and format the partition in Vista by the following method:

3) Change Drive Letter and Create New Partition
a) To make the new partition into D:, one will have to free up the drive letter taken up by the CD-ROM’s drive letter from D: to E:. This can be done by right clicking the cd-rom drive in the Disk Management Screen and then change drive letter of the CD-ROM drive to E:.


4. Create New Partition
Right-click on the Unallocated free space and then select New Simple Volume from the new pop up menu.

The computer will start formatting this new partition and name it as D:
To install XP system, one will have to reboot the computer with the XP installation disk in the CD drive.
Problems
1. Shrink Volume has Limited Size of Available Disk Space
For computers that have been used for sometimes, system/program may have created unmovable file sectors called MFT (Master File Tables) in the harddisk. These MFT will limit the size that shrink volume can shrink the existing spaces in the harddisk partition. To increase the capacity or size of spaces to be released, one must remove these unmovable MFTs. There were reports that one can release the space reserved from Pagefiles and disable hibernation functions to remove the MFTs. Others reported they have tried Diskeeper to remove these MFTs during defragment at bootup time. It was speculated none of the free defraggers can remove the MFTs.
Should you experience these problems, suggest to google for answer or alternatively, use other partitioning software such as Gnome Partition Editor.

Simple and Easy Way To Backup Photos, Movies and Documents from handphones

 2 December 2023 In the past,  we used iTunes when we wanted to transfer or backup our photos,  movies, and documents from iPhones or Androi...