Search This Blog

Wednesday, February 12, 2020

Get Rid of CloudNet Virus?


10 February 2020

When one  switches on his  PC or notebook (named as PC), he  might notice

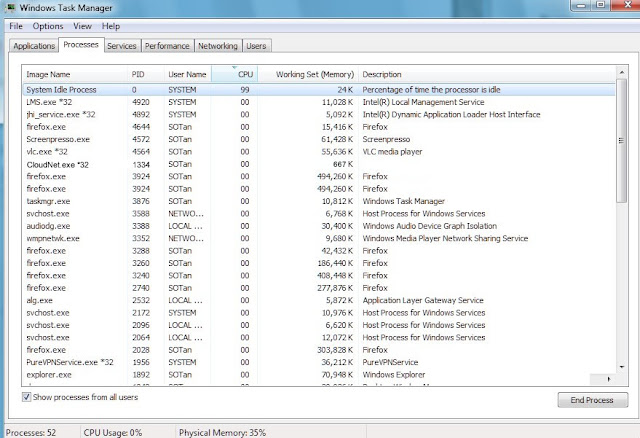
a) the CPU fan was running very fast.  It would make a lot of fan noises after some idling moment. This was despite having  no other running programs running; the CPU is 99% idling as indicated by Task Manager.


b ) the CPU’s graphical plot next page showed CPU running at 50% load;


c) the Network Activity showed heavy usage and;
d) the TCP Connection showed a lot unidentifiable connections 


What had happened?

Likely the PC has a virus called “CloudNet virus”

What is CloudNet?

CloudNet is an Web consulting firm in Central Minnesota. But this CloudNet virus has nothing to do with it.  The CloudNet virus happened to use the same name. 

Initially, this virus was an xtension hiding behind the web browser. It would hijack PC user’s Internet home page. It would distribute promotional materials, display banners, coupons, pop-ups and other advertising products. PC users can remove this virus with a few simple steps. May be because of this, the new virus is now hidden and embedded in a System protected program. Ordinary users and novice might not be able to remove it without any effort.

Is the Virus Harmful?

This virus will use one's  PC to send signals to various designated Internet addresses. It is not known exactly for what purpose. May be it is sending "clicks" to those addresses to earn some advertising money. Anyway, it will make one's PC running slow and will help to consume lot of CPU power.

How to Remove?

There are plenty of articles written in the Net about how to remove this virus. As CloudNet is embedded and hidden behind a protected System process called "CSRSS", it will need some special steps to remove it.

What is CSRSS?

It stands for client/server run-time subsystem. It is an essential subsystem that must be running in the background. It must also run in the Safe Mode. The process handles the creation and deletion of threads. It also deal with some parts of the 16-bit virtual MS-DOS environment. Hence, there is no way to remove it using Windows Explorer using traditional method.

What are the Methods ?

3 possible methods
 
Method 1:

It involves restoring the system images. If one has a good copy of system image saved earlier, this is the best and easiest method. However, not many users has the habit of updating and keep a recent copy of the system.

Method 2:

It involves disabling the control of the Windows system that prevents users from deleting CloudNet. This method requires one having to change the security setting of "CloudNet".

To do that one must first change the ownership of the "CloudNet". From the “CloudNet” search directory using Windows Explorer, right click to select Property. In the property of CloudNet, change the ownership from "System" to "Administrator control. After that edit the permission of the system so that the System will be "Deny Full Control" of CloudNet. Once the System lost the control, Windows Explorer can delete the "CloudNet".

But there is still one more step i.e. to disable the Startup Autorun of CloudNet. This is because Windows operating system will always protect any running program.

To disable Autorun, one can use "CCleaner" or "Hijackthis" or Microsoft's Autorun program. Make sure CloudNet will not run in the next start up before deleting it.

Method 3

This method involves the repair and replacement of CSRSS. This CSRSS is located in System32 in the Windows directory. One can download a fresh copy from either a trusted website or extracted it from another PC or installation disk.

One would not be able to replace the existing copy of CSRSS because it is protected bythe Operating System. To replace CSRSS, one could use another operating system like the Unix Operating System used in either Knoppix CD or Hiren's boot CD. However, can it allow CloudNet to be deleted when starting up Windows has yet to be tested.

The 3 methods are shown in this video presentation


Will these Methods work for Windows 10?

The same 3 methods should also work for Windows 7 as well as windows 10
Saturday, February 8, 2020

Upgrading from Windows 7 to Windows 10.


5 February 2020

Microsoft has stopped providing technical support from 14 January 2020.

But, it is still safe to use Windows 7. Microsoft will still provide patches if they found any security threat. However, they will not update their software when there is new feature. For example, they will not provide any new drivers for the new hardware coming out after 14 January 2020.


Is it Free?

The upgrading from Window 7 to Windows 10 was free of charge when it was first announced in 2015. This upgrading work is still free today. No one knows how long I will last. Therefore, it is better to grab it before it is too late


How about Performance?

In 2015, many have tested Windows 10. They did not like it because it was quite baggy and running slower than Windows 7. Some have difficulties navigating around. They have to install a software call "start is back" to change the menu screen to look like Windows 7. These problems have been improved after so many years. The menu screen is  now friendlier. The new menu screen will look a bit like Windows 7 with added Windows 10 features. One would find the desktop mode easier to navigate. As for the speed, some claimed that it would run faster than Windows 7. Windows 10 is no longer as baggy as compare to Windows 7 if one has a SSD drive to run it.


How difficult to Upgrade?

They have made it so easy to upgrade. Just copy the windows files into a CD ROM; or memory stick,  then click set up after booting up the Windows 7. Everything will run smoothly. The installation is much faster than installing a new Windows

Losing existing files, user data and applications?

The files, data and applications will be copied over just like re-installing a new windows. Some existing data and files that cannot be transferred will be savedin a folder called "old window". One can always recover back these data and files

Will all existing Applications of Windows 7 work?

Some applications from Windows 7 might not run properly. But this can be fixed by changing the compatibility settings. There might be some very old applications such as games which will not work. These are the exceptions rather than the norms.


What needed to upgrade?

No special tools or software needed except the followings

a) About 16 GB to 20 GB free hard disk space for the working files, depending on whether the existing Windows is 32 bits or 64 bits;

b) Prepare an USB stick with at least 6 GB of space if one wants also to upgrade other PCs in the house;

c) 7-Zip compression software if one is using USB or CDROM copies and of course,

d) A stable Internet connection to update the Windows

After that, download a file called"Media Creation Tool" from this Microsoft web page. There will be an option to choose if one wants to upgrade the PC straightaway or have the installation software extracted and copied to an USB or a CD ROM.

What Version After the Upgrade?

If the existing Windows 7 is an Ultimate or Professional version, the upgraded version will be Windows 10 Pro. For others, only Windows Home edition.

What are the Possible Issues?

a) Windows Slow Start up

One might experience slow startup even when one has a SSD to run Windows 10. “Insufficient memory” allocated for running Windows startup programs could be the cause. The Windows could take 40 seconds instead of less than 20 seconds to start the Windows. This problem was solved when the maximum size of the virtual memory was changed to 8 GB.

b) Some Applications cannot work properly

This could be the compatibility issues. A change in the compatibility setting will normallysolve this problem. It involves running the applications under compatible Windows 7. Setting it to "run as Administrator" will usually fix this problem. 

Here is the video presentation for this article.


Monday, February 3, 2020

Add a 250GB SSD To PC with 1TB HDD & Keep all Files


3 February 2020

SSD (Solid State Drivers)  are very cheap nowadays. Many PC users have upgraded their existing PC or Notebook with new SSDs. They will want to get rid of their existing smaller sized 250 GB SSD for a song.

If one has a PC with a mechanical hard disk (HDD), it will time to upgrade the PC. One can add these small and cheap 250 GB SSD to speed up the PC. The challenge is how to add these small SSD so that it can be transparent to PC users. Many a time, the existing HDD will have twice as much data/storage as compared to the SSD's capacity.

Many cloning and OS migration software will not work under this kind of setup. For example, one user has a 1TB HDD with about 500 GB of data/programs in the existing setup. He would want to add another 250GB SSD. The cloning and OS migration software will warn him that the 250 GB SSD is too small and refuse to proceed.

What Can Be Done?

There are 3 methods:

1.  Reinstall fresh copy of Windows OS to the SSD and copy all the application and files one by one and then patch them to work with the new  Windows OS. This will be a very tedious work;

2. . Reduce the storage in the existing HDD to fit the migration requirement. After that, reinstall the deleted programs and games.  This method will be better but still require lots of manual patching work;

3.  Use special migrating software such as "PC Mover Professional". This will be the easiest and quickest method.  This will be described in detail in this article.

Step by Step

Follow the step by step procedure as shown in this flow chart and also the video presentation to add the SDD.


 Finishing up

1)  Update the ShortCuts in the Start Menu and Recovering Lost Files and Program

The PCMover software will not migrate some applications from the old harddisk to the new SSD. This is because the applications may not be compatible or one has left them out during the migration. These applications will not show up in the Start Menu. One can always recover them.

The PCMover software will not affect any applications or files in the older hard disk. This older hard disk has been automatically renamed as D: Drive. One can recovered these applications by creating a short cut as shown in this video.


2)  Tidying Boot Startup Menu
It is advisable to install a new copy of Windows for a new disk. When we install a new windows, the Startup Menu will show 2 copies of Windows. They might be of identical name. The following video will show how this problem can be resolved.


Things to Take Note


PCMover will not migrate
  • Files that has Digital Rights Management (DRM) protection. These files are music files and programs that has keys or serial numbers for proper working. They might need deactivation on the old PC and reactivation on the new PC;
  • Specific hardware drivers;
PCMover is not for migrations from newer operating systems to older operating systems. For example, from a PC running Windows 7 to a PC running Windows XP. It will not run properly.

It is advisable to carry out a Windows Updates (including .NET) for the new PC before carrying out the migration work


Simple and Easy Way To Backup Photos, Movies and Documents from handphones

 2 December 2023 In the past,  we used iTunes when we wanted to transfer or backup our photos,  movies, and documents from iPhones or Androi...