Search This Blog

Monday, October 21, 2019

How to take ScreenShot and ScreenRecording Using MiTV4


20 October 2019

How to take ScreenShot and ScreenRecording Using MiTV4

A feature unknown to many Xiaomi TV user is 

a)  Taking a Screenshot
b)  Taking a short video clip of about 15 seconds


Directly using just MiTV’s TV controller.  This feature also  includes a screen cleaner,  wiping clean the screen for other screen capturing and recording purpose.  It has been tested to work in MiTV4.

Item

Action
Remark
1.  How to Access?
Press [Home] button twice in quick succession
https://blogger.googleusercontent.com/img/b/R29vZ2xl/AVvXsEgglbPdFmIIEA9B7AM1YKSf4YScM7_NzMZrj0UtJQUy33e5_BQv-2aUzDVfci-mDzmcsnWtSYCR-K_cYLEkaoa4C6kPdXuTVQAKmN89NS44JO2JJJMj27ho4uBfnnOcY2OIcfmYLTG7q4SE/s1600/controller+.jpg
Doubleclick to enlarge
This screen will show
 
https://blogger.googleusercontent.com/img/b/R29vZ2xl/AVvXsEgfcS80FObYH-je6g58GdkH0_V7XUu35z_AzD8zS-4m5NZWTXj_dX1CNQrnalCy0m2xtGfmWN0Szi9F5ftawquNOzCUR6vgSjLPirfxsUlZPvxgeL9sFPxT9W4iBxSHFMYJ8sm8Ba3gVSyU/s1600/2019-10-21_19h47_45.jpg
Doubleclick to enlarge

With 3 buttons at the bottom
Namely,  the [Cleaner],  the [Screen Capture] and [Screen Recorder]

https://blogger.googleusercontent.com/img/b/R29vZ2xl/AVvXsEhFptnyEzJmbtvoKRnQ0pVOSgUlG6b8jX04RI-qhtTMtL9_c523DOwnNbSGGiszz6Z5nYXoc0aCbFaoIC0fOns4PmS6OIzad4u2DjZaogVbze1Ko4RtlQSFi54fu6y96VF4LDp3L6OYRl-i/s1600/2019-10-21_19h48_45.jpg
Doubleclick to enlarge
2. [Cleaner] Button
Select the button
Clears all the screens shown above the button,  leaving only main menu screen

3. [Screen Capture] Button
Select the button
Captures the screen instantly and displays a notice when completed

4. [Screen Recorder] Button
Select the button
Records a short video of about 15 seconds and displays a notice when completed
5.  Retrieve the captured screen or video
1. Fire up [ES file explorer]


2. Scroll down to [Internal Storage] on the left side bar and click it
https://blogger.googleusercontent.com/img/b/R29vZ2xl/AVvXsEgiAmk8Jb9n0Md51li6Nf5qeiFKAHEkkZf_sc7aiud4EySg2ctFcb1WlTY-ueCp_1d8ZiKgLoXZEJsPTeSN83ffNEwGWmEeA3NEAOH65IXkXfD6a4yEGB8dmTw7QI2fepOhb_Z4KW73JYTy/s1600/2019-10-21_20h00_00.jpg
Doubleclick to enlarge

3.  Click [ScreenCapture] for all the screen captured
Or Click [ScreenRecorder] for the 15 seconds video clips
https://blogger.googleusercontent.com/img/b/R29vZ2xl/AVvXsEgi-j0xS9Msy4V7-Nm1TUEuYbRxOgiHnOcnlxkaRvmZ7WS84cY9knu-MXPbqoJm2cUmjZ1nhhFC23yt61NooYWRAOM3Sy-JuRKQrvVfjfgHAcCWgJMeq04DSyt3QhEGVj1ZLtMlQUqsCwUp/s1600/2019-10-21_20h04_28.jpg
Doubleclick to enlarge

Note that the picture are captured as png files
https://blogger.googleusercontent.com/img/b/R29vZ2xl/AVvXsEjGkhhlp9SfTZZBtg4nXBPjP9N89Ovccu7GZn6ioYhv8ij3ch-Juo9Y62092jnHRksUzE9yhIyl6JniWVH_JuZdbgCvuaycpWI0IQhjNVi49YsWcxAtnU5KoB8kxC8rlpiK5-8DvKf3r0yY/s1600/2019-10-21_20h08_39.jpg
Doubleclick to enlarge

Video Recording of the Article


How to use iPhone 6 BoostCase for iPhone 7?

20 October 2019

How to use iPhone 6 BoostCase for iPhone 7?

One of our family members was given a Carte Blanche BoostCase for iPhone 6 as a gift.  Before she could use it,  she had the iPhone changed and now has a iPhone 11 Pro.  This BoostCase was given tome to do something.  This article tells how the BoostCase was turned into iPhone 7 case instead of selling it as it doesn’t worth much/

What is a iPhone 6 BoostCase?

It is just a 2700 mAh power pack specially designed to fit iPhone 6 so that it can become part of the  iPhone.


Compatibility

There are only 2 problems if one uses this iPhone 6's BoostCase in iPhone 7

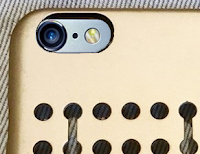
1.  First,  the camera lens will be half blocked because the camera windows of the BoostCase are too small;

2.   No wired earphone can be used as the lightning cable port will be used by the  BoostCase.

One can live without the wired earphone as there are Bluetooth earphones;  however,  it would be hard to go without the camera!!    So,  the next thing to do is to enlarge the camera window hole.

Easy Job?

It is a relatively easy job;  however,  there are things to watch out when enlarging the window holes
What’s Needed?


a)  A high speed drill like Dremel with a 6 mm grinding stone tool bit
b)  A paper template to fit and cover the camera lens of the iPhone 7.

Step by Step

Item Description
Action
Remark
1.  Making  paper template
Draw the window hole on a paper using either the existing iPhone 7 case or by measuring from the phone. 
Draw the window on the front and back of the paper to check the progress of the grinding..
2.  Sticking the paper template
Stick the paper template to the inside of the BoostCase's cover using Uhu glue or otherwise
Avoid sticking to the external side of the case as it might leave ugly marks
https://blogger.googleusercontent.com/img/b/R29vZ2xl/AVvXsEhEUlxXmOEZ4UTcuYNVFpjGjaCQQ5q7lzJbjKnbLDGg6PJWUP8-f7aIrXjpoMfFkHBlBdHrTOy44ZDKM2sCo1N8fZHZ37DHjeVNiJuRRNKpXcvT4whSLGnbbonM3cyrejC_N1Y4uI0g6uEq/s1600/case.jpg
doubleclick to enlarge

3  Enlarging the window hole
Follow the template and grind away the excess plastic of the BoostCase
Again,  work from the inside of the case
4.  Checking and Finishing
Check and repeat the grinding  
https://blogger.googleusercontent.com/img/b/R29vZ2xl/AVvXsEj6fTUqMlems_HFP8C64cHYcsnEejoZwg78dwOjHD2D1EE5Dmo1OKXoNKlgqh5bRuOV-LlDRtW2bWIm7iHU03ffKYb7CjTmEGwR7NWVKhC6vDAt3H9C1I486D8ITmGUOTuXEeWyw9TmrLgg/s1600/after.fw.png
doubleclick to enlarge
5. Painting and Polishing
Use black color permanent marker to paint the inside edges of the window so that it will look like the original.  Polish to complete the work
Again, use permanent market to work from inside of the case to avoid leaving markings that would be difficult to clean.
6.  Repeating same for the Booster Case


Friday, October 18, 2019

How to use the New Reminder Apps in iOS 13


18 October 2019
2) Why my iOS13 Reminder Apps doesn't have the new features 

How to use the New Reminder Apps in iOS 13

Apple revamped the iOS12's Reminder Apps and completely changed the apps with new features added.  The new apps allow users to  set various elements of the Reminder Apps.  It also allows the creation of reminders and the organisation of various tasks at ease,  much like any commercial Reminder apps.  This article intends to introduce the features used commonly in the new Reminder apps.  

back to top
What’re the Changes?

iOS12’s Reminder only has 2 main screens;   the Reminder list and the Setting screens.  The new iOS13 not only revamp these 2 screens but also added many other features like image insertions etc.   It is also has a power task reminder function that will remind users at the precise date and time,  how and where to announce and sound the reminders.   All these are done easily by the users.

From These (in iOS12)

To These (in iOS13)

https://blogger.googleusercontent.com/img/b/R29vZ2xl/AVvXsEj5S8b8nUTP5LdTWt53CiSBIUwNK-UrNIIrq7XCoQ-JwAbUZpSaSw1usA8M1CIFZbd_ryTrRugnOina1w8YM0TsH0VRMVzjM1-1yo0b-DaGCUhostrU41UacmvrJDWx7LNEZ1CJKvxNCX8d/s1600/2019-10-18_18h05_51.jpg
Doubleclick to enlarge


https://blogger.googleusercontent.com/img/b/R29vZ2xl/AVvXsEiklluMVA5NKWwTmm8F6QY_CY2LsU1BKqtzLZeF-iUqx1TE2YjpOd375w2nvf2vcsJnOhwu8tdG1CeA5P9V8AyYhEZvrD6VEhm_Fb8-WQKAJNEjL0YXecf48Q4OjJUkQmcQYwyD49nYbaCS/s1600/2019-10-18_14h02_11.jpg
Doubleclick to enlarge


https://blogger.googleusercontent.com/img/b/R29vZ2xl/AVvXsEisBqFUy8P5ljTm_ip_V0l7vsNgc0sIz_7PP_yYyf9CuJ1U5bmlBuS5AxUFRYksXHn2ASDqflzI6hZG6N59EF-g2HMuAkqzCEzvRPtobH-EtH_XGP0ap96j4cYonl8tkzL2fIYltVp1gjsN/s1600/old+setting.jpg
Doubleclick to enlarge

https://blogger.googleusercontent.com/img/b/R29vZ2xl/AVvXsEjwImKKK7OgUOZasv_WQ8yH-EOuYli_Xj7rIZMZ66p9gK0dDBXhrllIliUGBrZ0YJeSEyOts92gUDfd9cfkSj1uJx4MKhbs76lc0uMP-4oUrdtz_fTnym0BVPdYqgw53a2QGFDRGXxZPSBZ/w60-h140-p/2019-10-18_14h25_20.jpg
Doubleclick to enlarge
           

back to top
Why My Reminder Apps Doesn't have All the Features?
  
As iPhone always syn its Reminder Apps with the other devices connected to the iPhone;  therefore,  one must either upgrade all the connected devices to iOS13 or have them  deleted if one wants all the features of new iOS13 Reminder Apps.   The other reason could be because iPhone was never backup before due to insufficient iCloud storage.  This video will tell how to do an upgrade after the iOS13 has been installed


back to top
I)  What’re in the New Reminder Apps
Itemised Description
Actions
Remarks
1.  4 Sections of a List
1.  Tap [Reminder apps] on the icon menu as usual
This screen will show the 4  Sections;  namely,  [All],  [Today], [Scheduled] & [Flagged]. It also shows the name of the list and the numbers of task created the list.  

https://blogger.googleusercontent.com/img/b/R29vZ2xl/AVvXsEhiq7TlcOlU9f-jKcdy9x6b6R-p-FQQ44PulwuOZFzUjy8MLO3frXSUCyzDMM8yR6kG0J8MZg6xxtmqYbb_hMwg2tEcyPTrtvMRLbQQAQqnCBlco-HnFFlyuFhsLcyqdrcGjAVxJIrEAVFU/s1600/2019-10-18_14h02_11.jpg
Doubleclick to enlarge

2.  Show detail of the Tasks
1.Tap Today as example
This Task list will show up,  showing there are 3 tasks already created for this Today section

https://blogger.googleusercontent.com/img/b/R29vZ2xl/AVvXsEj06UGvO9gjL0u_gjgiTfhQcfiaFV39AHFf9R3AhwfF82DNJIgqroUunRRIHd_grGq2Mn2E8NGbZJ2yp47Xms0IfzzMO6T8OQno6kXh_roycJWfTmoMecqVE_J_YiYeM9lcKOZpf-atW9FT/s1600/2019-10-18_14h03_15.jpg
Doubleclick to enlarge


back to top
II)  Add New Member or Group and then Reminders

1.  Add member or group in My List
1.  Tap [Add List] as shown
Doubleclick to enlarge
2.  Add Reminders
After adding the member/group
1.  Tap the member/group
2.  Tap [New Reminder]
3.  Set the details of the reminder as shown

  • Set alarm and the way to remind such as where,  when,  how
  • Flag the reminder if necessary for attention

https://blogger.googleusercontent.com/img/b/R29vZ2xl/AVvXsEi3BttB38Oq7wAFFCVe0fM2JLM6DQitY8ax4qckRfiaEvn5G4toJx7b021Uc1FzPqX73aiodtSbrMy-EcOZ0TnC4bKirEWimtsNnlfG5Pone-WI8fCb-meMdz40l37T6aaC9a4nt2Wx34DY/s1600/2019-10-18_14h25_20.jpg
Doubleclick to enlarge

  
5. Add Attachment to the Reminder
Scroll down on the last detail screen.  one  will find [Add Image] ,  click it and the next picture with 3 options will show to ask where image will be extracted.  Proceed to add the image
Doubleclick to enlarge


back to top
III)  Create New Reminders?
Itemised Description
Actions
Remarks
1.  Reminders
1.  Tap any of the Section e.g. [Today]

2.  Select the list and in the next screen,  tap [+ New Reminder]

Doubleclick to enlarge
2.   Add Reminder to other member/group in [Today] section
1.  One can add/change reminders settings to other members by tapping the [+] signs and type in the reminder task as shown,  then
2.  Tap [i]  to set the details of the reminder
https://blogger.googleusercontent.com/img/b/R29vZ2xl/AVvXsEiDRW1uAx0W3A1WfQ6pzTcGrp-U_M2pnfx_Bxt0chFUA5VxVUfSS_w5awYZq11YwEh8ulBWKXeG0gA3832THLC04-kXOyXajE6S9LwHyZF-orXYhuirgeUk-yOqtCQeP-gDlbI132qJXOZO/s1600/add+reminder.gif
Doubleclick to enlarge


back to top
IV)  Create New List?
Itemised Description
Actions
Remarks
1,  Create New List
1.  In the main menu,   tap [Add List],  in the next screen,  type in the name of the Task List.  Click [Done] to create the new list,  in this example,  a list called  [Holiday] was created
Doubleclick to enlarge
2.  Add New Reminders
1.  In the following up screen,  find and tap e.g. [Holiday],  and click [Add Reminders] in the next screen, then, follow Section II's procedure  to create the new reminders’

2.  Tap the [3 dots] on top as circled yellow when one want to change the name,  delete the list etc..
https://blogger.googleusercontent.com/img/b/R29vZ2xl/AVvXsEhzxI2hkOo_3P5RI70iwHEqgDzPqZklKZoFOcIPST58PsdasTI2IerPghXJNgPSTbl7xsJlshukfX0PvTA8B9l9GHnbhCrjFsq0aTL2d49tTXzfGIdBlC6-cC8LNSw4fJxxgUDxp1zGhyoH/s1600/2019-10-18_15h17_04.jpg
Doubleclick to enlarge


back to top
V)  Create Schedule Reminders?
Itemised Description
Actions
Remarks
1,  Create Scheduled Reminders for the new list
1 After adding the new reminders,  one can tap the [i] button as circled yellow and  proceed to set when to remind and if the reminder should be repeated and at what location should it remind the user
Doubleclick to enlarge
2.  Set the Alarm
1.  Tap the [Alarm] and in the next screen shown,  set the date and time for the alarm to go off

2.  Click [Done] when complete
https://blogger.googleusercontent.com/img/b/R29vZ2xl/AVvXsEgD_SilI_XSLGYVkO_DPB-GbK2WpI3YfPG5_ZGphH3r3x5gepJifUijSd1egsWeXkw24LLQZ9TWpVFaqVfOHgR5cd7EKXqhWotDaNfDUslRZkg53I1ssnH0VPqUXu1EkAR8Qjx8AIQFBens/s1600/2019-10-19_05h40_47.jpg
Doubleclick to enlarge


back to top
VI)  Delete a Reminder?
Itemised Description
Actions
Remarks
Delete a Task/Reminder
Find the Task/Reminder or list to be deleted,   click the item and swipe item to the left of the screen as shown,  then click the red rubbish bin to delete.
https://blogger.googleusercontent.com/img/b/R29vZ2xl/AVvXsEjvooZV6v9qkGl4ijCBefDqGkmXQUlRsvbDtZLJh9nuLSo67sUenSu8HdZGFUPUkyC-czcfVPqqUqxuFfHQeBpBsCOf8y8Cy1lsGR4CuuOtHlS5tC2mgultK17RAfeshdllQMLSom1deyhh/s1600/2019-10-19_05h49_02.jpg
Doubleclick to enlarge


back to top
VII)  Show and hide Tasks Completed ?
Itemised Description
Actions
Remarks
Show Task Completed
Tap the desired list and in the next screen,  tap the 3 dots at the top,  then click the [Show Complete].  This will hide the completed tasks.
https://blogger.googleusercontent.com/img/b/R29vZ2xl/AVvXsEglkaoYhzo0tNxH1DQ7GPrTepDEOzkraWm91t2jnxBohq4GLujkB2YwSsVW9XBexu5kJgA4OY1E4uPCdyjz1EgkZ6jt4f5bhFNAQKv2ft330k57XQmElQwVftgzLwxQUrt4jx0E3W6ZInOH/s1600/show+complete.gif
Doubleclick to enlarge


back to top
VIII)  Create and Add Subtask

One can create a reminder for a task,  then create more subtasks with reminders so that one can get the reminders.organised properly.   Here is how

iPhone and iPad: How to Create a Short Cut in Home Screen to Clear Cache & History

23 November 2024 What are Cache and History? Cache and browser history store information about websites you've visited.  The C ache s to...