Search This Blog

Friday, November 2, 2018

A Quick, Easy & Cost Effective Way to Handle Water Leaking Ceilings


2 November 2018

Water leak from ceiling is quite common.  The roof may be leaking.  The neighbor living upstairs may have a leaking pipe.   The conventional wisdom is to place pails all over the place to “catch” the leak while the repairs are on the way.  This may take days or even weeks.    This article will offer a cost effective way to handle this “disaster” in the meantime.


Conventional Wisdom

Placing a pail to “catch” the leak is always the first thing to do but this is not a good solution.  Water could splash all over the place.  It would create lots of noises.  The leaking area could grow and spread to other areas.   Also,  one could not always place pails on top of the bed.  Getting a good night sleep would be difficult when there is constant water dripping noise.  

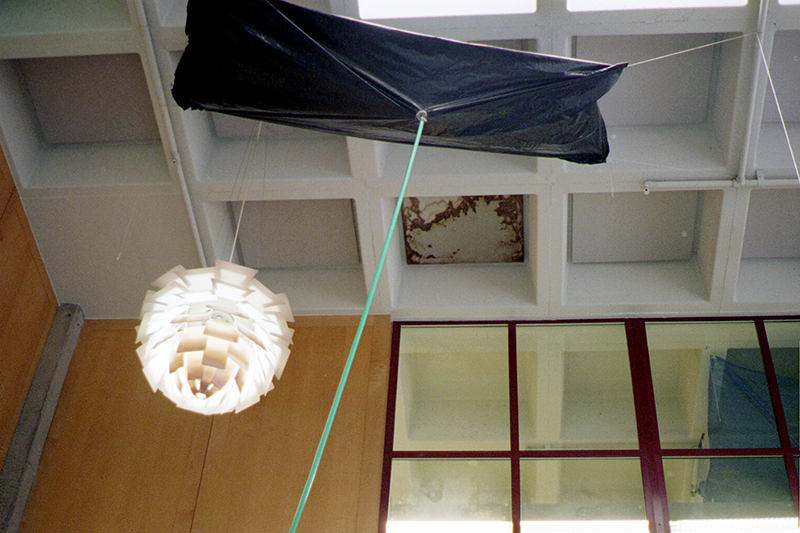
The other traditional way is to place tarpaulin sheet as shown attached.  This method is commonly used for larger area.   One would have to find way to collect and get rid of the water.


Commercially,  there are available roof leak diverters complete with bucket and other kits as shown.


What is The Cost Effective Method?


Plastic or Tarpaulin sheet plus proper water drainage solution. 


How Does it Work?


The idea behind is to “drain” the water from the ceiling as fast as possible..   If one can drain faster than the water leaking from the ceiling,  one would not see any water drop in the ceiling.  This does not only prevent water from spreading quickly to other areas but also allow cheaper and lighter materials to be used as canvas. 

How to Do it?

Action

Remarks
(Dbclick to enlarge pictures)

I)  Materials Required


a)  20kg Nylon fishing String or Nylon Twine


b)  0.1mm (100 micron) thick plastic bag of size capable of covering the leakage area to form a “drain”;  the alternate is to use tarpaulin sheet. Transparent sheet is preferred as one can spot water pool forming.  A plastic covering sheet such as those used for house painting job can be as a canvas to cover an area as big as 9' x 12' as shown.


c)  4 pieces of  wall hooks for wooden walls or special hooks for masonry walls.  

Note:  As the hooks for masonry walls are not ring type,  the string can easily get unhooked.   It is good to heat up the hook by using a cigarette lighter and bend it to narrow the gap.  

If an ring metal hook such as the one shown in the next picture,  open up the ring hook so that the canvas string can be "hooked" or "unhooked" when necessary.


d)  Fabric sheets

Reasons to use

1.  Light weight and can be easily fix to the ceiling using sticky tapes,  masonry nails on concrete (just tagged and not nailed to) or just using stapler on softboard or wood;
2.  Has good water capillary action to lift water and direct water to locations as required.  Water can be directed to flow through door gaps,  allow doors to be closed.
3.  Can act as "conduit" for water flow.  For large water flow,  just use bigger strips cut from the Fabric sheets.


e)  Stapler,  ladder and tools

II)  Preparation


1.  Survey the location and the area of the leak

2,   Determine where the water would be drained and the slope  for forming  the “drain”

3.  If big plastic bags are used,  cut and split both edge  of the plastic bag to form a continuous sheet.   Spread the sheet over the floor.


4.  Cut multiple strips of about 12 mm width from the fabric sheet;  either tie or join the strips with plastic sealer or electric iron or just using stapler to form continuous length of “wick” to direct the water    More strips can be used as wicks if water draining is not fast enough.


III) Installation


1.   Install the 4 hooks at four corners;  for a large area,   more hooks might be required and can be fixed after the installation;  

2.  Run the nylon fishing string to the 4 corners and tie a knot so that the string can be hooked or unhooked from the hook,  making sure there is no slag in the string; 

3.  Dismantle the string after marking the string to make sure the string can be re-installed back to the same hook/location.  

4.  Place the string on the floor and on top of the plastic sheet and secure the string with masking tape.  Cut the sheet to size if necessary after leaving about 40mm free space in the sheet for wrapping and covering up the string;

5.  Stick a piece of masking tape to hold the string and the plastic sheet together and then fold the plastic sheet in place with a stapler as shown in the animated pictures on the right;

6.  When all are done,  just hang the plastic sheet together with the string onto the hooks and there you have a canvas fitted to the ceiling.

7.  Pour a small cup of water on top of the canvas to locate the "centre" where water will flow and accumulate;   adjust the "centre" when necessary;  


8.  Cut a small hole underneath for the pool of water  to be drained out.


IV)  Improving Water Flow


1.  Make a long wick using the fabric sheet as described in step 1(d) and place the long water wick through the small hole.  If needed be,  tie the wick be tied to a  “stopper” made from plastic sheets/bag  to stop  the wick from sliding through the small hole.  Spread the top end of the wick to direct water to be drain out through the hole so that there will not be any water pool on the canvas.  Remember:  water pool will add weights to the canvas


2.  Place more wicks to hang from the ceiling so as to direct the water down to plastic sheet or tarpaulin.  “nail” or staple the wicks to secure it onto the ceiling or false ceiling.  Extend the wick if necessary by stapling them.

Without the water wicks,  water would splash over the place when it hit the water surface


This will ensure water will be "drained" quickly from the ceiling.

V)  Testing and Commission


1.  Check that water will drip into the pail provided


If the wicks have been installed correctly,  there shall not be any water pool found in the plastic sheet or tarpaulin and hence,  no additional weight would be added.  Cheaper and thinner plastic sheets can be used as canvas 


Update  8 November 2018

What Best to do if the leaks spread Further?


The traditional wisdom is to enlarge the canvas or put up another canvas to cover the new leaking area;  however,  the leak might just  be temporary as it find its way to other locations.  This is because water will always find a path with the least resistance.   The existing water path could be clogged up with "debris";  water will find new path to flow.

The better method is still using strips of  fabric cloth.  Cut to size and join them up either by plastic bag sealer or stapler to form longer strip.   Because the fabric are woven material that has good capillary action to "suck up' or lift water to higher level, it can be used to direct the water drippings to where one would like them to flow.   In this example,   water drippings were directed to flow from the study  room next door through the top of a door to the bucket of water  placed in the bed room as shown in the following pictures

(dbclick to enlarge pictures)

https://blogger.googleusercontent.com/img/b/R29vZ2xl/AVvXsEgztlHFXfA9tGFbKaz1-2rhQDmwr_x9DTqXV9Wxcsdz7nm-wj0sH5_8H7U7xcYQpLhkjO1ElvU_lvIq5SjyqqusZT_DOAonJoqSaEMT4uFPz2R_Vwf62ojTwGYMTnPcsItnbXgCpbGYwYsm/s1600/2018-11-08_09h20_59.jpg

https://blogger.googleusercontent.com/img/b/R29vZ2xl/AVvXsEgjJg5qurcFIYWC-VYZ47aB2r2rF5yS1_K_sB0ms7RxbXsqwpWuoNsb14lM-sIuGuyxdsVr2q4qL4yZFeYMNCuxShUAE78gqBG-wZ9IIvrqwyfYqJgQUxQ9CtUJWf9XanV8fzgYDWY1t9h2/s1600/2018-11-08_09h25_49.jpg


Other Interesting Methods 

(Dbclick to enlarge pictures)


https://blogger.googleusercontent.com/img/b/R29vZ2xl/AVvXsEjsLh5h3QzK-BsDt04Sqd1GL0wIELtdpgeQx_O-E0UKvfsgtA9FOlXwPBM3NfQqtxbQhEfZIsUCXeGqCv6eHYZEY0ZDvxpexfj9ueaNrnt4IJ_AID2mk1-b4yM8yT8oM1yyaiEw8bOLSQ2v/s1600/2018-11-09_08h32_43.jpg

https://blogger.googleusercontent.com/img/b/R29vZ2xl/AVvXsEhqEUJPpKOtiRbKytHga3fapjdc_RreuwVYLSZBGRPK0tICxgGAhYILQPB8tnHeHSaK0oonxRyoHEfPjg0bT7oSrv6RIJ8EpzI898tz4Hq4i-uBUsN7Z1Ff8NgiP8iRzhzNo7zrTW4jahfI/s1600/2018-11-09_09h10_35.jpg


https://static1.squarespace.com/static/59b88742bce176c4a1f86726/59cad85de9bfdf669482463b/59cadb3f37c58195d09722a7/1506466644211/UV_BB_34.jpg?format=500w

http://energeticos.com.co/wp-content/uploads/2018/05/leaking-ceiling-in-apartment-ceiling-leak-apartment-com.jpg

https://www.jurinroofing.com/wp-content/uploads/2016/09/ceiling-leak.jpg


_________________________________________________________________________________

tinyurl :  https://tinyurl.com/y9egku8q


4 comments:

  1. I truly like to read your post. Thank you so much for taking the time to share such nice information.

    Elsa Water Leakage

    ReplyDelete
  2. Great post, keep posting. Protect your ceilings and way to handle water leaking ceilings.To cover the top area of the building Roofing Sheets in Chennai are preferred. It protects from the heavy temperature. Roofing Sheet Prices in Chennai will afford you the best price. It includes some materials and construction things to support the building walls.

    ReplyDelete
  3. Highly beneficial information particularly the last part. I take care of this kind of information much. I was seeking this specific information for a long time. Thanks and good luck.
    Tarpaulin Suppliers In India

    ReplyDelete
  4. Nice blog, thanks for sharing this roof repair post with us. Keep sharing more informative posts like this.

    cost of waterproofing roof Singapore

    ReplyDelete

iPhone and iPad: How to Create a Short Cut in Home Screen to Clear Cache & History

23 November 2024 What are Cache and History? Cache and browser history store information about websites you've visited.  The C ache s to...