Search This Blog

Wednesday, January 30, 2008

Repair Heating Coils of Electrical Appliances

Introduction
Festive season is here. It is time to bring out that electric deep oil fryer or the Baby Belling oven from the store to make some cookies. Switch it on and it trips the earth leakage circuit breaker and cuts the power to the house.

FAQ
Why?
Moisture trapped inside the heating coil of the electrical appliance had lowered the insulation of the coil. That caused higher than normal current leakage to the earth wire and tripped the circuit breaker.

How the Circuit Breaker Works?
The circuit breaker constantly measures the differences between current that flows into and returns from the house. Current leakage, if any, flows directly to the ground. When the appliance's current leakage to the ground exceeds 30 milli-ampere, the circuit breaker will trip the power supply and protect humans against electric shock;

Why 30 milli-ampere?
The research and experience found that this is the safest level of electricity that a normal human can withstand without suffering any injury.

How to Get Rid of the Moisture?
By heating. To enable the heating coil of the appliance, one must first remove the earth wire or the green wire; otherwise, it would continue to trip the power supply.

Isn’t that Dangerous?
It is not dangerous if there are sufficient controls to ensure that one would not come into contact with any metal work of the appliance;

Are There Any Better Method?No. Removing the coil to be heated separately is not a good solution.

How to Remove the Moisture Safely?1. One would need the following tools:-
a) A two pin adaptor that would accept a 3-pin socket outlet as shown;
b) A test pen
These 2 items are available from the local stores


2) Plug the adaptor into the wall socket outlet and then turn on the appliance as usual;
3) Do not touch any metal works. Use the test pen to touch any metal work; note the brightness of the neon lamp in the test pen;
4) After about 10 minutes, use the test pen again to test. One should note that the neon lamp will get weaker; meaning, the insulation of the coil is improving with less electricity leakage from the heating coil;
5) Now, plug the appliance without the adaptor. If the appliance has no other fault, it should not trip the circuit breaker this time; if not, repeat the heating.

Tuesday, January 29, 2008

Car Safety Inspection and Checks at Home

IntroductionGoing for that mandatory annual car inspection? Concern about the car safety before a long trip? One can do a simple and yet effective inspection and check on the wheel alignment and the brakes at home.

Car Inspection in SingaporeCars between 3 and 10 years old will have to be inspected once every 2 years whereas for cars older than 10 years, every year. The inspection fee is around S$ 60/=. If one fails the first, the second inspection will be carried out for an additional of about $ 30/=.

FAQ
1. What do they check in the Inspection Centres ?

a) The proper working of the head, tail, brake and the turn signal lights;
b) The brakes and the hand brake;
c) The wheel alignment;
d) The smoke emission and noise generation;
e) The undercarriage condition and the steering mechanism.

2. What are the most Common Types of Faults that Required a Second Inspection?
The wheel alignment and the brakes. As for the rest, they can be inspected easily or should have never happened to a car that is less than 10 years old;

3. Can I Always Save that Second Inspection?Yes, you can. This article will concentrate on how one could carry out simple and effective checks for wheel alignment and the brakes.

Simple Tests at Home for Wheel alignment and brakesWhat equipment or tools needed?
For the wheel alignment, a portable side slip meter :


As for the brakes, a short crawl bar or any other tool that one can use as a level, such as the tire opener as shown in the attached


Wheel Alignment CheckThe check is relatively simple and straightforward. Reset the needle indicator to the zero position. Place the side slip meter in front of any front wheel, drive the car slowly and steadily over the side slip meter. The indicator needle should stay in the centre of the scale and within the ok range.


If the alignment is out for some reasons, one would have to adjust the length of the steering tie rods of the car or just send the car to the garage. Adjustment of the tie rod is also a simple task and some detail of which can be found here.


Note: ignore the second part that talked about how to align the wheel using toe-in measurement methods.

Brake check
a) Checking the condition of the brake is relatively simple as well. Jack the wheels up one by one. Using the crawl bar or the tire opener as a level, try to turn the wheel by leveling the bar using some fixtures behind the wheel as a pivot; for example, the disc brake assembly. The wheel should not turn at all.


Note1: Get someone else to step on the brake pedal while one is checking the brake. The engine must be switched on if one has ABS braking system in the car.
Note2: Use only sufficient force to turn the wheel so as not to spoilt the disc brake assembly if it is to be used as a pivot for the level.

b) Repeat a) for other wheels.

Note: don’t forget to test the hand or foot brake when one is testing the brake for the back wheel.
Other Related Sites
1. Car Aircon Compressor Repairs
2. Car Air-conditioning Part 1

3. Car Air-conditioning Part 2
4. Car Air-conditioning Part 3
5. Car Freon Charging for Novice
6. Replace Engine Oil by Vacuum
7. Wheel Alignment Using Sideslip meter


Monday, January 28, 2008

Wheel Alignment Check and The Side Slip Meter

Introduction
Car tires are wearing unevenly? Going for a car inspection soon? One will need a wheel alignment check. This article describes how one can have this check done at home.

FAQ
1. Why Wheel Alignment?
When the front wheel hits a road side kerb, that nasty impact might have affected the car steering mechanism. One might have a wheel mis-alignment. If that problem is not taken care of, one's car tires will wear out quickly. In many countries, wheel alignment check is a mandatory requirement for a car to obtain a fitness certificate.

2. How Do They Check?
Car Inspection Centres and most shops use side slip meters to check the wheel alignment. Some use optical alignment method. The very rough method was to use strings and human eyes, aligning the front to the back wheel.

3. What is a Side Slip Meter?It is an instrument that will tell how much the wheel will slide sideway on a free-to-slide surface. A perfect wheel alignment will have no sideway sliding movement on the wheels.

Types of Side Slip MeterThere are many different types of side slip meters. It ranges from simple and portable ones being used at home to the bulky and sophisticated types being used by the Tire Alignment Shops. This article will make an attempt to describe the simple and portable type that is available from Ebay at around S$230/=.


The Portable Side Slip Meter
The meter basically consists of 5 components:
a) The base plate
b) The small cylindrical rollers
c) The roller plate
d) The indicator needle and
e) The top plate

The components are all made of plastic materials except for the cylindrical rollers which could have been made from hard polyester material. The roller plate that contains the cylindrical rollers is designed to slide freely in between the top and the base plate. The sliding movement of the top plate is detected by an attached indicator needle that will tell the relative sideway movement of top plate.


Photobucket

Photobucket

Note: the above are automated GIF picture
The Wheel Alignment CheckThe tire alignment check is straightforward and easy using the portable side slip meter. Simply place the meter in front of the wheel. Drive and move the front wheel slowly and steadily over the side slip meter. The indicator will give the slip of the wheel.


DIY Side Slip Meter
It should not be difficult to DIY the portable side slip meter if you are a handyman type and have 3 Nos of 4-mm thick plastic sheets of size around 48 cm x 25 mm. The author will describe how to DIY this side slip meter if there are interested readers.

Other Related Sites
1. Car Aircon Compressor Repairs
2. Car Air-conditioning Part 1

3. Car Air-conditioning Part 2
4. Car Air-conditioning Part 3
5. Car Freon Charging for Novice
6. Car Safety Inspection and Check at Home
7. Replace Engine Oil by Vacuum


Sunday, January 27, 2008

Car Air-Conditioning Compressor Repair

Introduction 
 
The car's air-conditioning compressor has just failed. The mechanic quoted about S$700 for the repair including the replacement of filter and the Expansion valves. What to do next?


FAQ

1. Can I trust this mechanic? 

The mechanic is probably right. The cost of the repair is also reasonable. You have just checked with the other shops; 

2. Have I been taken for a ride? 

After the repair, the air-conditioning worked fine for a year or two; then, the second compressor failed suddenly. One soon realizes that he has been taken for ride.

3. How to avoid?

Compressor usually has a life span of more than 8 years. It failed in the first instance because there was not enough lubrication. The second new compressor failed again because of improper repairs.


It is unlikely that one could tell if the mechanic had carried out a proper repair job because the air-conditioner performed well; also, common instrument won't tell the difference. However, one could avoid this kind of shoddy work done by observing and listening to what the mechanic has to say about the repair.

Assess the Mechanic by Observation

 1. Observe and find out what tools and equipment that the mechanic has owned. If he does not own a air-conditioning flushing machine, most likely he is not fit to replace the compressor. This is because when the compressor failed, it will send “sprinkles “ or tiny bits of iron chip, all over the air conditioning system. These sprinkles must be removed;


2. Observe if the mechanic keeps his tools and instrument tidy and clean and that he has calibrated his equipment regularly.

This will tell the differences between a Professional and a non-Professional.

3. Find out if he has repeated customers; however, this might not be a good indication alone because many customers are more looking for cheaper repairs;

Assessment by Listening

He could have said:-
a) “We do not own flushing machine but we use air compressor and cleaning fluid to flush the system”; then he added that “we have done this for hundblacks of car. No problem”. Most likely, he has been using non-approved method to carry out the work.

b) “We will dismantle the components one by one and blow the sprinkles out using air compressor”. Avoid this mechanic as sprinkles stuck to the oil surfaces are not easily to be removed by air compressor alone; also, there is a lot of hard work to dismantle each and every component;

c) “There is no need to flush…”; then, better walk out on him and put your car in another better hand.

The Experience

The author recently replaced his air-conditioning compressor DIY. He found many old and rusty sprinkles after flushing the Evaporator. These sprinkles could have been left sitting in the Evaporator for years and some of which could have found its way to the compressor to cause the earlier compressor failure.

Other Related Sites
1. Car Air-conditioning Part 1
2. Car Air-conditioning Part 2
3. Car Air-conditioning Part 3
4. Car Freon Charging for Novice
5. Car Safety Inspection and Check at Home
6. Replace Engine Oil by Vacuum
7. Wheel Alignment Using Sideslip meter


Animated GIF for Discussion Board Set 3

More free and interesting animated GIF to liven up Discussion Boards can be download by clicking the "Free Animated GIF for Forum" on the right drop down panel.
For small picture, right click the thumbnail then choose "save picture as".
For larger picture, double click the thumbnail, then right click that larger picture and choose "save picture as".
Download Avatar of the same picture from here and here


Saturday, January 26, 2008

Animated GIF for Discussion Board Set 2

More free and interesting animated GIF to liven up Discussion Boards can be download by clicking the "Free Animated GIF for Forum" on the right drop down panel.For small picture, right click the thumbnail then choose "save picture as".
For larger picture, double click the thumbnail, then right click that larger picture and choose "save picture as".
Download Avatar of the same picture from here and here


Animated GIF for Discussion Board Set 1

More free and interesting animated GIF to liven up Discussion Boards can be download by clicking the "Free Animated GIF for Forum" on the right drop down panel..
For small picture, right click the thumbnail then choose "save picture as".
For larger picture, double click the thumbnail, then right click that larger picture and choose "save picture as".
Download Avatar of the same picture from here and here


Friday, January 25, 2008

Make Youtube and Google Video DVD

Introduction
Youtube and Google video files can be downloaded as FLV files. Nero 8 now supports FLV files. One can use Nero 8’s Nero Showtime to play these FLV files and also can use Nero’s Nerovision to make a DVD of one's favorite Youtube or Google videos, .

FAQ
1. What is a FLV file?
FLV files are actually Flash Video Files developed by Adobe System Corporate and has an extension '.FLV'.

2. Can Nero 6 or Nero 7 play these FLV files?
No. The feature is only available in Nero 8. Nero 6 and 7 do not recognize the FLV files as video files

3. Where Can One Download Nero 8 ?A trial copy of Nero 8 can be downloaded from here

4, What Else Do One Need to Burn the DVD?a) A blank DVD
b) A DVD burner

5. How Long it Would Take to Burn one Video?
Depending on the speed of desktop/Notebook and the amount of Rams available, one should be able to burn a standard DVD of 4.75 GB in less than 20 minutes.

Next Step
1, Download the FLV files from Youtube or Google video website.Many websites offer free downloading service for Youtube and Google videos. They can convert the videos into FLV files to be saved in the harddisk. One of such websites is here.
One can also download this little free program called FreeFLVconvert from here.
Note1: Youtube kept changing its configuration. When the website or the program does not work, search updates or use other sites.
Note2: Some websites only accept youtube’s address without the “&” and qualifications after that.

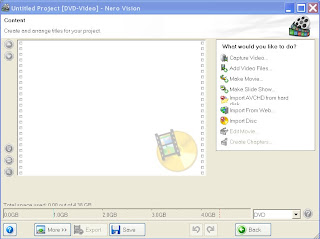
2. Now, start up Nero from Nero SmartStart. Select Nerovision and then 'Make DVD' and "DVD Video", one would be greeted by this screen.


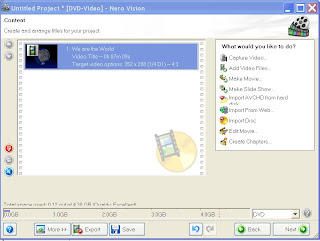
3. Select 'Add Video File’ and start looking for where one has saved the FLV files and load them. Nero will convert the FLV files automatically into Nero video files with thumbnail picture as shown


4. Repeat step 2 for another Youtube or Google FLV file;

5. When completed adding video files, edit the Nero video files if necessary by double-clicking the thumbnails or selecting the video and then clicking “Edit Movie”;

6. On completion, click 'Next' and select the introductory short video or page. After that, continue clicking 'Next' until one reaches the page to burn the videos into DVD. Select the correct Burner here and click "Burn". Nero will start transcoding and do the rest.

Other Related Sites
1. Making Movies Using Nero 8
2. Professional Music/Audio Recorder


iPhone and iPad: How to Create a Short Cut in Home Screen to Clear Cache & History

23 November 2024 What are Cache and History? Cache and browser history store information about websites you've visited.  The C ache s to...