No floppy drive to install that SATA driver for XP installation? Wanting to incorporate XP service pack plus the drivers into the XP installation or recovery disk? This article will describe an easy step by step procedure, call slipstreaming.
FAQ
1. What is Slipstreaming?Slipstreaming is a jargon used here to mean integrating and incorporating the new XP installation files, drivers and other necessary files into the existing to create a totally new XP installation CD;
2. Why Slipstreaming?
One would save time when installing or repairing the XP operating system as one would not have to reinstall the Service Pack and drivers; also, if one does not have a bootable floppy drive for the XP installation, slipstreaming that SATA driver is one workable method .
3. Is it Difficult?Not any more difficult than XP system installation although one might need to prepare and download the free software and the necessary drivers.
4. How Much Additoinal Disk Space?The computer should have about 1.5 giga bytes of disk space left to include also the ISO images.
5. Other Ways to Solve that SATA Problem in XP installation?
Try entering into the BIOS setup at computer startups. If one could find an option in the BIOS setup to disable the Native SATA mode, disable it. One might be able to install the XP without the need of slipstreaming the SATA driver.
PreparationOne would need to do the following :
1. Download a copy of nLite.
2. Make ready the XP installation disk
3. Download the necessary drivers. Unzip or unrar them into anotther folder of the harddisk/CD. If one is making a recovery from existing computer, one can use this software to extract and create a list of existing drivers.4. Download or prepare newer Service Pack and store them in harddisk/CD
5. Make available a copy of CDROM Burner such as Nero
Next Steps
I) Starting up1. Create a New Folder in the harddisk to store the new XP installation files and the other files;
2. Start up nLite. The program will ask and assist one to install Microsoft.Net Framework if one does not have one. Restart nLite after the installation. Select "Next" in the starting screen and one would be greeted by the following screen:
3. Insert the XP installation disk in the CD drive and browse to select the location of the XP installation disk; soon after, nLite will ask for where to install the XP files. Select the New Folder that one has just created earlier. nLite will begin copying the entire XP files into this new folder.
4. When completed, it will give a summary of what has been copied.
II) Installing Service Pack and Drivers1. Continue clicking “NEXT” until one reaches the following screen to select “Service Pack” and the Drivers to slipstream; also select to create ISO image which is require to burn the new XP installation Disk:
2. Further clicking of “NEXT” will bring user to the following page, asking user to select the location of the new Service Pack. Remove the XP installation Disk and insert the Service Pack CD into the CD drive. Click “Select”. nLite will start to merge the files together into the New Folder.
3. On completion, click “Next” and nLite will ask for installation of the XP drivers. Select "insert" to upload the necessary drivers, for example the SATA drivers that one wishes to integrate into the new XP installation Disk'
Select 'Multiple driver folder". Nlite will come up with a list of drivers that are in the folder. Pick the correct driver to insert.
Note: nLite will always try to find the .inf file; so please try to unzip or unrar the driver file if they are in ZIP or RAR form. The driver should be unzipped to the new folder that was created earlier during startup and they must have the following files:-
a) txtsetup.oem to tell where nlite can locate in the drivers in the new folder. One may need to edit the directory where the drivers are located
b) The driver files. In the case of VIA Raid:-
- viamraid.cat
- VIAMRAID.INF
- viamraid.sys
4. On completion, note the total size of the image compiled. Make sure to select the correct capacity of CDRW disk or CDR disk that is larger than the compiled program.

II) Burning new XP Installation Disk
5. One can either choose the in-built ROM burner or an external ROM burner such as Nero to burn ISO image directly to a CDRW disk or CDR disk. CDRW is preferred because it is not always that the result would be acceptable.
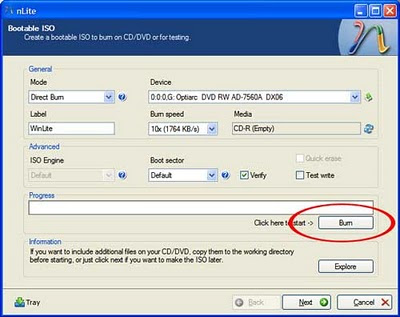
a) Use in-built ROM burner
After having press next, the following screen will appear. Select "Direct Burn", select the lowest burn speed, and click "Burn". Dont forget to check "Verifiy" (optional)
b) Use External ROM Burner such as Nero Burner.
Once completed, the following screen should appear, asking user to create the ISO image. Click "make ISO" to create this image file.
On completion, nLite will write an ISO image file called “WinLite.ISO” in the select folder. One could always choose other name the for ISO file.
Select "create image" in the next page and create a ISO image in one of the folder where one can find it later.
6. Further clicking of “NEXT” will start the compilation and integration process. Successful completion will be greeted by nLite.
Create XP Disk Using Nero Burner
1. Start up Nero 8 (obtain trial copy from here) and the following main screen will appear:
2. Click the Nero icon at the left bottom corner and select “Nero Burning ROM” in the list and a new screen will appear:
3. In the new ISO screen, click “New”. Select the New Folder that contain the "Winlite ISO".
4. In the following screen, drag the file “Winlite.ISO” to the left hand window and click ok when prompted.
5. Back to the ISO screen, once the button "Burn" is clicked, Nero will start the CD burning process and make a new XP installation disk with all the necessary updated files and drivers incorporated. It might take roughly 15 to 30 minutes depending on the speed of the computer.


Easy to follow directions, solved the problem, thank God I'm not stuck with Vista...yet. thank you!
ReplyDelete