Want to update that BIOS in your ASUS motherboard? Just been to the ASUS website and were confused? This article will describe a step by step procedure of a simple method recommended by ASUS to flash the BIOS.
FAQ
What is a BIOS?A BIOS (Basic Input/Output System) is a set of instructions that a computer uses to start computer operation. The BIOS is located on a chip inside of the computer.
What is Flashing?
This term, flashing, is loosely used in computer jargon to mean updating or over-writing the BIOS data stored in the chip.
Why Flashing?Newer hardware might not work in the computer; also, virus might have attacked the BIOS, making computer behaved differently. Flashing of the BIOS might fix these problems. However, if one’s computer has been working fine, it is advisable not to flash the BIOS as an incorrect flash could damage the computer.
What’s Required ?
1. Find a blank floppy disk or CDRW or USB thumbdrive;
Note that the computer must support booting from these device; for example, older motherboards can boot only from floppy disk. Please check the motherboard manual for such capability. One could also check the booting capability of the computer from the "BOOT" page of the BIOS setup.
Preparation1. Download the latest BIOS from ASUS website;
2. Unzip the 3 files, AFUDOS.EXE, the ROM and a txt file into a folder in the harddisk;
3. Rename the ROM file. (See Note 1);
4. Insert the floppy disk/CDRW/USB devices; format if necessary;
5. Copy the unzipped files into the floppy disk/CDRW/USB devices. (See Note 2);
6. Remove the floppy disk/CDRW/USB device;
7. Restart the computer
Note1: The computer will look for a ROM file with a specific file name at starting; for example, P5LD2-SE.ROM. That specific file name can be found by examining the root directory of the Motherboard CD; however, if one does not have the Motherboard CD, then one would have to find out the specific file name during rebooting as computer will inform user that it could not find that file name in the floppy/CDRW/USB device.
Note2: If one wants to copy the files into a CDR or CDRW, one would have to burn the 3 files into the CD using the Nero or other CD Burners;
Note3: Important. If one is using XP or Vista system, do not use the Windows’ in-built unzip program to unzip the BIOS files into floppy disk directly. Doing this will overwrite track 0 of the floppy disk, making it unusable.
Next Step
1. Immediately after starting up and when the computer is performing the POST to check the memory and other functions of the computer, depress "ALT"
2. Thereafter, the computer will start searching for the correct ROM, starting from the floppy disk, then CDRW and USB device, according to the sequence specified in the BOOT page; it will flash the name of the ROM file if it cannot find it from the devices. This file searching will go on and on until it can find the ROM file or when it receives a "Alt-Ctl-Delete".
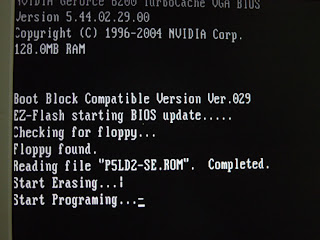
3. Insert the floppy disk/CDRW/USB device. The computer will show the following screen when it has found the correct ROM and flash it successfully.

4. The restarting may require the user to update the CMOS by hitting F1 because the CMOS may not have the correct checksum for the new BIOS.
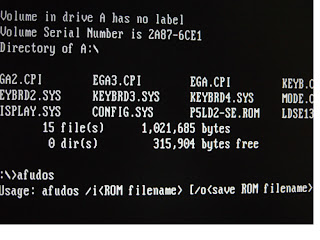
Note1: It is always recommended to save a copy of existing BIOS but the above simple method does not have this function. To save a copy of existing BIOS, one must prepare a bootable floppy or CDROM or thumbdrive. After booting, type afudos /? after the A> prompt to get a short instruction as shown. (Tips: when entering the ROM filename, follow the example in the screen exactly without leaving any space between the i or o and the filename) .
Note2: After having flashed the BIOS, one might be told that "This device can perform faster if you connect it to a Hi-Speed USB 2.0 port" when one use USB drives. This is because the BIOS have a default to set USBs to use USB 1.0. Simply go to the BIOS setup page and enable the USB2.0 port.

Expected Problem
1. After successful flashing, one might find the computer starting up with a black screen. This may be caused by the CMOS having a checksum error. Try shutting down the computer, remove the CMOS battery and re-install it to reset the CMOS;
2. If the resetting of CMOS does not solve the problem, the BIOS in the chip could have been corrupted. The recommendation is to restart and re-flash again from the floppy disk. There are chances that one can still recover a corrupted BIOS chip so long as the BIOS Block Section of the BIOS chip has not been damaged.


Thanks Dude thats really helps... :)
ReplyDeleteAfter exploring a number of thee articles on your website, I honestly appreciate your technhique of
ReplyDeleteblogging. I added it to my bookmark site list and will be checking back soon. Take a look at my
website as well and let me know what you think.
Feel free tto vist my homepage :: http://youtu.be/9l7B6gP_OEE (http://juegosdefutbol2014.org)