Making a Movie? This article will describe how one can do this without using any expensive equipment.
FAQ
1. What One will need?
a) A digital camera or digital video camera with capability of taking reasonably good picture and video. It would facilitate quick transfer of pictures/movies if the camera has memory card that can work with your PC or notebook;
b) A working PC or notebook that has a DVDRW drive.
2. What Additional Software?
a) The Nero Vision that comes bundled with Nero Burning software;
Note: Nero Vision version 4 and above is preferred as it allow the mixing of pictures and movies freely during editing. The newer versions can be found in Nero 7 or Nero 8.
Preparation
If one does not have a copy of Nero Burning Rom, please download a trial copy from Nero site
Next Steps
I) Start up
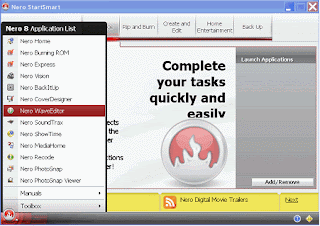
1. Start NeroSmartStart and one would be greeted by the starting page;
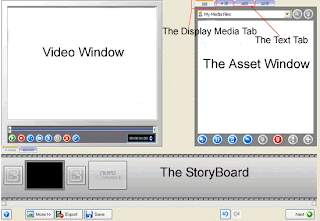
 2. Click the Nero icon at the bottom left hand corner and select Nero Vision from the list. In the new screen, select “Make Movie” as the next choice. One would reach the Nero Editing Screen with 3 windows, namely: the Video, the Asset and the StoryBoard windows:
II) Adding Movies and Pictures
1) To add the movies or pictures
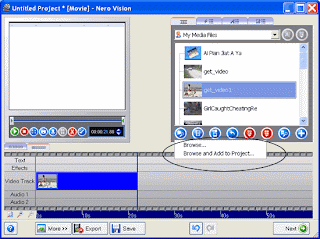
a) Click the first button, “Browse for Media” in the Asset Window. This button will be activated when the “Display Media” tab is selected;

b) Click and select “Browse and Add to Project” to attach the first picture or movie.
2) Repeat step 3 until one has completed a chapter, then click “Next” to return to another main screen. In here, one should see the first chapter of the movie;

3) To continue adding more chapters, click “Make Movie” and repeat step 1 and 2
III) Editing
1) To edit the movie.
• Doubleclick the chapter icon in the Main screen to reach the editing screen again.
2) To cut the movie
In the top left hand window as highlighted (edged red), for:
a) Rough Cutting
• Drag the left or the right tab to the correct location.
b) Fine Cutting
• Click the left or the right tab; the triangle in the tab will change color
• Click the spinning button up or down to move the movie in deci-seconds.
Note: The “XXXX” will appear when one drags the tab. It indicates the portion of the movie to be cut. If one cannot find the tab, try clicking the thumbnail of the movie in the “StoryBoard” window.
3) To add a moving effect text in the movie
• Select the Text Tab and the text movement in the Asset Window. The StoryBoard window will change to Timeline window. For example, if one wants the text to zoom in and out, select “zoom In/Out” by doubleclicking it. A “Properties” window will pop up.

• Enter the appropriate text replacing the “Sample Text”. Close the Property. One should find a Text bar shown in the Timeline Window.
• Drag this text bar to the exact location where one to show the moving text;
4) To add music or sound file
• Select the “Display Media” tab in the Asset Window. Click the first button, “Browse for Media” to add the music or sound file;
• After adding the file, the Timeline Window will appear, showing the music/sound bar which indicates the location and the actual length taken to play the music or sound file;

• To prevent double playing of sound in the movie and the music file, doubleclick the movie icon or the music/sound bar in the Timeline window, another property box will pop up. Drag the volume to zero to silent the sound of the movie or the music/sound. One can also lower the volume to play them in the background;
IV) Saving the file
One should always save a copy of the project file whenever convenience. It will only take seconds to save this copy and few seconds rather than hours to restore the work. To save a copy of the work, just click the diskette icon at the lower bar of the Nero Vision screen.
IV) To burn the Movie into DVD
In the Main Screen, select “NEXT”, one will be back to the original screen to create DVD Movies. Save a copy of the project when prompted.
Other Related Sites
1. Make Youtube and Google DVDs using Nero 8
2. Professional Music/Audio Recorder


No comments:
Post a Comment