FAQ1. Why My Scanner Cannot Get Rid of the Viruses?The scanner might not have the databases of the viruses because it is new to the scanner; but some viruses are quite smart in that it can hide itself from detection once it resides in the memory. Some will lock themselves and prevent any detection; others might just restore the file when deleted.
2. What Are The Methods Recommended Here?
Manual detection and deletion. Windows has a Safe Mode to start up only few selected system components. As viruses are usually not part of the system components, it will not be started up and will remain dormant and therefore, one can detect and delete it.
3. What if the Virus is Part of the System File?Sometimes, the viruses will disgust themselves and replace or embed in one of the system files which will be started up with the computer. This will also happen in the Safe Mode startup of the Computer. Once activated, it might prevent Windows from deleting them in the Safe Mode. Fortunately, Windows has Signature Verification and System File Check (sfc) programs that can verify the integrity of the system files and flag or replace them if necessary.
4. Can The Virus Disgust System File With The Signature?
Signature are digitally verified, it will be difficult for viruses to disgust themselves. The verification is supposed to protect the computer from virus attack but this is never fool proof. One might be able to find a virus that can disgust system file with signature.
Preparation
Ensure the one has a copy of the XP installation disk
Step By Step
Step 1. The First Step: Restore the Operating System
This should be the very first step. There are 2 ways described here. If the restoration by choosing the "Last Known Good Configuration" does not work, then choose the 2nd method and restore the operating system to an earlier date and if this very first step failed to get rid of the virus;
Step 2: Removal of Viruses Manually1 Terminate Running Virus
a) Reboot and get into Safe mode (Pressing F8 in the start screen)
b) Sign in as Administrator
c) Unhide file scan by selecting Start>MyComputer>tools>Folder options>view, the select “show hidden files and folders”
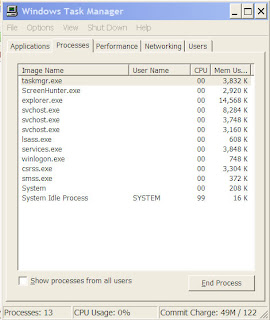
d) Press “Crtl-Alt-Del” to get into Task Manager (See Appendix 2 if one cannot activate Task Manager), then click the “Processes” tab". One should see only about 10 to 11 files running. These are taskmgr.exe, explorer.exe, svchost,lsass.exe,services.exe. winlogon.exe,csrss.exe,smss.exe.system and system Idle Process. Should there be other files or user names, just select them and click “End Process” to terminate it. This will end only the running of the program and does not delete the program.
2. Check File Signature Verificationa) Click Start>Run and in the dropdown box, enter “Sigverif” and click OK. One would be greeted by the following screen:
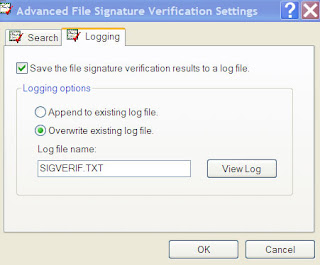
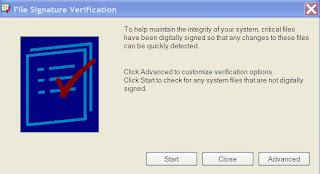 In the screen, click “Start”. The program will check all system file for digital signature. On completion, View log by clicking “Advance” and the “Logging tab”. There should be no non-signature file appearing in the list. If there is, locate the file by a search and try to change the extension of this file or delete it if one is sure that it is a virus file.
3. Check MS Configuration
a) Click Start>Run and in the dropdown box, enter “msconfig” and click “OK”, In the next screen, select “Startup” Tab, uncheck as many startup item as you can. This will only prevent the items from starting up and will not delete the files. Should you have found the virus file that you have found earlier, uncheck it.
4. Delete the Virus File
If one has found suspicious files, it is time to delete the files or if you are not sure, change the extension of the files to "tmp". One can find these files by using the search file function. Once complete, restart the computer normally. Sign in as an Adminstartor or its Team member.
a) Check Integrity of System files
After rebooting normally, check the integrity of the system files by using System File Checking program (sfc). Note that this sfc cannot be used from Safe Mode. Now, click Start>Run and in the dropdown box, enter “sfc /scannow” and click "OK", one will be greeted by the following screen
 If there is nothing happening after clicking the OK or the above screen does not appear, it could be because one does not have the permission or "certificate' to amend the protected system files. Goto Appendix 1 to obtain this certificate and restart the computer. One can refer to the website shown at this end of this article for other problems in using sfc.
On successful starting of sfc, the program will start checking the integrity of the system files and replace these files if necessary, It might prompt for the XP installation disk to copy some files.
b) Re-visit Processes Removal and Scanning of Signature FileRepeat the Processes of stopping the running of suspicious files and Scanning of Signature Files as in step 1 and step 2 above. . This time, one would find lot more files being run in the "Processes" tab folder of the Task Manager and also the log file of the Signature file scan will be much longer. Carefully scan through the list of files and note down the names and extension of the suspicious files. Then Google the web for information. If there are virus file found, try to stop them from running in the Task Manager and then, rename them or remove them if possible.
c) Ending Processes that Are Running
If one still fail to locate the virus, one can try isolating the virus by stopping each process that is running in the Task Manager in Normal Mode. Remove first those processes created by the users (identified by name) except for the "Explorer.exe", which is required for window navigation. Then follow by ending the processes of other file names. Avoiding ending the system processes because that will require user to re-start the computer. A list of such system processes can be found here. Note down the name of each process ended and check the computer's working. If the virus attack has stopped, then that must be the virus file. Rename or remove the file.
Stubborn Viruses Cannot Be ErasedIn case one cannot remove the virus because it is locked and protected itself from being deleted. Note down the particular of the file, such as file folder, the file name and the extension.
1 Method 1. Floppy Disk
If one has a floppy disk drive :
a) Format the floppy diskIn Start>MyComputer, right click the A: and the select Format. Insert a new Floppy disk and check the “Create an MS-DOS Startup disk” box and start to format and create a bootable floppy disk.
b) Delete or Rename the Files
Restart the computer and hit the manufacturer’s prescribed key (F2, F10 or delete button) to enter the Boot Set up and change the Boot priority to start from floppy disk. In the boot up screen, one should see an A:> prompt. Use the following instructions:
a) To change drive from A: to C: Enter "C:" and hit Return
b) To change the folder : Enter "cd\" (without quotes, similar for the rest) at C:> prompt, followed by the name of the Folder and hit Return
c) To list the files in a director: Enter "dir/w" and hit Return
d) To delete a file: Enter "erase " , followed by the file name and extension with a space in between them (for example, "erase auto.bat"
e) To rename the file : Enter for example "rename auto bat auto.tmp" and hit Return.
2. Method 2: Bootable CD
If one does not have a floppy disk drive, one would have to either use
a) XP installation disk. Enter into the Recovery Console, in the DOS prompt, find the folder and delete the virus file. A copy of the Microsoft's guideline on the use of XP's Recovery Console and the commands can be found hereb) Make a bootable CD using Nero Express or similar CD burning. Select the “making of bootable CD” option to make this CD. Reboot into the CD, find the folder at the DOS prompt and delete or rename the virus file
3. Method 3. Make a Bart PE Bootable CD or KNOPPIX Linux CD
Make a bootable BartPE CD or KNOPPIX Linux CD and boot from the CD drive. Navigate the program to the folder to delete or rename the virus file. The BartPE is preferred because it is in Windows platform with many plug-ins available for virus scan and other programs.
Appendix 1: If sfc cannot run. Obtain Certificate
1. Click Start>Run and in the dropdown box, enter “mmc”. A “Console” screen will appear,
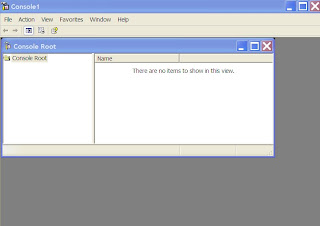 In the dropdown list of the file menu, select “Add/Remove Snap-in”. In the next screen, click “Add” and select “Certificates” in the dropdown list. In the new screen, select “Computer Account” and click “Next”. Finally, select “Local computer “ to complete.
2. Back to “Console screen” and in the right list, expand “Trusted Root Certificate Authorities” folder and double the “Certificate”, a list of certificates will be shown. Select “No Liability Accepted” and doubleclick to bring up the certificate and check to ensure that the expiry year is in 2004.
3. Export this certificate by selecting “Export” in the “All Tasks” dropdown after clicking the “Action” menu as shown.
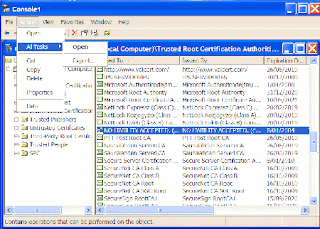 Save the certificate with a given name.
4. Back to the "Console" screen and in the Console's root directory, select “Trusted Root Certification Authority” and right click it to show a dropdown panel. Right click “All Tasks” and select “Import” to import the earlier certificate from the saved location.
Reboot the computer. The sfc function should now be working.
Appendix 2 : Ctl-Alt-Del Does not Bring up Task Manager screThe "Remove Task Manger" function has been enabled.
Window XP and 2000's Task Manager can be disabled by Administrator. If that is the case, Click Start and the Run, in the dropdown box, enter "gpedit.msc" (without quote) and click OK . One would be greeted by "Group Policy" window. In the left pane, expand the folder "User Configuration" and then the "Administrative Templates" . Click "Ctrl+Alt+Delete options". In the right pane, if the "Remove Task Manager" is enabled, doubleclick it and disable it in the new screen.Alternatively, for XP system one can use the following
a) Click Start then run, and in the dropdown box, copy and paste the following code: "REG add HKCU\Software\Microsoft\Windows\CurrentVersion\Policies\System /v DisableTaskMgr /t REG_DWORD /d 0 /f" (without quote) and click OK. the screen will flash. Now check if Task Manager has been enabled.
b) Start NotePad, copy and paste the following text :
Windows Registry Editor Version 5.00
[HKEY_CURRENT_USER\Software\Microsoft\Windows\CurrentVersion\Policies\System]"DisableTaskMgr"=dword:00000000
Click "save as" in the File menu and save the file as "taskmgr.reg" in one folder, then find this file and doubleclick it to update the system registry.
Other Related Sites
1. Window's Protection Files (such as sfc) May Not Start
2. Information on Recovery Console by Microsoft
3. How to System Restore
4. Creating a Troubleshooting BartPE Bootable CD
5. Problems on the user of sfc /scanow
6. Files names in System Processes
7. Task Manager Disabled


No comments:
Post a Comment