Saturday, February 9, 2008
Insert a Small Picture in the Title Block
Want to insert a small picture or an animated gif in the title block as shown above. This article will show one easy way.
Step by Step Procedures
1. Enter the Page Layout Editor and select “Page Element” Tab;
2. In the Header, click “Edit” and the following screen will appear;
 3. Upload the image by using the Browser or Enter the address of the animated GIF from Photobucket (http://photobucket.com/) or any other site that host the animated GIF;
4. Select “Behind title and description” and click “Save Changes” to save.
Note: If one views the blog page now, one will see the image or GIF stays behind the title block as configured;
5. Go back to the "Page Layout Editor" and now select the “Edit HTML” tab instead of the “Page Element” tab. The following screen will appear; 6. Tick the box for “Expand Widget Templates” to expand the scripts of various widgets that control the blog page;
7. Search for the following line that will show the Title of your blog (somewhere in the middle of the HTML page)

8. Scroll the page down until you reach the second “b:else”, which contains the source code for placement of image/GIF behind the Title;

9. Change the position of the image/GIF from the default of left to centre or right and also place + "margin-right: 5em;" immediately after "background-repeat: no-repeat; " as shown above.
10. Save the template and view the blog page.
Note 1: “Margin-right:5em” is a CSS (Cascading Style Sheets) code that specifies the margin, in character space, to the right of the image. Change the number to get the correct spacing.
Note 2: Make sure the image or GIF is small enough to fit the height of the Title.
Other Related Site
1. Embed Auto-GIF in Website/Blog
2. Embed Youtube in Website/Blog
3. Back up Blog the Super Faster Way
Friday, February 8, 2008
Fast Backup of Blog Acticles
Many blogs and web pages have recommendations about how one can backup the articles in a blog. Many methods or software recommended are either time consuming to use, requiring registration/payment or not user friendly. This article will introduce one other method that one can use to backup thousands of articles in just mere minutes instead of hours.
How?By using the Excel Spreadsheet's XML capability to read the RSS feed. Note that version earlier than Excel 2002 does not have this XML capability.
What is RSS Feed and What is XML Language?
RSS (Really Simple Syndication) is a file format that one can send updated articles quickly to the Readers;
XML (Extensible Markup Language) is a general-purpose computer language to facilitate the sharing of structured data across different information systems; for example, the Internet. It is often the language specified in RSS feed.
How Does it Compare?
This method can store thousands of articles in mere minutes instead of hours, limited only by memory and harddisk space.
What are the Other Limitations?This method can store only html of the articles, the various links and other statistics. It does not store the images. The other limitation is that it may truncate any article that is more than 4,000 words or 19,000 characters or roughly about 12 pages per article (Excel 2003 and 2007 can actually store up to 32,000 characters in a single cell if spaces are included). Also, this method will back up only the published articles.
Why?Because this method makes use of MICROSOFT EXCEL as a RSS reader and EXCEL does not recognize image feed; also, it has limits on the number of characters that each Excel cell can hold.
What is the Workaround?One can use other software, such as "HTTrack Web Copier" to backup the blog once in a while. The author tried HTTrack. This program took him about 40 minutes and used about 50 MB of space to backup all the 33 articles in his blog; on the hand, the new method took him less than 5 seconds and about 600 KB of disk space.
PreparationOne would need the following :
a) A copy of Microsoft Excel installed in the computer;
b) A harddisk space of not less 500 KB for about 33 articles;
Things to do Next
1. To Backup the Bloga) Start Internet and enter the following in the address:
http://yourblogname.blogspot.com/feeds/posts/full?max-results=10000;
Replace yourblogname with your real blog name.
b) Click “go” and one would be greeted by the usual file download screen.
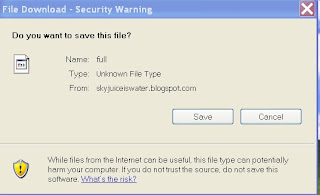
Save the “full” file to a folder that you can remember; the file will be completed in seconds.
2. To Restore Blog Articles
a) Start Excel. In the File Menu, open the “full” file and one would be asked if one wants to load this file “as an XML list”, click ok;
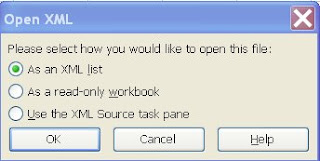
b) after that, Excel will load up the following screen that contain all the articles for the blog;
c) Look for a column that list the “Content” or “Description” of the blog; such as the one showed in solid square.
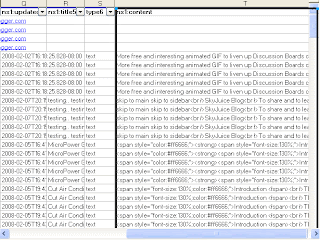
d) Check to make sure that it contains the necessary HTML language. Try to copy the entire content in the Excel Cell of the article that one is prepare to restore;
e) Goto the blog, paste this content in the blog's HTML Editor for the article. If the reference images and the website addresses are intact and valid, they will be restore automatically as if they were original copy of the article in the blog.
Process Automation
1. The Author has a little Excel Program to automate the process of downloading the RSS feed of the blog into the an Excel file called Blogback.xls.
2. Download this "Blogback" program which is only 185 KB into a folder. Doubleclick the program in the file menu of folder will show a screen to "Enable/disable the macro". Enabling the macro will start "Blogback" that will allow users to maintain 3 blog sites.
Note 1: The computer must have Microsoft Excel Installed.
Note 2: Users are free to examine and modify the source code which is available for view by selecting Tool/Macro/Visual Basic Editor in the Excel Sheet. It should contain no viruses/spywares.
Note 3: The Author only tested this method in Microsoft Excel 2003. "Blogback" should also work in earlier versions if they support the imports of XML files.
Other Related Site
1. Embed Auto-GIF in Website/Blog
2. Embed Youtube in Website/Blog
3. Insert Small Pic in Title Blog
Tuesday, February 5, 2008
MicroPower Generation in Singapore
Power Generation and Distribution in SingaporePresently, Singapore imports natural gas from Malaysia and Indonesia and bulk of which are for power generation. About 80% of Singapore’s total power demand of 5,000MW are from natural gas. Singapore has 8 power generating companies and one power distribution company, called the PowerGrid.
What is MicroPower Generation?MicroPower Generation more refers to on-site, small scale power generation that uses alternative source of energies such as wind, solar, natural gas and other energies. Overseas examples, especially those in US, will show that one can use natural gas to power Fuel Cells and Microturbines to generate electricity, heat and cooling on site for homes and offices. Judging from the sales of the companies selling these products, there is an increasing trend for on-site MicroPower generation. Presently, on-site generation systems in US are producing 135 billion Kwh per year or about 3.6 percent of U.S's generation
What is Fuel Cell and what is Micro-Turbine?
Fuel Cell is an electrochemical device that produces electricity silently without combustion. In a Fuel Cell, electricity can be generated by combining hydrogen fuel extracted from natural gas and the oxygen derived from air. Fuel cells can produce enough heat to generate cooling as well as heating for use in homes and offices. Fuel cell, like battery, has no moving parts except for the chemical reactions between hydrogen and oxygen. Fuel Cells can be packed to power a car or on site to supply energies to building complexes.

Microturbines are actually miniature combustion turbines that have been used in small jets or as auxiliary units in airplanes. It has approximately the size of a refrigerator and can generate electricity from 25 KW to about 500 kW. Similar to Fuel Cells, Microturbines can also generate cooling as well as heating energies. The details and the workings of the Microturbine can be found here.

For efficient use of natural gas, Fuel Cells and Microturbines are sometimes combined such that waste heats from Fuel Cells are used in the Microturbine and vice versa.
Why MicroPower Generation?
Large power plants are 15-20% less efficient than MicroPower generation because they can’t make use of the waste heat effectively; also, there are losses over long transmission lines. Examples in US show that investment in Fuel cells or Microturbines can be repaid in the period between 3 to 5 years depending on the differences in the rates between electricity and natural gas. The rate increase in favor of natural gas will force more users to consider the use of MicroPower generation.
Can I use MicroPower at Home?Today’s Fuel Cells and Microturbines from the stores have generation capacities above 25KW which is too big for home that requires only about 3 KW of electricity. They would be more suitable for residential complex, offices or factories, which usually consume more than 25 KW; however, there is an experiment that uses Fuel Cells to power a house in UK.
What About Cost?Microturbine will cost roughly US$1,200 to US$1,500/= per KW whereas Fuel cells, 4 times as much at US$5,000 to US$10,000 per kilowatt. However, Fuel Cells have lower operating cost of about US$0.07 to US$0.08 per Kwh as compared to US$0.10 per Kwh in the case of Microturbine. There were examples that the cost of these installations can be recouped within a period less than 5 years basing on today’s natural gas and electricity rates. In comparison, a normal power generation plant will
cost around US$ 650 per KW.
Would the Authority Permits?The generation and distribution of electricity in Singapore is regulated by Energy Market Authority (EMA). Present regulations do not permit anyone to retail electricity without first obtaining a licence from EMA; however, there are isolated cases where MNCs have generated power for use in their own hi-tec plants. Islandwide, ENV has permission to generate electricity from the refuses in incinerators.
Can I Connect to the Grid?There are reports that users of MicroPower in US have connected their devices and sell excess electricity to the Grid. However, it is not expected that PowerGrid will permit such connection when Microturbines and Fuel Cells become available, not until when there are regulatory policy on such connection.
Policies in other Parts of the WorldUS, Canada and European countries have regulatory policies governing on-site power generation to promote the use of MicroPower generation. This is because MicroPower generation is in-line with the Governments’ Distributed Generation (DG) policy that helps to ease power generation pressures in the countries. For example in US, the Public Utility Regulatory Policy Acts of 1978 stipulates the right for users of small generating plants to sell power to Public Utilities. These countries also offer incentives, such as cash rebates, for the use of Fuel Cells and Microturbines.
What are the limitations?Unlike electricity, Fuel Cells and Microturbine will need a few minutes for starting up; they are not instantaneous. These MicroPower plants are cost effective only when they are constantly in operation with a minimum base load; therefore, connection to the power grid is essential for economical operation. Besides the higher first cost, these MicroPower devices will occupy space and require fire safety consideration.
Conclusion
The use of natural gas will give an opportunity for Singaporean to consider on-site generation of electricity. Examples in US show that these MicroPower plants can be cost effective. Whether Singaporeans can effectively use the MicroPower plants will much depend on the Government’s policy for on-site generation.
Saturday, February 2, 2008
Cut Air Conditioning Bills by 50%
Introduction
How?
According to estimate, the air-conditioning bill can come to around S$850/= per year if one uses a standard HDB room for 10 hrs per day. Up to S$450/= or 50% of the bill can be saved.
Can you Explain?
In air-conditioning , about 30 to 40% of the cooling losses are through the walls and the infiltrated air that seep through door and window gaps. By moving the home office from a standard HDB room to a newly converted or partitioned smaller room, one can reduce the space of cooling and save as much as 35% and further, by using spot cooling, one can save another 18 to 20%.
What’s Spot Cooling?
Spot cooling is a term often related to temporary cooling or cooling of a specific area or equipment. Spot cooling has been used in industrial plants and factories for years. In our application, we refer to coolings directed to a room occupant.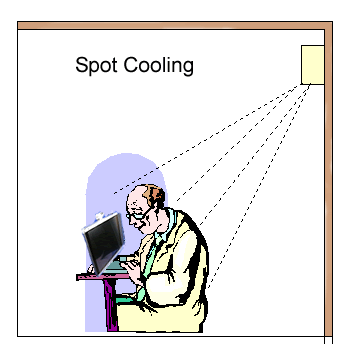
Is Spot Cooling Comfortable?
What about Housekeeping?
1) Air-conditioning system has sufficient charge of Freon. Experiments show that by undercharging Freon by 10%, it reduces cooling by 4%; however, ice would start to form at the coil when Freon level drops to 80%. According to some estimates, the cost of recharging can be recovered in a period of 3 to 4 months;
2) Air filters are often cleaned. Use disposable secondary filter if possible;
3) Evaporator and condenser are pressured-water cleaned at least once a year and chemical cleaned once every 2 years.
Friday, February 1, 2008
Car Freon Charging for the Novice
The car air-conditioning is getting weaker; ice was seen formed in the evaporating coil. One guessed the Freon was low. Can one recharge the Freon DIY at home? This article will try to answer some of these questions.
Why Freon leaks?Freon often leaks from piping joints, cracked pressure switch , expansion valve or corroded evaporator. The most common cause of leaks is from corroded evaporator which is often made from thin and flimsy aluminum material for some reasons. Leaks from piping joints are often caused by swelling or damaged O-ring which allows Freon to escape under the hot sun. Sometime, the Freon leakage is so bad that a full charge of Freon would completely disappear over night. This will happen in the case of a corroded evaporator.
What are the Synthoms of Low Freon?
When Freon level drops below 90%, the cooling efficiency would be reduced by about 4%. As the level drop below 80%, ice will start to form often in the evaporator. Further drop in the Freon level until high pressure of the compressor reaches around 20-30 psi, the low pressure switch will start to cut-in and stop the compressor from running to prevent further damage.
What are the Other Causes for Poor Air-conditioning?Faulty expansion valve and compressor can also cause poor air-conditioning; especially when one has just charged the Freon and there are enough Freon in the system.
How Do I Confirm if Freon is Low without Pressure Gauges?
Open the bonnet; look for the Filter/Dryer. On top of the Filter/Dryer there should a small glass window(sight glass) not larger than a 5 cent coin. Observe the color of the window carefully (one may need a torch light). If the car is short of Freon, the window would be whitish in color even when the engine is speeded up with the air conditioning switched on.
Why Window in Whitish Color?If the car is short of Freon, the Freon will bubble when it passes through the window. The small tiny bubbles are whitish in color.
What if the Window is clear and the Compressor is not on ?
Quite likely the low pressure switch has activated and prevents the clutch from engaging to turn on the compressor. Test if there is Freon in the system by momentarily pressing the nipple valve provided on the suction (larger) or the discharge (smaller) piping of the compressor with the engine switched off. There should be Freon discharge. If not, Freon could have completely drained. In that case, air moisture could have entered into the system and one should vacuum the system first before charging it with Freon.
I’m Prepare to Charge Freon; What do I need?One will need the following:-
a) A tank of correct type of Freon, either R12 or R134a depending on the age of the car;
b) A pressure connecting hose;
c) Some amount of correct type of compressor oil for air-conditioning system;
d) A strong torch light
Where can I get the supplies?
From the car air-conditioning spare part shops. Retail Freon comes in 25lb cylindrical tank, the oil in 1 litre bottle and the pressure hoses, in a set of 3. There are also recharge kits available in the Web that provides a short length of pressure hose, Freon gas and also compressor oil.
What type of Freon for My Car?
Pre-1990 models probably come with Freon R12 and the newer ones, Freon R134a. Check out from the Car Agencies what type of Freon is used for your car because Freon R134a cannot be used in an R12 system and vice versa.
Can I tell the difference between Freon R12 and Freon R134a?Both will be in gaseous state in discharged form. There will be no way to tell by sight. Instrument will detect all types of all refrigerant and blends.
Why I cannot mix the Freons?Oil used in R12 system is incompatible with the type used in R134a systems. Oil must mix well with Freon for it to be returned to the compressor for lubrication. R12 systems use mineral oil (YN-9) and R134a, synthetic oil (PAG YN-12 or Double End Capped PAG).
How much Freon do I need?
It varies from car to car. A modern car nowadays has roughly about 600 cc to 1200 cc. One could loss more than 50% of the Freon.
How much oil do I need?
It will depend on the amount of leakage. Minute leaks escape from the joints may need less than 5%. Assume 15-20% loss for normal leaks. The complete system has about 300 to 350 cc of oil
Is there an oil level gauge?
System is not designed to have level gauge because it is a pressurized and closed system. The amount of oil required to be charged will much depend on experience and guessing work.
What if I overcharged the System with Oil or Refrigerant?There is no indication that slight overcharging will harm the system; however, it is expected that one should not have over-charged the system with oil or refrigerant because oil is not compressible and too much refrigerant builds up pressure in the system. Over charging of oil can clog the air-conditioning components and starve the compressor of oil; undercharging of oil can destroy the compressor as well.
Should I fix the Freon leakage first?One should always fix the Freon leakage first because it will be a waste of time and money if these leakages are not fixed; but, there are times that leakages are minute due to regular use of the car under the hot sun.
Air-conditioning has high pressure; Is it dangerous?Any pressure vessel is dangerous to handle but air conditioning system has limited volume of Freon. Most cars come with pressure relief valve that will release Freon in the event of excessive high pressure but understand that the industry is doing away with this valve. Wear safety glasses if necessary.
Is Freon Dangerous to handle?It is not toxic as well as flammable. It is quite safe to handle.
Next Step
Charge the pressure hose or use a proper oil injector with estimated amount of compressor oil. Connect up the tank of Freon as shown attached.
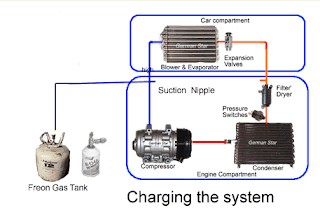
The pressure hose should be connected to the nipple valve of suction piping of the compressor (the larger of the two piping going into the car compartment).
With the engine running in idling speed, turn on the valve on the Freon tank slowly and observe the sight glass on the filter/dryer carefully. If the Freon is not adequate, the sight glass window will be whitish in color. Further addition of Freon should clear the bubbles especially when one revs up the engine a little (see animated picture).

On occasion that the sight glass window is still whitish or the Freon bubbles are still visible after some time of charging, suspect some trouble with the system or the compressor.
Important Note: Do not charge liquid Freon into the compressor as that will harm the compressor. When the Freon tank is turned upside down, most likely Freon will enter the compressor in liquid state rather than vapor state.
Testing and Commissioning
Do a test on the air conditioning system, the air vent should now blow cooler air if the system is fully charged up with Freon.
To ensure proper work is done:
a) Make sure the engine and air-conditioning are running smoothly;
b) Check the suspected area of leaks leak using soap bubble test if necessary.
Other Related Sites
1. Car Aircon Compressor Repairs
2. Car Air-conditioning Part 1
3. Car Air-conditioning Part 2
4. Car Air-conditioning Part 3
5. Car Safety Inspection and Check at Home
6. Replace Engine Oil by Vacuum
7. Wheel Alignment Using Sideslip meter
