There are 2 methods one can install XP operating system in the new PC/Notebook that has been preinstalled with Vista operating system.
Method 1: Replace Vista Entirely with XP Operating System
Method 2: Dual boot with XP and Vista in one computer
FAQ
1. Will the Installation Void Warranty?
Check with the manufacturer or its website. Some manufacturers have advised against downgrading to XP but most do not give indication about voiding warranty; also, some manufacturers like HP, will require users to re-install back the Vista operating system if the PC/Notebooks are to be sent back to them for repairs.
2. Do I Need Another Hard Disk for the Operation?Not necessary. The PC/Notebook can be re-installed back to factory defaults any time if one has already make a copy of System Recovery Disk. However, it will facilitate the recovery and re-installation of the operating systems if there is another hard disk.
3. How difficult to Install the XP or Dual Boot?It is not too difficult but XP system will need new drivers for the hard disk, network controller, sound system and other new devices in the new computer. This is because XP, being older technology, does not have these new drivers incorporated. Finding these XP drivers can be difficult if the manufacturer does not provide the support. Most computers will require a special driver for the newer SATA (Serial ATA) hard disk; otherwise, XP will not be able to find the hard disk during installation.
4. How to get Drivers if there is no Support?
One will have to depend on forums and discussion boards to get these drivers. "Google" with the model number and with words such as "XP drivers", one may be able to find some essential drivers.
5. How Can I Extract Drivers from Other PC?If one can find suitable XP drivers in other PC/Notebook, one can extract the drivers and use them for installation. Please email for details on how to extract these drivers.
6. Will Dual Booting Slow down Vista?
A dual or multi-boot computer can only load one operating system at a time. The operating system will have full access to and the control of the RAM and the computer; therefore, its operation will not be affected by the other operating systems although they reside in the same machine.
PreparationWhile one is still in Vista Operating System,
a) Download the SATA driver from the manufacturer’s site and save it in a floppy drive if one has a floppy drive; otherwise, one would have to slipstream the SATA driver into existing and create a new XP installation disk (see note1);.
b) Download the rest of XP drivers and keep them in a folder or CD (see note 2). The drivers could come in several forms. Many come with individual packages but there are some that come with compact format (with .info files). One can slipstream the drivers if they are in the latter format.
c) If one want to dual boot, download a copy of VistaBootPro from here or its Web page and save it in one of the folder in C:. Remember where you have saved this file.
d) Make a System Recovery Disk and back up the important data in the hard disk to the CDs or an external hard disk or thumbdrives. Important: One must make sure that the Sytem Recovery Disk will work by trying it out first. Also, make a copy of all the drivers available using this program.
Note 1: If the PC/Notebook's Boot Setup has a "Native SATA" mode. One can disable this mode without having to download and install the SATA driver.
Note 2: One could "slipstream" the SATA and the rest of XP drivers into existing and make a new XP installation disk.
Next StepsMethod 1: Replace Vista Entirely with XP Operating Systema) Boot from XP CD. One might have to change the boot sequence in the Boot Set up to allow booting from XP CD;
b) If SATA driver is required for the installation and if one did not "slipstream" the drivers, hit F6 when one see "'Press F6 if you need to install a third party SCSI or RAID driver".
 Then, press "S" to specify additional device in the next screen. At the prompt, insert the floppy disk with the SATA driver, press enter to continue. The computer will further prompt for selected driver. Select "VIA Serial ATA RAID Controller (Windows XP)" to install the SATA driver and continue with the installation.
c) If one has slipstreamed the drivers, just continue with the installation until one reaches the following partitioning screen;
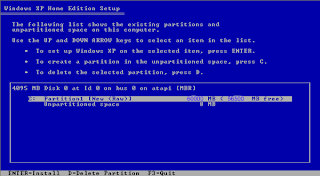
d) Select "D" to delete the partition. Window will prompt to confirm the selection. Select "L" to confirm and delete the partition.
e) Follow the instructions to create a new partition and subsequently, format the partition and then, proceed to complete the rest of the XP installation.
f) Remove the XP installation Disk and reboot the computer.
g) Proceed to install the rest of the XP drivers if one has not slipstreamed the drivers into the XP installation Disk (see note2).
Note1: If XP installation cannot find hard disk with the SATA driver, it could be an incorrect SATA driver or the hard disk's cable may not have been connected correctly.
Note2: If the XP drivers are in a compact format (see Preparation b), one can use the Device Manager to install these drivers following the instructions here. (ignore the part on the downloading of HP drivers). Device Manager has a function to search for the required drivers if it is led to the right folder.
Note2: For some computers, there are reports that XP would not start properly without one having to delete the hidden partition created by Vista for making the system recovery disk. XP may experience repeating booting process. In that case, try rewriting the Master Boot Record and Fixboot or erase the hidden partition.
II) Method 2: Dual boot with XP and Vista in 1 computera) Make a new partition in the hard disk for XP
b) Follow step a), b) and c) in Method 1 until one reaches the following partitioning screen:
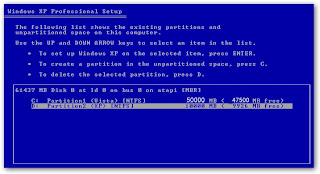 c) If the new partition is shown as "Unpartitioned Space", then select the Unpartitioned space, press “C” to create and subsequently, format the partition. If prompted, choose NTFS as the file system.
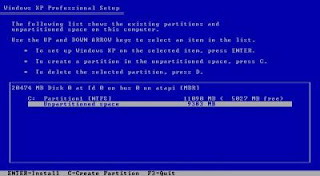
d) Continue with the rest of the installation as per normal instruction;
e) Reboot. This time, Windows will reboot into XP instead of Vista operating system. This is because XP, being an earlier version, cannot recognize Vista and has overwritten Vista's Boot Configuration Data (BCD);
f) When XP completes its booting, one should see a C: for Vista operating system, D: for XP operating system after clicking the "Start" and the "Computer" icons;
g) Proceed to install the rest of the XP drivers if these have not been "slipstream" into the XP installation disk. Check the network for proper connection to Internet because VistaBootPro will ask one to download Microsoft .Net.Framework when it is reconfiguring the BCD.
h) Start VistaBootPro and reconfigure the BCD to re-activate Vista operating system.
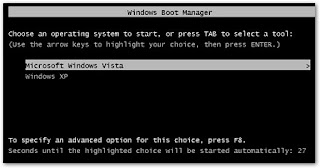
i) Remove the XP installation disk from CD drive and reboot the computer. One should now see two systems, the XP and Vista, being displayed in the Windows Boot Manager. Select either one system to boot and complete the installation by adding all the necessary XP drivers.
Other Related Sites
1. Dual Boot HP TX 1209
2. Making New XP Installation Disk
3. Forum on Downgrading of TX1000
Disclaimer: Efforts have been made to present the author's experience in correct details. Users are advised to do further research and checks by themselves. The author is not responsible for any damage (which should not have happened) as a result of any use of information contained in this blog.


 2. Click the Nero icon at the bottom left hand corner and select Nero Vision from the list. In the new screen, select “Make Movie” as the next choice. One would reach the Nero Editing Screen with 3 windows, namely: the Video, the Asset and the StoryBoard windows: