Search This Blog

Tuesday, February 12, 2008

Making Movies

Introduction
Making a Movie? This article will describe how one can do this without using any expensive equipment.

FAQ
1. What One will need?
a) A digital camera or digital video camera with capability of taking reasonably good picture and video. It would facilitate quick transfer of pictures/movies if the camera has memory card that can work with your PC or notebook;
b) A working PC or notebook that has a DVDRW drive.

2. What Additional Software?
a) The Nero Vision that comes bundled with Nero Burning software;
Note: Nero Vision version 4 and above is preferred as it allow the mixing of pictures and movies freely during editing. The newer versions can be found in Nero 7 or Nero 8.

Preparation
If one does not have a copy of Nero Burning Rom, please download a trial copy from Nero site

Next Steps
I) Start up
1. Start NeroSmartStart and one would be greeted by the starting page;
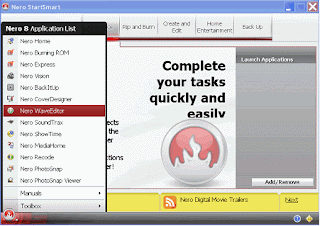
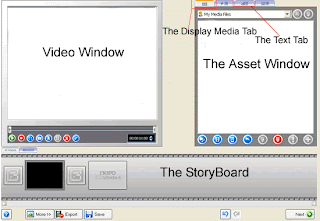
2. Click the Nero icon at the bottom left hand corner and select Nero Vision from the list. In the new screen, select “Make Movie” as the next choice. One would reach the Nero Editing Screen with 3 windows, namely: the Video, the Asset and the StoryBoard windows:

II) Adding Movies and Pictures
1) To add the movies or pictures
a) Click the first button, “Browse for Media” in the Asset Window. This button will be activated when the “Display Media” tab is selected;
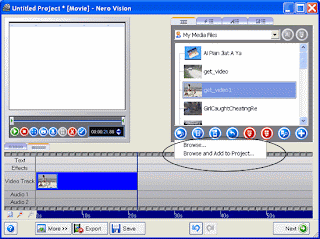

b) Click and select “Browse and Add to Project” to attach the first picture or movie.

2) Repeat step 3 until one has completed a chapter, then click “Next” to return to another main screen. In here, one should see the first chapter of the movie;


3) To continue adding more chapters, click “Make Movie” and repeat step 1 and 2

III) Editing
1) To edit the movie.
• Doubleclick the chapter icon in the Main screen to reach the editing screen again.

2) To cut the movie

In the top left hand window as highlighted (edged red), for:
a) Rough Cutting
• Drag the left or the right tab to the correct location.
b) Fine Cutting
• Click the left or the right tab; the triangle in the tab will change color
• Click the spinning button up or down to move the movie in deci-seconds.

Note: The “XXXX” will appear when one drags the tab. It indicates the portion of the movie to be cut. If one cannot find the tab, try clicking the thumbnail of the movie in the “StoryBoard” window.

3) To add a moving effect text in the movie
• Select the Text Tab and the text movement in the Asset Window. The StoryBoard window will change to Timeline window. For example, if one wants the text to zoom in and out, select “zoom In/Out” by doubleclicking it. A “Properties” window will pop up.


• Enter the appropriate text replacing the “Sample Text”. Close the Property. One should find a Text bar shown in the Timeline Window.
• Drag this text bar to the exact location where one to show the moving text;

4) To add music or sound file
• Select the “Display Media” tab in the Asset Window. Click the first button, “Browse for Media” to add the music or sound file;
• After adding the file, the Timeline Window will appear, showing the music/sound bar which indicates the location and the actual length taken to play the music or sound file;


• To prevent double playing of sound in the movie and the music file, doubleclick the movie icon or the music/sound bar in the Timeline window, another property box will pop up. Drag the volume to zero to silent the sound of the movie or the music/sound. One can also lower the volume to play them in the background;

IV) Saving the file
One should always save a copy of the project file whenever convenience. It will only take seconds to save this copy and few seconds rather than hours to restore the work. To save a copy of the work, just click the diskette icon at the lower bar of the Nero Vision screen.


IV) To burn the Movie into DVD
In the Main Screen, select “NEXT”, one will be back to the original screen to create DVD Movies. Save a copy of the project when prompted.

To burn the project into DVDs, click "Open saved project" and in the pop up screen, select the project saved and one would be brought to the "Content" page where icon of various chapters of the movie will be shown. Click "Next: will start the burning process after one has selected the introduction in the next page and review the movie using the "remote control". The burning process will take approximately 15 to 20 minutes depending on the speed and the amount of of memory in the computer.

Other Related Sites
1. Make Youtube and Google DVDs using Nero 8
2. Professional Music/Audio Recorder
Monday, February 11, 2008

Avatar Picture Set 2

Animated Picture reduced to 84x84 pixels for making of Avatar. To download, right click picture and select "Save Picture as"


Avatar Picture Set 1

Animated Picture reduced to 84x84 pixels for making of Avatar. To download, right click picture and select "Save Picture as"


>


Flashing BIOS Chip in ASUS Motherboards

Introduction
Want to update that BIOS in your ASUS motherboard? Just been to the ASUS website and were confused? This article will describe a step by step procedure of a simple method recommended by ASUS to flash the BIOS.

FAQ
What is a BIOS?A BIOS (Basic Input/Output System) is a set of instructions that a computer uses to start computer operation. The BIOS is located on a chip inside of the computer.

What is Flashing?
This term, flashing, is loosely used in computer jargon to mean updating or over-writing the BIOS data stored in the chip.

Why Flashing?Newer hardware might not work in the computer; also, virus might have attacked the BIOS, making computer behaved differently. Flashing of the BIOS might fix these problems. However, if one’s computer has been working fine, it is advisable not to flash the BIOS as an incorrect flash could damage the computer.

What’s Required ?
1. Find a blank floppy disk or CDRW or USB thumbdrive;
Note that the computer must support booting from these device; for example, older motherboards can boot only from floppy disk. Please check the motherboard manual for such capability. One could also check the booting capability of the computer from the "BOOT" page of the BIOS setup.

Preparation1. Download the latest BIOS from ASUS website;
2. Unzip the 3 files, AFUDOS.EXE, the ROM and a txt file into a folder in the harddisk;
3. Rename the ROM file. (See Note 1);
4. Insert the floppy disk/CDRW/USB devices; format if necessary;
5. Copy the unzipped files into the floppy disk/CDRW/USB devices. (See Note 2);
6. Remove the floppy disk/CDRW/USB device;
7. Restart the computer

Note1: The computer will look for a ROM file with a specific file name at starting; for example, P5LD2-SE.ROM. That specific file name can be found by examining the root directory of the Motherboard CD; however, if one does not have the Motherboard CD, then one would have to find out the specific file name during rebooting as computer will inform user that it could not find that file name in the floppy/CDRW/USB device.
Note2: If one wants to copy the files into a CDR or CDRW, one would have to burn the 3 files into the CD using the Nero or other CD Burners;
Note3: Important. If one is using XP or Vista system, do not use the Windows’ in-built unzip program to unzip the BIOS files into floppy disk directly. Doing this will overwrite track 0 of the floppy disk, making it unusable.

Next Step
1. Immediately after starting up and when the computer is performing the POST to check the memory and other functions of the computer, depress "ALT" and hit "F2", a DOS Screen will appear with a short description about flashing the BIOS;

2. Thereafter, the computer will start searching for the correct ROM, starting from the floppy disk, then CDRW and USB device, according to the sequence specified in the BOOT page; it will flash the name of the ROM file if it cannot find it from the devices. This file searching will go on and on until it can find the ROM file or when it receives a "Alt-Ctl-Delete".

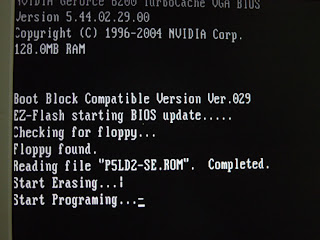
3. Insert the floppy disk/CDRW/USB device. The computer will show the following screen when it has found the correct ROM and flash it successfully.


4. The restarting may require the user to update the CMOS by hitting F1 because the CMOS may not have the correct checksum for the new BIOS.


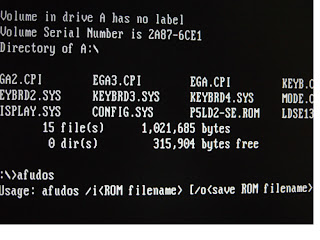
Note1: It is always recommended to save a copy of existing BIOS but the above simple method does not have this function. To save a copy of existing BIOS, one must prepare a bootable floppy or CDROM or thumbdrive. After booting, type afudos /? after the A> prompt to get a short instruction as shown. (Tips: when entering the ROM filename, follow the example in the screen exactly without leaving any space between the i or o and the filename) .
Note2: After having flashed the BIOS, one might be told that "This device can perform faster if you connect it to a Hi-Speed USB 2.0 port" when one use USB drives. This is because the BIOS have a default to set USBs to use USB 1.0. Simply go to the BIOS setup page and enable the USB2.0 port.


Expected Problem
1. After successful flashing, one might find the computer starting up with a black screen. This may be caused by the CMOS having a checksum error. Try shutting down the computer, remove the CMOS battery and re-install it to reset the CMOS;

2. If the resetting of CMOS does not solve the problem, the BIOS in the chip could have been corrupted. The recommendation is to restart and re-flash again from the floppy disk. There are chances that one can still recover a corrupted BIOS chip so long as the BIOS Block Section of the BIOS chip has not been damaged.


Burning CDROM or CDRW using Nero

Introduction
Nero 8 and earlier version of Nero has facility to import files and then burn these files into a CDROM or CDRW.

What is Required?
1) A copy of the Nero Burning Rom
2) A CDROM or CDRW

Preparation
Download the latest copy of the Nero Burning Rom if one does not have one in the PC

Next
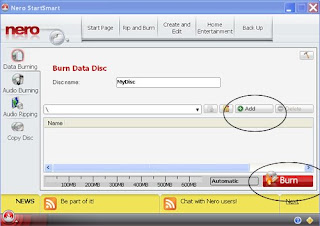
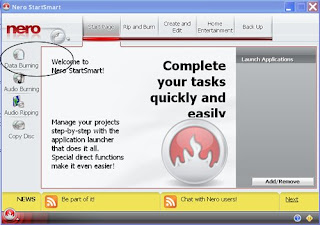
1. Start Nero 8 from Nero StartSmart and the following main screen will appear


2. Click “Data Burning” and then the “Add” button to select and add the files that one wants to burn into a CD


3. On completion of adding the files, click “Burn” button; if one has a blank CD in the CDRW drive, Nero will start checking the disk and writing to the disk. If the CD is not a blank, Nero will ask if one wants to erase the file.

3. If everything goes fine, Nero will inform the user about the successful burning.

Note: If one has a multi-session CD burnt earlier and want to add more files without erasing the existing in the CD, then select Nero Express by clicking the icon in the lower right corner in the main screen. After that, in the new screen, select either Data CD. one should see the existing files in the CD, click add button to add more files to the existing CD.


Saturday, February 9, 2008

Insert a Small Picture in the Title Block

Introduction
Want to insert a small picture or an animated gif in the title block as shown above. This article will show one easy way.

Step by Step Procedures
1. Enter the Page Layout Editor and select “Page Element” Tab;
2. In the Header, click “Edit” and the following screen will appear;

3. Upload the image by using the Browser or Enter the address of the animated GIF from Photobucket (http://photobucket.com/) or any other site that host the animated GIF;
4. Select “Behind title and description” and click “Save Changes” to save.

Note: If one views the blog page now, one will see the image or GIF stays behind the title block as configured;

5. Go back to the "Page Layout Editor" and now select the “Edit HTML” tab instead of the “Page Element” tab. The following screen will appear;

6. Tick the box for “Expand Widget Templates” to expand the scripts of various widgets that control the blog page;
7. Search for the following line that will show the Title of your blog (somewhere in the middle of the HTML page)


8. Scroll the page down until you reach the second “b:else”, which contains the source code for placement of image/GIF behind the Title;


9. Change the position of the image/GIF from the default of left to centre or right and also place + "margin-right: 5em;" immediately after "background-repeat: no-repeat; " as shown above.
10. Save the template and view the blog page.

Note 1: “Margin-right:5em” is a CSS (Cascading Style Sheets) code that specifies the margin, in character space, to the right of the image. Change the number to get the correct spacing.
Note 2: Make sure the image or GIF is small enough to fit the height of the Title.

Other Related Site
1. Embed Auto-GIF in Website/Blog
2. Embed Youtube in Website/Blog
3. Back up Blog the Super Faster Way

Simple and Easy Way To Backup Photos, Movies and Documents from handphones

 2 December 2023 In the past,  we used iTunes when we wanted to transfer or backup our photos,  movies, and documents from iPhones or Androi...