Search This Blog

Saturday, January 19, 2008

Repairing Car Air-conditioning (Part 1)

1. How Air-conditioning works?
2. The Special Tools and Equipment?
3. The Professional Must Owned Equipment?
4. The Professionals Verse Non-Professionals
5. Repairing Car Air-Conditioning (Part 2)
6. Repairing Car Air-Conditioning (Part 3)


Introduction

The Air-conditioning system of one's car started to blow hot air or one found frost in the evaporator. What went wrong? Part 1 of the article describes how the car air-conditioner works and what special equipment will be required to carry out the necessary inspection and repairs.

FAQ

1.. How difficult to troubleshoot and repair?

 If you are not a handyman type, it could be difficult as one might have to dismantle the mechanical components, and might have to crawl underneath the car to carry out the necessary inspection and repairs;

2. Do I need special tools and equipment? 

Yes. One would need at least high and low-pressure gauge to perform simple work such as inspecting if there is enough gas in the system and charging up the Freon;


3. What other material is required? 

To top up the Freon, one would need a small tank of the correct type of Freon, either R12 for the older cars or R134 for the newer cars. There is also a need to have the special grade of compressor oil ready in hand. To repair the air-conditioning, one would need to have a vacuum pump besides having the necessary replacement parts and the O-rings to seal the joints and pipes. As for the Professionals, they may have owned also the flushing and the Freon recovery system.

4. Can I DIY this special equipment also?

Yes. There are websites that describe how to DIY this equipment using simple and cheaper equipment but proper equipment is required for that serious mechanic who would want to do a good and lasting repair job.

back to top
How Air-conditioning works

Air conditioning works primarily on the principle of evaporation. Much like humans feeling the cooling when water evaporates from their skin; except, in air-conditioning equipment. the evaporation process is carried out at a very very much faster rate.
The media being used in most air-conditioners or refrigerator alike is a gas called Freon. The older car used Freon R12 which has now been phased out by Freon R134 because the latter is ozone depletion free.
https://blogger.googleusercontent.com/img/b/R29vZ2xl/AVvXsEgzDEJbs-FAh9SlkY7CF7bS6jNftgpEK7r_lqc_FIogP-NF3tAkpu6nLzRAO14H6AGk7usgPphEFvHuneoW-U52yKw2odzjwX8n80lApaMREhhQ2ko_SovFK7SN7MK0mwzAA7S3X0eGz4tl/s1600/Refrigeration++flow.gif
Doubleclick to expand the picture


The air-conditioning system for the car has about 5 major components as shown attached. The cooling process starts at the compressor. The Freon is first compressed from gaseous state to liquid state to a pressure of about 90-180 psi (600 -1200kPa), depending on the cooling requirement and the ambient temperature. Freon gets heated during this compression process and must be cooled by a fan(usually electrical or mechanical) in the condenser (the heat rejection). The liquid Freon, after being filtered by the filter/dryer, will expand quickly into the evaporator through a metered orifice called the expansion valve. This sudden expansion of the liquid Freon into a bigger evaporator chamber causes "violent" evaporation of Freon. This expansion process turns Freon from a liquid state to a gaseous state and picks up the heat from the car compartment (heat absorption). The gaseous Freon is then sucked back into the compressor at a pressure of about 30 psi (200 kPa). The cycle then repeats.

back to top
The Special Tools and Equipment

I) The Basic and Must-Have Equipment

1) High/Low-Pressure Gauge with Manifold

a) The tool is as shown below
https://blogger.googleusercontent.com/img/b/R29vZ2xl/AVvXsEiwiG0A7FDfyqHbuvHIh41ntZMbZYjmKkqVKF3x2uwMKp7Fh4vFyXEb6bv0DHi0aSrcu98zoniquZOL1qGVaXV9I6Wh5ykiX46CgU_f9gtCMNr3AjGZR9tJvUFxBm4VxT63FDHVwSpqX_K9/w140-h140-p/513DFHNNGEL._AA280_.jpg
Doubleclick to enlarge the picture

The gauge has the following components
a) 2 pressure gauges, one for measuring high or Freon discharged pressure (red in color) and the other is for measuring the low or Freon suction pressure (blue in color)
b) A manifold with 2 control valves to close the release of the Freon gases
c) 3 connection hoses, one to connect to the compressor outlet and the other to connect to the compressor inlet. The yellow one is for connection to the Freon gas tank.

2) Freon

The Freon is usually sold in a cylinder tank of about 25 lbs in weight. The commercial ones come in industrial cylinders whereas the hobbyists may buy them in canisters.

https://blogger.googleusercontent.com/img/b/R29vZ2xl/AVvXsEjBpMES-YMTdPt8iRd_eXrwX7dniqjjhEDRqRoSK53i72lH3HN54D9NVyhrOzfdMsU05tryOhyGPNAQQMWVH3xkMxTvVWb4FWHm1NhY5XnvGmUr_ymx5nss4lZDwuCLGGKnIpzIrw3rCBUD/w105-h140-p/a41d_2.jpg


The Must-Have Equipment for Repair Work

1) Vaccum Pump

One would need the vacuum pump to remove the air as well as water vapour trapped in the air-conditioning system after every repair job. Air and water vapour not only take up unnecessary space, but they are harmful also to the compressor. Normally, water will boil at room temperature of 25 degreeC when the vacuum pump reduces the system pressure to 25 mm of Hg. The vacuum pump should be left long enough (15 to 30 minutes) to remove all possible traces of moisture.
The vacuum pump should be capable of pulling at pressures twice the boiling point of the water or around 1 atmospheric or 760 mm or 29” Hg pressure.

2) O-rings and Replacement Spares


Faulty parts are often replaced than repaired. This is because many parts are not repairable. When purchasing replacement spares from the shops, ask also for replacement O-rings. Discharge the old O-rings as these are often deformed after use.

back to top
The Professional Must Owned Equipment

1) The Air-conditioning Flushing System

The purpose of flushing is to remove oil and debris in the system. Very often when the compressor seized up, it generated a fair amount of metal chips or debris which are trapped in the system, especially in the evaporator. If this debris are not removed, it will damage the replacement compressor.

The Professionals are seen to own and use such a piece of machine because the machines are not only expensive but also require frequent maintenance. The non-Professionals often do away with flushing totally or just flush them with mineral spirits or just petrol, utilizing compressed air to charge in the liquid as well as to dry and empty the cleaning fluid.

The Regulatory Equipment

1) Freon Recovery Equipment

Some countries, like the United States, have mandatory requirements for Freon to be recovered in order not to pollute the environment; however, many other parts of the World, especially in 3rd World and Asian countries. Mechanics have been seen to vent the Freon into the good air.


back to top
The Professionals Verse Non-Professionals

In countries that do not regulate car air-conditioning repairs, one would often find many non-professional setting up shops offering different rates for their services.
These non-professionals do not necessarily offer lower rates for the repair and servicing work; however, their work can do more harm than good to the car air-conditioning system. It is also good to be aware of such repair shops.

These shops often do not own the necessary equipment such as the flushing system. They also never renew their old and broken-down tools and equipment. Many a time, one would find the pressure gauges with broken glasses, tubes full of grease and dirt, and vacuum pump with either broken down pressure gauge or without any pressure gauge at all.
This non-professional would often ignore oil losses when charging the Freon and one would not normally realize until the compressors started to make noise a few months' time; by then, a replacement is required.

The author has been often "cheated" by these non-professional shops and therefore, writes this article for the benefit of the car owners

Other Related Sites
1. Car Aircon Compressor Repairs
2 Car Air-conditioning Part 2
3. Car Air-conditioning Part 3
4. Car Freon Charging for Novice
5. Car Safety Inspection and Check at Home
6. Replace Engine Oil by Vacuum
7. Wheel Alignment Using Sideslip meter

Friday, January 18, 2008

Home Made Food for the Koi Fishes

IntroductionWe kept 10 Koi fishes in our indoor pond; 8 of them survive for more than 10 years. We rear them from about 2 inches to more than 22 inches today. When they were tiny, we feed them with pellets. As their appetites grow, we prepare home cook meals. This article describes the few methods we used to feed these fishes.

Nutrition and Vitamins
Fish needs nutrition and vitamins to grow and survive; so, there is a need to feed the fishes with several different kinds of food.

Types of Food
At different occasions, we feed them with different food:
a) When we are in hurry, we feed them with pellets or just plain slide of bread; sometimes, we feed them with dried small fishes or shrimps we bought from the market;
b) When we have a little more time, we feed them with hard boiled egg or we just mix the raw egg with some dried small fishes or shrimps or sometimes, the pellets and fry them into a pancake, then cool it with water before feeding;
c) When we have more time, we prepare cookies. In here, we mix pellets, any leftover biscuits and other dry foods such as dried small fishes or shrimps and then blend them into powder. Finally, we mix the ingredients with raw eggs and hand mix them until they can be made into nice small balls for refrigeration. Make the balls large enough so that each ball is enough for one feeding.

Things to Observe When preparing the Food
a) There is no single nutrient that is capable of satisfying all the nutrient requirements of Koi. These nutrient requirements can only be completely met by blending various raw materials;
b) Test the food each time in small quantities when you mix and prepare new formulas. The food should be consumed within 10 minutes for each feeding. The fish may not like the new ingredients. Left over, if any, will quickly degrade the water quality;
c) The filtration system must be good enough to take all the food that you have just thrown into the water.

Important Observations
Koi fishes, like any other animal, are always:
a) Hungry at food feeding time; they would respond actively and swim faster than normal when one approaches the pond. They would take no more food when they are full. Feed them once or twice a day, and;
b) Actively swimming around, except during the night when they would stay quietly; if they are not active, it is time to investigate as they may be sick, requiring medical treatment;

The Koi fishes will always tell you when they are uncomfortable. They will be nervous and keep jumping out of the water often; at times, they may even jump out of the pond. It will then be the time to investigate the causes. The water quality would be the first to be suspected; there may be other causes that might have threatened the living condition. Check the water pump for reduced water flow or stoppage. Reduce the food consumption or increase the filtration capacity to suit the size and number of the fishes in the pond or the aquarium.

Other Observations
a) Kois can learn. They are timid at first when we have them. Always grouped and stayed away from us even when they are hungry. They would only take the food when we are away. This lasted few months until they started to take food away from our palms.
b) Kois are cleaners. They would clean up every bit of food they can find and the water in their area will always be cleaned. Dirt, if any, will be pushed away to one corner for easy siphoning. When we give them the right mix of food, we could hardly find any dropping. They would chew every bit until it is fine enough to be cleaned up by the filters.

End Note
With sufficient and effective biological wet and dry filtration system, we only clean our filters once every two years or when we need to repair the filtration system. We top up the water through a small dripping feed pipe and we provide an overflow drain pipe to maintain constant water level. We have never change the water since we set up the indoor pond 10 years ago.

We used simple and cheap materials for the construction of the filtration system and made the water to clean itself over and over again before returning back to the pond. We will write about the filtration system and the indoor pond construction if there are interests.


Note: Sorry about the picture quality... will update when I got another good camera,

Thursday, January 17, 2008

Embed Youtube/Google Video in Blog/Websites

Introduction
Want to embed Youtube or Google Video screen in your blog or website? Just follow the simple instruction described here

What you will need?
Nothing; except the Youtube or Google web address that one is about to embed.

Next Step
1. Goto the Youtube or Google Video web address;
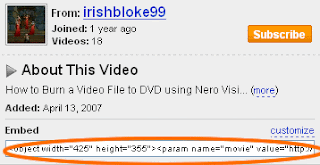
2. For Youtube, copy the little html code as shown in the attached;


3. For Google Video, one will have to click the "Email - Embed" or "About this Video" to expand the screen as shown, then click the "Embed HTML" code or html code and copy that code.


4. Place this little code in the Edit Html page (Not Compose page) at a location where one wants the youtube screen to appear and bingo, one got the Youtube and/or Google Video screens embeded in one's website or blog as shown attached.

Note:
1. Make sure the whole code is copied and pasted in the html page. For the Youtube code, it should start with "object" and end with another "object". For Google Video, it starts and ends with the word "embed". The html editor will re-code the sentence properly. One can change the size of the youtube screen window by changing the width and the height. One can also change the youtube address in the html code for another new screen.
2. For Google Video html, do not use Compose page to view as it would erase the video identification and one will get a blank screen shown. If one must view, use Preview instead.
3. One can also add the videos in the blogspot as video bar by utilizing blogspot's "Add a Page Element" in the customize page. The result is as shown in this blog with 4 small picture videos in the side bar.

Youtube Screen


Sunday, January 13, 2008

If One Can Hear It, One Can Record and Edit It

Introduction
Looking for a professional music or audio recorder? Look no further. This article tells how to make use of Nero Wave Editor.

FAQ
1.What is Nero Wave Editor?
This Nero Wave Editor allows one to record, edit and burn the music or audios into CDs or DVDs using the Nero Burning ROM or Nero Express. The Editor is capable of recording also any music or audio that you can hear on the computer;

2.Where can I find this Nero Wave Editor?
This Editor is bundled free together with the new Nero 8 Burning ROM software. A copy of the trial software is available from here;

3.What version of Nero 8 has been used successfully ?
Nero Wave Editor Version 4.1.0.0 that come bundled with Nero 8.1.1.0. This function is not available in earlier Nero 6 or Nero 7 versions.

4.Is this function described in the Nero Manual?
Not specifically mentioned in the Nero Manual.

Preparation
One will need a copy of Nero 8 and a new CDR or CDRW if one needs to record the music.

Thing to do next
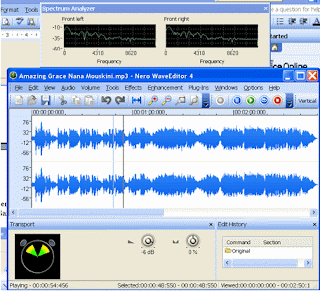
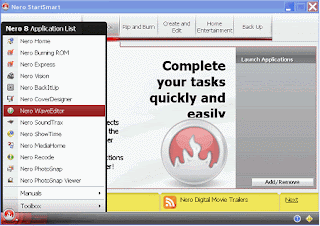
1. Start Nero from Nero StartSmart and then expand the menu to select the Nero Wave Editor:


2. In the File of the menu bar, select "New" to create a new file, then "Audio" and one would be greeted by the following screen:


3. Then select “Record” to get to the “Sample Format Setting” screen where one could select the quality of recording. Click ok to select the default, one should be greeted by the following screen:


4. Slide the Input level bar to “8” level (default is to set to the maximum sound recording) and then choose "Stereo Mix" or “Mono Out” in the “Audio Input line”;

5. Now start the recording session by pressing the red radio button and then play your music or audios as usual. Do not care about the exact start timing of the recording as one can always edit the recording later;
6. Click the same radio button again to stop the recording session and when one is satisfied with the recording, click the OK button, one would come to the following screen:


7. In the Audio Menu, select "Play All" or "Play Section" to play the audio. Follow the instructions of the manual to edit the music as required;
8. Finally, click “Save as” in the file menu to save the recording;
9. Repeat Step 2 to record the next song or audio and finally, use Nero Burning Rom or Nero Express to burn the audio collections into a CD or DVD

Tip: There are many functions available for one to edit the music. For the beginners, one needs to learn only how to edit the sound level, increase or decrease the recording volume to get rid of under or over recording and also, how to cut and then save the recordings.

Other Related Sites
1. Making Movies Using Nero 8
2. Make Youtube and Google DVDs using Nero 8

Saturday, January 12, 2008

Making New XP Installation or Recovery Disk

Introduction
No floppy drive to install that SATA driver for XP installation? Wanting to incorporate XP service pack plus the drivers into the XP installation or recovery disk? This article will describe an easy step by step procedure, call slipstreaming.

FAQ
1. What is Slipstreaming?Slipstreaming is a jargon used here to mean integrating and incorporating the new XP installation files, drivers and other necessary files into the existing to create a totally new XP installation CD;

2. Why Slipstreaming?
One would save time when installing or repairing the XP operating system as one would not have to reinstall the Service Pack and drivers; also, if one does not have a bootable floppy drive for the XP installation, slipstreaming that SATA driver is one workable method .

3. Is it Difficult?Not any more difficult than XP system installation although one might need to prepare and download the free software and the necessary drivers.

4. How Much Additoinal Disk Space?The computer should have about 1.5 giga bytes of disk space left to include also the ISO images.

5. Other Ways to Solve that SATA Problem in XP installation?
Try entering into the BIOS setup at computer startups. If one could find an option in the BIOS setup to disable the Native SATA mode, disable it. One might be able to install the XP without the need of slipstreaming the SATA driver.

PreparationOne would need to do the following :
1. Download a copy of nLite.
2. Make ready the XP installation disk
3. Download the necessary drivers. Unzip or unrar them into anotther folder of the harddisk/CD. If one is making a recovery from existing computer, one can use this software to extract and create a list of existing drivers.4. Download or prepare newer Service Pack and store them in harddisk/CD
5. Make available a copy of CDROM Burner such as Nero

Next Steps
I) Starting up1. Create a New Folder in the harddisk to store the new XP installation files and the other files;
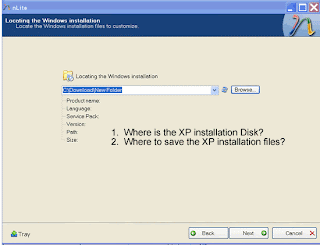
2. Start up nLite. The program will ask and assist one to install Microsoft.Net Framework if one does not have one. Restart nLite after the installation. Select "Next" in the starting screen and one would be greeted by the following screen:


3. Insert the XP installation disk in the CD drive and browse to select the location of the XP installation disk; soon after, nLite will ask for where to install the XP files. Select the New Folder that one has just created earlier. nLite will begin copying the entire XP files into this new folder.
4. When completed, it will give a summary of what has been copied.

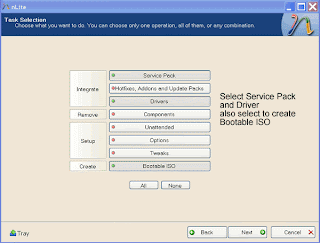
II) Installing Service Pack and Drivers1. Continue clicking “NEXT” until one reaches the following screen to select “Service Pack” and the Drivers to slipstream; also select to create ISO image which is require to burn the new XP installation Disk:


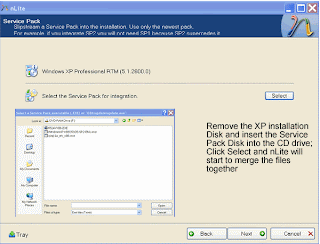
2. Further clicking of “NEXT” will bring user to the following page, asking user to select the location of the new Service Pack. Remove the XP installation Disk and insert the Service Pack CD into the CD drive. Click “Select”. nLite will start to merge the files together into the New Folder.
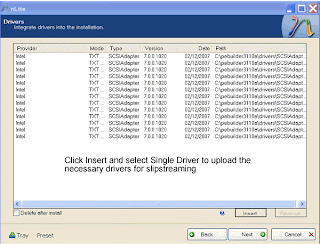
3. On completion, click “Next” and nLite will ask for installation of the XP drivers. Select "insert" to upload the necessary drivers, for example the SATA drivers that one wishes to integrate into the new XP installation Disk'
Select 'Multiple driver folder". Nlite will come up with a list of drivers that are in the folder. Pick the correct driver to insert.

Note: nLite will always try to find the .inf file; so please try to unzip or unrar the driver file if they are in ZIP or RAR form. The driver should be unzipped to the new folder that was created earlier during startup and they must have the following files:-
a) txtsetup.oem to tell where nlite can locate in the drivers in the new folder. One may need to edit the directory where the drivers are located
b) The driver files. In the case of VIA Raid:-
  • viamraid.cat
  • VIAMRAID.INF
  • viamraid.sys
select multiple


4. On completion, note the total size of the image compiled. Make sure to select the correct capacity of CDRW disk or CDR disk that is larger than the compiled program.


II) Burning new XP Installation Disk
5. One can either choose the in-built ROM burner or an external ROM burner such as Nero to burn ISO image directly to a CDRW disk or CDR disk. CDRW is preferred because it is not always that the result would be acceptable.
a) Use in-built ROM burner
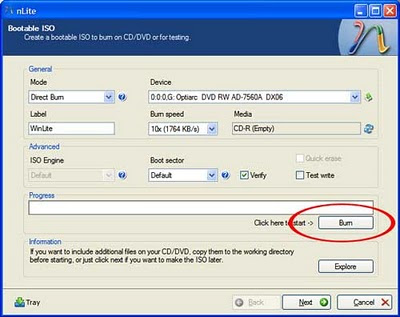
After having press next, the following screen will appear. Select "Direct Burn", select the lowest burn speed, and click "Burn". Dont forget to check "Verifiy" (optional)


b) Use External ROM Burner such as Nero Burner.
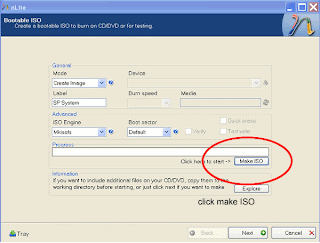
Once completed, the following screen should appear, asking user to create the ISO image. Click "make ISO" to create this image file.

On completion, nLite will write an ISO image file called “WinLite.ISO” in the select folder. One could always choose other name the for ISO file.
Select "create image" in the next page and create a ISO image in one of the folder where one can find it later.

6. Further clicking of “NEXT” will start the compilation and integration process. Successful completion will be greeted by nLite.
Create XP Disk Using Nero Burner

1. Start up Nero 8 (obtain trial copy from here) and the following main screen will appear:


2. Click the Nero icon at the left bottom corner and select “Nero Burning ROM” in the list and a new screen will appear:


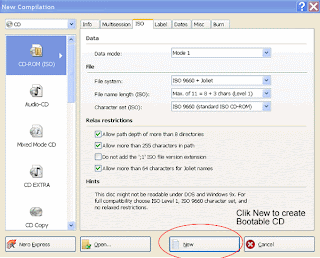
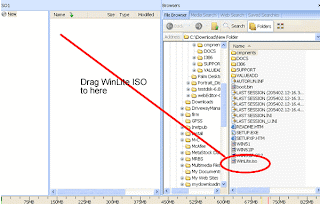
3. In the new ISO screen, click “New”. Select the New Folder that contain the "Winlite ISO".
4. In the following screen, drag the file “Winlite.ISO” to the left hand window and click ok when prompted.


5. Back to the ISO screen, once the button "Burn" is clicked, Nero will start the CD burning process and make a new XP installation disk with all the necessary updated files and drivers incorporated. It might take roughly 15 to 30 minutes depending on the speed of the computer.

Friday, January 11, 2008

Appendix 3: Install Plugins

Appendix 3: How to install the Mcafee and Adware Plugins

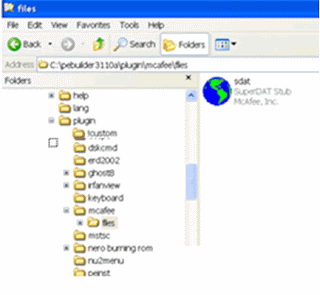
1.For Mcafee, download this SDAT.EXE file and copy the SDAT.EXE file into the files folder of the Mcafee plugin as shown. See note 1 to get latest copy of SDAT file.


Now, click Start button in the bottom task bar of your screen and click “Run”, enter in the command line as shown and click ok. Check that this will further install some files in the plug-in directory.


2. As for Adawarese, the new software no longer support BartPE. Workaround is to download this ; unzip Ad-ware.EXE and the defs.ref files into the "Plugin/adawarese/files" folder. Latest copy of defs.ref file can be downloaded from here.

Note1: One can download the latest copy of SDAT.EXE by downloading this file, unzip it into a folder and then click GetMcAfee.bat. The computer will start the downloading the latest copy.
Note2: If one has a more advanced copy of Adware such as the Professional version, one may want to copy the Adware.exe and the definition files of that version over instead.

Note2: BartPE will need a plug-in for "Plug and Play". If so desired, go back to BartPE websites to search for this plug-in. For our purpose, we will omit this step as we can always start BartPE with USB mouse and thumb drives plugged in.

3. The plug-ins are now ready for next operation

Appendix 1&2 : Build BartPE CD

Appendix 1: How to "slip stream" the drivers

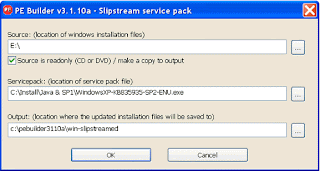
If one has an earlier version of XP operating system, then one must merge it with the Service Pack using “Slip streaming” technique included in BartPE. Select Source in the Menu bar, and then select “slipstream” and one will reach the Slipstream service pack screen as shown below:


Now, enter the path of the source directories ( where one has inserted the XP system installation disk and the service pack), and then select “Source is readonly”. After that, enter the path of the output directory or just accept the default directory to store the merged files. Now press OK, and the disk will do the rest.

Appendix 2: How to install the Network and SATA drivers

1. If one had difficulties getting any other software to detect the existence of hard disk drives, it is likely that one will need the SATA driver for BartPE; otherwise, one would not be able to detect the harddisk when using BartPE.
2. Download the SATA drivers from the computers’ manufacturer website and unzip them into the /drivers/ SCSIAdapter folder as shown and according to the recommendation of this website.

3. Do the same for network drivers; however, one does not really need the network drivers if one prepares this CD just for virus screening or using some of the built-in functions.


Wednesday, January 9, 2008

Use BartPE to scan Computers for Viruses and Spywares

Introduction The computer hanged and won’t start properly or the Virus software just detected a virus that refused to be cleaned or deleted. This article describes how to scan the computers and get rid of these stubborn viruses using BartPE.

FAQ 1. What is this BartPE ?BartPE is in short for Bart's Preinstalled Environment. It is a bootable live windows CD/DVD, which is handy for troubleshooting XP operating system.

2. Why BartPE ?Some viruses protect themselves from being detected, cleaned or erased. These viruses often reside in or as an essential files and will become active once the computer is booted up. BartPE has a standalone and independent operating system which is beyond reach of most viruses; thus, users stand a better chance to get rid of these viruses. Besides, if the harddisk is still operational, BartPE allows users to backup the important data in the harddisk to the thumbdrive or external harddisk. One can also examine the condition of the computer and drives from a different environment. BartPE brings back a lot of familiar function of the XP operating system and therefore, it is quite user friendly; plus, many of the XP software can be used here.

Preparation
1. Make sure you have a copy of the BartPE with appropriate plugins and drivers. If you have not done so, go here.

2. To transfer data from the harddisk, you may need to have a large capacity thumbdrive or second CD drive. Note that one cannot use the drive that BartPE sits. Please plug in the USB mouse, thumbdrives or external harddisk before starting up. This is because BartPE will only activate plug-ins during start up unless one has already installed the "plug and play plug-in" when creating BartPE CD.

Things to do Next
1. Insert the BartPE CD in the drive and boot up. One should be greeted by the following screen in less than 2 minutes.


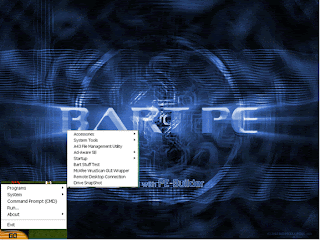
2. Doubleclick the "Go" and then select "Program", one should come to this screen

3. Select to scan the virus using Mcafee or scan the spyware using Adware as shown in Appendix 1 and 2 respectively.

Appendix 1: Scanning of virus using Mcafee
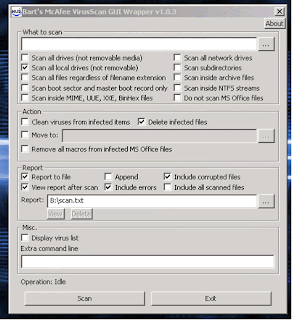
1. Select “Mcafee VirusScan GUI Wrapper” from the program icon, one would soon be greeted by:


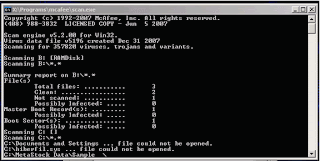
Now, tick “Scan subdirectories” and also tick “delete infected files” if one wants to delete the files. Click Scan and one should come to the following screen:


At the end of the process, the computer will save a copy of the summary in B:\scan.txt.

Note 1: The B: is a RAM drive which will disappear when one switches off the computer. Select other directory to save if necessary.

Note 2: Mcafee will prompt user if it cannot delete the file. To delete manually, one could go back to the program icon and select the “A43 File Management Utility” to bring up the familiar Windows File Manager, then find the appropriate directory and delete the file if necessary. However, some viruses are resided in working system files. When these working system files are deleted by force, one must be prepared to re-install them back when the other appropriate software detected the missing files.

TIP: If the list of viruses getting too long to read (sometimes, more than 300 viruses) , one might want to print out the scan.txt for reference.

Appendix 2: Scanning Spyware using Adware
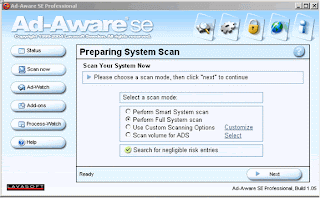
1. Start up Ad-aware from the Program icon, one would soon be greeted by the following screen:

2. Select "Perform Full System Scan" or "Customize" to enable all drives to be scanned. Note that the "Perform Smart System" will scan only the system directories which is now occupied by BartPE.

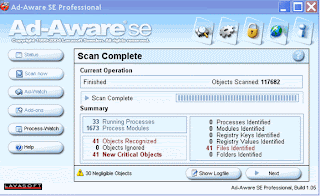
3. When the scan completed, one would be greeted by the following screen:
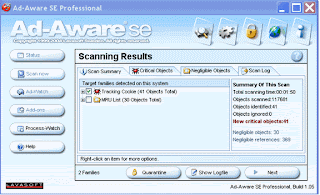
4. Click Next and then "Scan Summary" in the tab and subsequently, tick the box for the viruses and click next to get rid of the viruses.
Other Related Sites
1. How to Build a Bootable Troubleshooting CD for XP System


Tuesday, January 8, 2008

How to Build a Bootable Troubleshooting CD for XP System

Introduction
The computer just hanged and won’t restart. Recovery is not possible through normal XP's system restoration processes. The last resort would be to use “System Recovery Disks” to restore to factory defaults; but, this would wipe off all the stored data unless one can boot and backup the important data. For this, one would need a bootable CD or other devices such as thumbdrive with a separate operating system. This article describes the step by step procedure to make this CD.

FAQ
1. What is this Bootable CD all about?
The bootable CD is called Bart's Preinstalled Environment bootable live windows CD/DVD, in short, BartPE.

2. What’s the use of this CD?
It can be used to troubleshoot computers with XP operating system and to recover the important data stored in the harddisk. It can also be used to examine the condition of the computer and drives, scan the drives for viruses and perform other maintenance function.

3.Why do I need it?

Some viruses are known to protect themselves against being cleaned, removed or deleted unless one has a separate operating system. This live CD has not only a separate operating system, but also an independent system resided in read-only CD, where it is out of reach of those nasty viruses.

4. Do I need to pay?

No, the BartPE and most of its plug-ins etc are freewares

5. What is the system requirement?

One must have:
a) A copy of XP installation disk with Service Pack 1 or higher;
b) A working desktop or notebook that has about 500MB of free harddisk space and a CDRW or DVDRW burner. That computer must be network connected to download all the software;
c) The necessary software and a copy of empty CDR or CDRW.

6. Is it difficult to make and use this CD?

It should not be difficult if one knows how to install XP system; except some procedures here are bit more complicated. The CD is actually a condensed version of Windows XP, it is quite easy to use; also, one will not need any additional drivers for the USB thumbdrives and external harddisk.

7. What if my faulty computer including harddisk and CD drive are not working?

The faulty computer must have a workable CD drive unless the BARTPE is mounted on USB thumbdrive. In this case, go back to the Website to look for more details. The computer must have the correct BIOS to boot from the thumbdrive.

Preparation
1. Make sure one has the following:-
a) A blank copy of CDR or CDRW. CDRW is preferred because one might have to re-burn over again for updated virus definition files;
b) A working desktop or notebook that meets the requirement.

Things to do Next
1. Download a copy of BartPE.

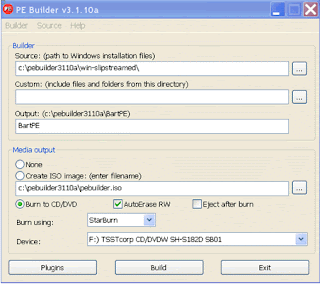
2. Start BartPE and just follow the instructions using the defaults to create a new folder etc, one should reach the following PE Builder Start Page within a minute:-


3. Enter the path of the source. This is the path of the drive where one has inserted the XP system installation CD disk (e.g. F\, if disk is in drive F). Now if one has just the old version of XP installation disk with separate CDs for Service Packs or one needs to install additional SATA driver for the hard disk controller or the network driver, please proceed to Appendix 1 and 2 to "Slip Stream" these program into the CD.

• Tip 1: If one has only one CDRW Drive, take the opportunity to copy the entire installation disk of XP files into a folder of a hard disk and insert that path directory as source instead. This is because the subsequent compilation process will always assume the CDRW drive has only an empty CD and will not prompt users to remove the installation disk.

4. Now one is ready to install the plug-ins as described in Appendix 3. (one can proceed to step 6 if one does not want to install the plug-ins for virus and adware scan engines)

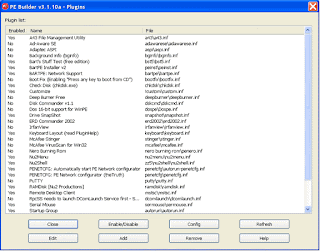
5. After having installed the plug-ins in the correct folders of BartPE, it is time to activate the plug-ins for the Mcafee Virus scan and Adware, hit the plug-ins button on the PE Builder Start Page, one should be greeted by the following screen.


Select Ad-Aware SE and Mcafee VirusScan for Win32 and enable them one by one by clicking the word "No" in the enabled column. If one has preinstalled the two plugins properly, the enabled column should change from “No” to “Yes”.

6 Now, it is ready to build the CD. Back in the PE builder Start Page, select “burn to CD” and insert a blank CDRW into the CDRW drive. After clicking the “Build” button, one should see the screen starting to roll and roll for about 5 to 10 minutes depending on the speed of your computer.

7 If everything goes well, the CD should be built in less than 10 minutes; if not, find out the errors and go back to website to search for a solution.

8 When one see the last action about saving the log file, the CD will be ready to be used to troubleshoot the faulty computer or notebook.

Other Related Site
1. Use BartPE Bootable CD to Scan Computer Viruses


iPhone and iPad: How to Create a Short Cut in Home Screen to Clear Cache & History

23 November 2024 What are Cache and History? Cache and browser history store information about websites you've visited.  The C ache s to...